Holemaking is largely the most frequent task that CNC machines carry out. This Easy Guide assists you in picking the most suitable tool for your CNC work.
Chapter 1
Twist Drills, Center Drills, & Spotting Drills
Chapter 2
Interpolated Holes

Chapter 3
Reamers: Smooth & Accurate Diameter
Chapter 4
Boring Heads
Chapter 5
Annular Cutters & Hole Saws
Chapter 6
Trepanning
Chapter 7
Counterbores, Chamfering, and Countersinks
Chapter 8
Deep Hole Tools & Technique

Chapter 9
Threaded Holes
Chapter 10
Spade Drills and Indexable Drills
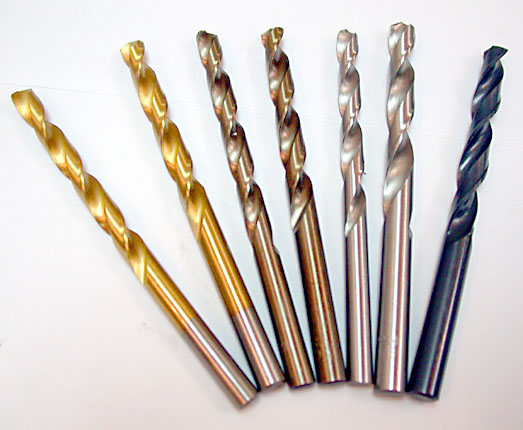
Chapter 1: Twist Drills, Center Drills, & Spot Drills
If Holemaking is the most common CNC operation, twist drills are the most common and efficient way to make holes. Their only real competition comes from interpolated holes where many sizes or large hole sizes result in savings, and in more specialized Holemaking, such as cases where precision is paramount.
Twist drills are available in a huge number of sizes (Imperial, Metric, and special sizes such as letters and numbers), materials (HSS, Cobalt, and Carbide), and coatings. They're also available in multiple lengths, such as screw machine and jobber lengths.
We've prepared a detailed guide to Twist Drills for CNC Jobs here:
[ Twist Drills for CNC Jobs ]
If it's Twist Drill Speeds and Feeds you're after, we've covered that too:
[ Twist Drill Feeds & Speeds ]
[ Carbide Drill Speeds and Feeds ]
That article covers important topics such as:
– Hole entry conditions
– Spot Drilling and Pre-Drilling to Accurately Position Holes
– Deep Hole Drilling and techniques such as Peck Drilling and Through Spindle Coolant
Chapter 2: Interpolated Holes (aka Helical Interpolation, Helical Milling, & Hole Milling)
If you've been around CNC for long at all, you will have seen Helical Milling, Interpolated Holes, or Hole Milling as it is variously called. Basically, that's where an endmill follows a spiral or circular pattern to cut a hole larger than the endmill.
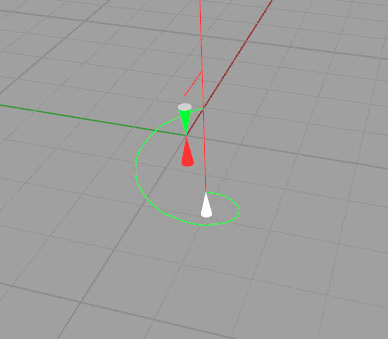
One of the great advantages of CNC over manual machining is the ability to create holes of almost arbitrary size using an end mill that follows a helical path. And this is one of the cases where an end mill can win over a twist drill when hole making. Twist drills can remove material faster than end mills, all other things being equal. But, the end mill has three major advantages over a twist drill:
- One size of endmill can make an almost infinite number of hole diameters, provided they're the same size or larger than the endmill. This will save tool changes, free up slots on the toolchanger, and generally be efficient. Save the twist drills for jobs that have very few hole sizes, or a whole ton of holes that are the same size.
- The end mill can make flat bottom holes. You can get special twist drills for flat bottom holes, but generally, the end is pointed and the hole bottom isn't flat with twist drills.
- Interpolating a hole takes longer, but it consumes less power than twist drilling an equivalent sized hole. In other words, you can make large holes that your CNC Machine's spindle is otherwise not capable of because it isn't powerful enough. Also, end mills are cheaper than big twist drills.
Aside from being able to remove material faster, another advantage of a twist drill is that when used properly, the position and diameter of the hole may be more accurate than when interpolating a hole with an end mill.
There’s a lot more to know about helical interpolation, so we’ve prepared some more in-depth articles to cover deeper topics:
– How to program helical interpolation: Gets into the g-code side of things. Don’t want to program? Try Conversational CNC for Interpolated Holes.
– When to interpolate vs use a twist drill. We’ve got two articles that walk you through exactly how to know which technique is better: Part 1 and Part 2.
– Make sure interpolated holes are round: When you need to hold tolerances, this article can help. Make sure to try these tips before you move on to using a Boring Head!
– Optimizing Feeds & Speeds for Interpolated Holes.
Plunging End Mills to Make Holes
Before moving on, a word about plunging end mills.
The only good reason to make a hole by plunging an end mill is that there is no other way to achieve the desired result. In general, twist drills are much more efficient at making holes. But, if you need a square bottom hole or want to save a tool change, you’ll have to use an endmill.
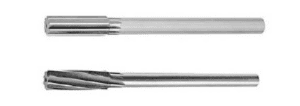
Chapter 3: Reamers (Smoother & More Accurate Diameter Holes)

Reamers offer a quick and efficient way to clean up the sides of a hole, make sure it is round, and get it to a particular diameter with fairly high accuracy,
In fact, reamers are so important for precision hole work that we've created a complete article that's just about reamers:
In it, you will learn:
- What a reamer is.
- Types of reamers and how to choose the best one for your job.
- Reamer Speeds and Feeds.
- Reamer troubleshooting guide.
- Many advanced tips and techniques to get the best results.
Chapter 4: Boring Heads (Precision Holes)
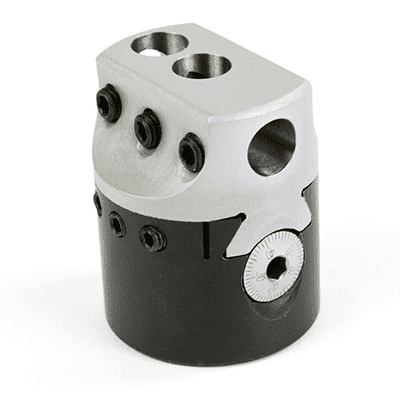
In CNC, we’re used to the idea of either drilling and reaming or interpolating a hole. So when do Boring Head’s come into play?
The answer is that you generally use a Boring Head for larger holes when tolerances are tight. Another reason to use a Boring Head is to improve the surface finish of the wall.
A typical example of an application that might require a Boring Head due to tight tolerances would be machining a bearing pocket.
Setting up and running a boring head can be time-consuming, so they're generally only used on the most demanding applications. Interpolation can be surprisingly accurate if you follow the tune-up tips mentioned above, so be sure and try those to see whether boring is necessary for your job.
If it is, here's our detailed guide to how to run a boring head:
[ Boring Head Operation & Boring Process Complete Guide ]
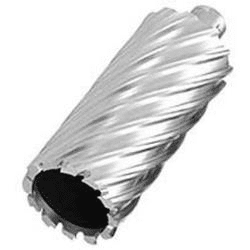
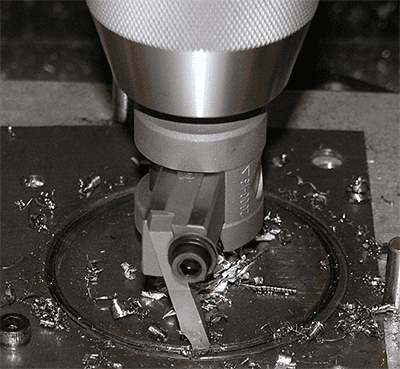
Chapter 5: Annular Cutters & Hole Saws

The annular cutter removes a slug by creating a ring-shaped hole and leaving the center intact...
You don't see annular cutters and hole saws used as much with CNC as in Manual Machining. The reason is probably that getting the slug to drop out of the middle can be a problem, and continuing an automatic process with the slug in leads to even bigger problems.
Still, they have a role. Cutting forces go up in a hurry with larger hole sizes. Not much will tax the machine's horsepower limits more than loading up a great big twist drill, or worse a big spade drill to make a large hole. Cranking a 2" indexable drill through 300-series stainless steel takes 8HP, for example.
There are two good alternatives, depending on whether you need a through hole or a blind hole. For through holes, the best bet may be an annular cutter.
Because they don't have to turn the entire hole into chips, just the circumference, annular cutters can move a lot faster and with a lot less power than an equivalent sized twist drill. Unfortunately, if they don't go all the way through, there's no way to extract the slug that's left, so they're only good for through holes.
The alternative for blind holes (which also works on through holes, just not as fast) is to use an endmill and interpolate the hole.
Chapter 6: Trepanning
Trepanning is a process of using a single-point tool to cut a hole. It only works for through-holes, and then mostly for shallow sheet metal applications. It’s not seen very often in CNC milling, though for turning, face grooving is essentially trepanning.
I see trepanning as a technique that’s handy to have in your toolkit, but you won’t use it much when you could simply interpolate instead.
More about trepanning on my page about grinding HSS tools.
Chapter 7: Counterbores, Chamfering, & Countersinks
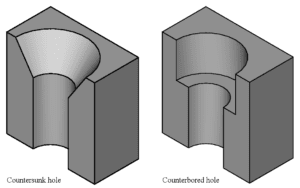
Counterboring and Countersinking is all about special treatments at the top of the hole, typically intended to allow the top of a bolt to be recessed below the surface of the material. A counterbore is cylindrical and typically is a larger diameter than the hole's bore. A countersink is conical.
Chamfering is like a countersink, but much smaller. It's more for deburring than fit of bolts.
For more on deburring holes, see our deburring tools for metal article.
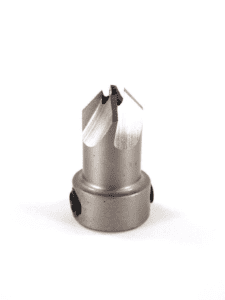
Countersinks and Countersinking
Since countersinks are conical, a special tool of some kind is needed with the correct angle for the conical section to be cut. Sometimes its convenient to use a spot drill to countersink if you have one with the correct angle and if that angle will serve for spotting. With a little ingenuity you may even be able to use the spot drill for chamfering too, which really saves on tool changes.
OTOH, if you have special needs, you'll need to purchase a special countersink for your job. Or perhaps a combination twist drill and countersink or countersink collar for your twist drills. These are all possibilities. Here's a typical countersink collar that's held on to the twist drill with two set screws:
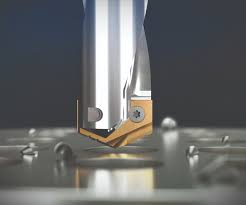
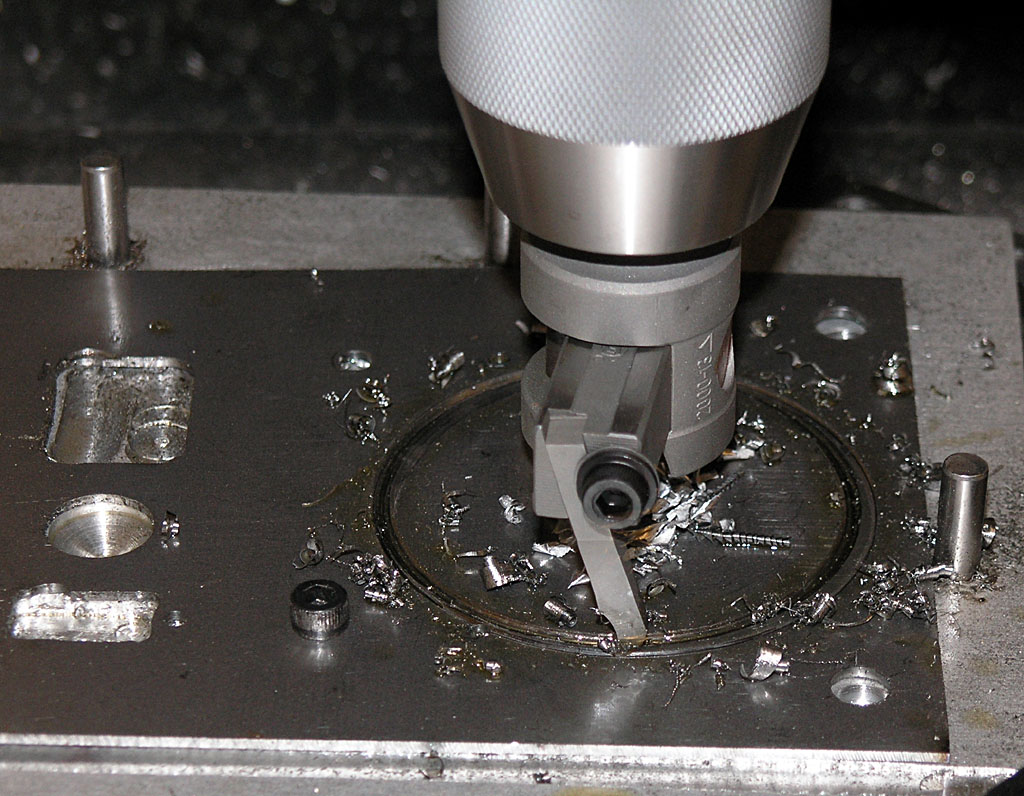
Counterbores and Counterboring
Here's a typical Counterboring tool:
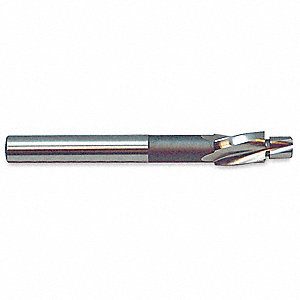
There's a pilot and a helical cutter for the counterbore. As mentioned, it's often easier just to interpolate counterbores with an endmill rather than use an actual counterboring tool.
Calculating Dimensions for Countersinking and Counterboring
Any time you want to countersink or counterbore, you will need to look up the specs for the bolt you're working with. Our G-Wizard Calculator has a handy reference for this:

It's also handy to do depth of cut calculations in G-Wizard:
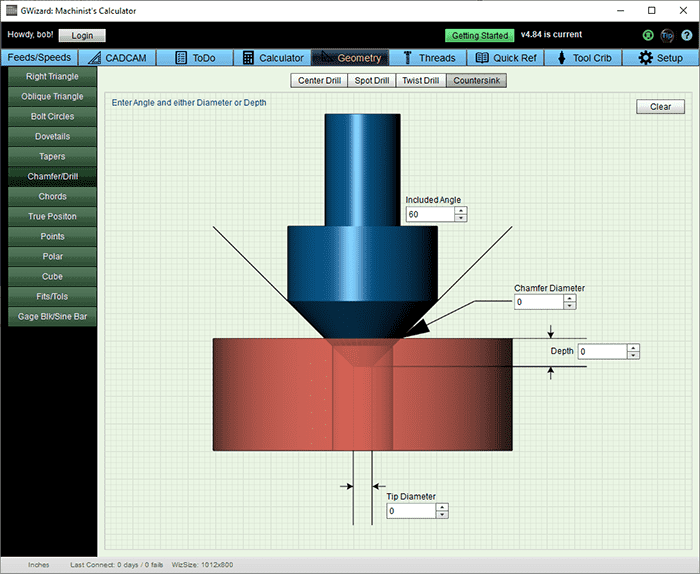
As you can see it does Center Drill, Spot Drill, Twist Drill, and Countersink depth calculations.
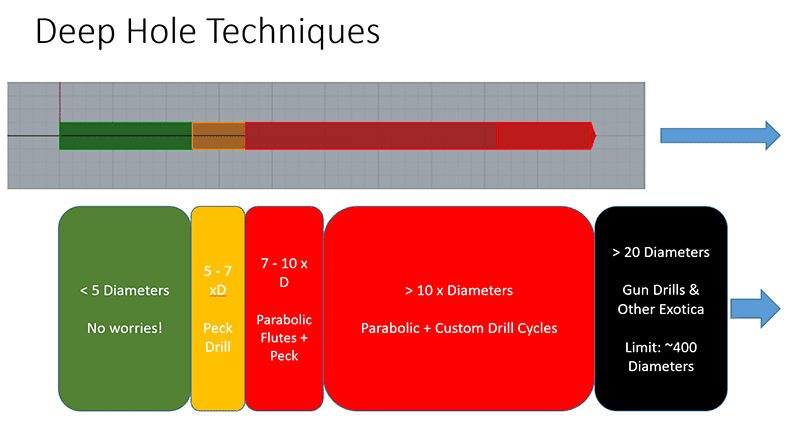
Chapter 8: Deep Hole Drilling
 \
\
Deep Hole Drilling is a very specialized expertise that involves special tooling, tips, and techniques. Fortunately, we have a wonderful detailed guide to it complete with a video:
[ CNCCookbook's Deep Hole Drilling Guide ]
[ Gun Drilling & BTA Drilling: Definitive Guide ]
Chapter 9: Threaded Holes: Tapping, Thread Milling, and Single Point Threading
Many, perhaps even most holes wind up having threads. There are basically 3 ways of making threads in a hole:
- Tapping: The most common when milling
- Thread Milling
- Single Point Threading: The most common when turning on a lathe
Let's check out each method.
Tapping
There's a huge variety of different taps available, so your first step is deciding what kind of tap to use:
[ 10 Different Types of Thread Taps: Definitive Guide ]
Let's also consider Blind Tapping, which is tapping in a blind hole (harder than tapping a through hole):
[ Blind Hole Tapping Secrets: Stop Breaking Taps! ]
Having chosen a tap, you'll need a toolholder for it:
[ CNC Tapping: Holders, Attachments, Rigid, + Feeds & Speeds ]
And here's a few more tidbits that cover even more CNC Tapping knowledge:
- G84 G-Code Tapping Cycles for programming tapping on CNC machines
- Miracle technology that can tap up to 75% faster
- Form Taps, Thread Milling, and Peck Tapping for high risk tapping situations
- Advantages and Pitfalls of Rigid Tapping
Now you've got all the tapping 411!
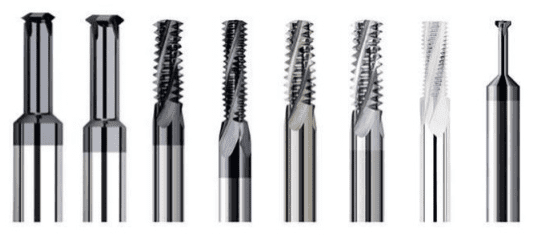
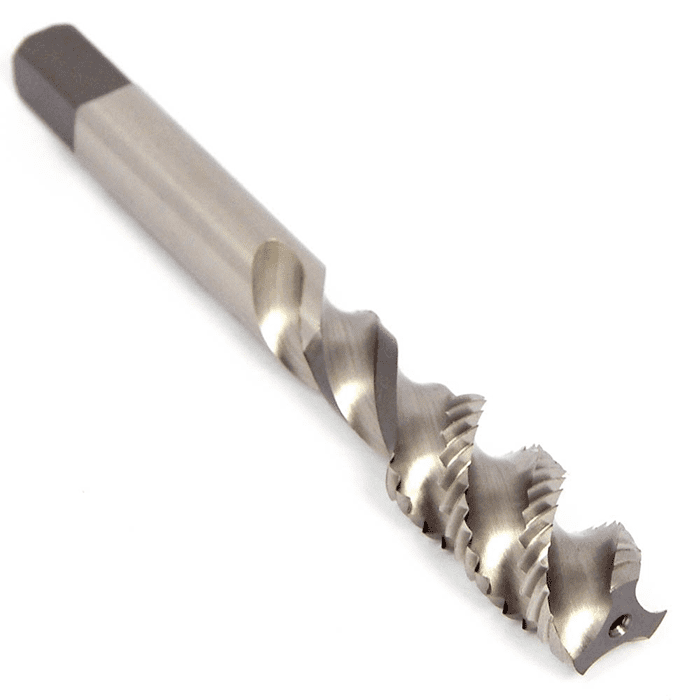
Thread Milling
Thread Milling seems almost impossible to visualize. A special cutter, like the ones shown above, follows a helical path corresponding to the thread's pitch to cut a thread. While it is slower than tapping, it has a number of advantages over tapping that make it a popular way to create threads.
Check out our complete guide:
[ CNCCookbook Easy Guide to Threadmills ]
Single Point Threading
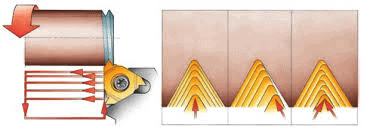
Illustration by Sandvik shows three infeed strategies…
Single Point Threading is the most common way threads are cut on CNC Lathes, and they do it really well. Here's a collection of articles to help you with it:
[ Programming Threading on Lathes with G76 ]
[ Chasing Threads on a CNC Lathe ]
[ Programming a Higbee Thread on a CNC Lathe ]
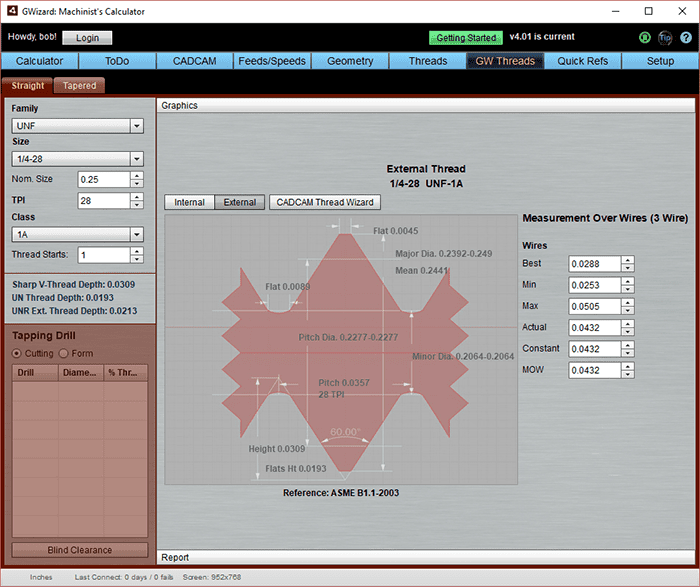
Thread Geometry
No matter what means of cutting you plan to use, it's often helpful to have information on each specific thread's geometry. Our G-Wizard Thread Calculator offers this information for thousands of different thread specs.
Chapter 10: Spade Drills and Indexable Drills
Spade Drills can be very cost effective because they can cover a wide range of hole sizes simply by changing the insert. For more see our article on Spade Drills.
Insert Drills are also excellent material removers. For more, see our article on Insert Drills.
Be the first to know about updates at CNC Cookbook
Join our newsletter to get updates on what's next at CNC Cookbook.