What is reaming?

Reaming is a cutting process that uses a special tool called a reamer to enlarge an existing hole to a precise diameter and at the same to to create a smooth finish on the walls of the hole. Reaming is typically done on a milling machine, a lathe, or a drill press. Reaming is therefore a finishing operating. Another process, such as drilling must rough out the hole before it can be reamed.
There are other means to create holes with precise diameters and high quality finish on the walls, but reaming is often the best choice for speed and low cost.
If you need to hold tolerances tighter than +/- 0.002" on hole diameter, a reamer is probably the way to go. For example, you could use our Press Fit Calculator to figure the required hole size and them use a reamer to achieve that size within tolerances.
The surface finish from reaming depends on the workpiece material. The range for cast iron is 50 to 80 rms and 30 to 60 rms for steels. A PCD reamer can impart a finish as fine as 8 rms in aluminum.
How to ream a hole?
Performing reaming correctly depends first and foremost on preparation of the hole. The reamer is only capable of removing a small amount of material from the hole, and it will tend to follow the hole. It can only slightly improve the straightness of a hole if it has front-cutting capability. A 1/4" reamer might improve the straightness of a hole by up to 0.005", but no more.
If you require more correction for straightness than that, boring may be a better approach.
Here's a quick video that shows how to ream a hole on a Bridgeport Mill:
More information on how to use a reamer:
Optimum Reamer Speed and Feeds
What are the best reamer speeds and feeds?
Saw this question come up on HMEM. A lot of machinists are taught a rule of thumb similar to this:
1/3 the SFM, 3x more feed than the same sized Twist Drill
(Click here to learn what is SFM and how to go from SFM to RPM)
Opinions vary on exactly what that rule of thumb ought to be for reamer speeds and feeds. Some say the ratio to a twist drill is 1/3, while others suggest it should be 1/2.
In looking over a number of different manufacturer's recommendations, we've found 1/2 yields results reamer speeds and feeds that are much closer to their recommendations. Moreover, when we say, "2x more feed", we actually want "2x more chip load". 2x the feedrate would be 4x the chip load since we've already doubled the spindle rpm relative to a twist drill. This chip load is a synthetic number for G-Wizard, so don't try to do too much math on it!
Here's what G-Wizard would suggest for reamer speeds and feeds with a 3/16" HSS Reamer in 300 series stainless, which was the question in the post:
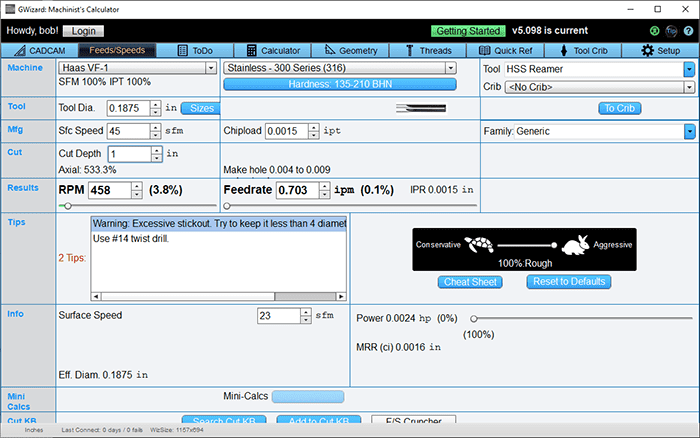
A 3/16" reamer going 1" deep in 304 stainless should run 458 rpm and 2.75 ipm feed. Chipload is 0.0015"
For comparison, here is the same cut with a 3/16" HSS Twist Drill:
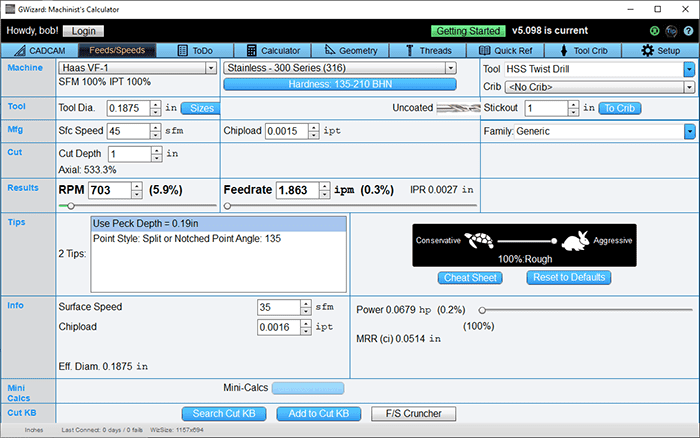
Twist drill is 703 rpm (a little less than 2x the reamer), and 1.863 ipm (reamer is feeding a little faster)...
Okay, those numbers are neither 1/2 nor 1/3, though the reamer is spinning close to 1/2 the twist drill, and the reamer feed is faster. What gives?
Well, this is another reason to use a calculator instead of a rule of thumb. There's more at work here than a rule of thumb can account for. For example, it gets harder for a twist drill to extract chips the deeper the hole. Reamers don't even try to extract chips-they have straight flutes and don't produce many chips if a large enough pilot hole is provided. Hence, the twist drill needs to behave more and more differently than the rule of thumb the deeper the hole goes. In this case, we're quite deep-1" is 5.3 diameters deep. I made the hole deep just to make the point.
Reamer Hole Sizes
Reamers are a fast way to finish a hole and very convenient relative to other precision approaches like boring. Their purpose is not to change the location of the hole. In fact, they often have long shanks so that they will deflect slightly to ensure the go into the hole. Rather, they're made to improve the surface finish, roundness, and hole size quickly and easily.
Reamers are certainly not the be all and end all of hole boring, but if you've never used one, give it a try. One thing to keep in mind when using reamers is hole size guidelines. If you make the hole too large (i.e. to close to the reamer's finished bore size without going over), there isn't enough meat for the reamer to do its job. Too small and you're making the precision reamer work way too hard.
There was recently some back and forth on CNCZone about reamer hole sizes, and I felt like it would be a good time to throw out that G-Wizard tells you the recommended guidelines for how far undersized to make your holes before reaming:
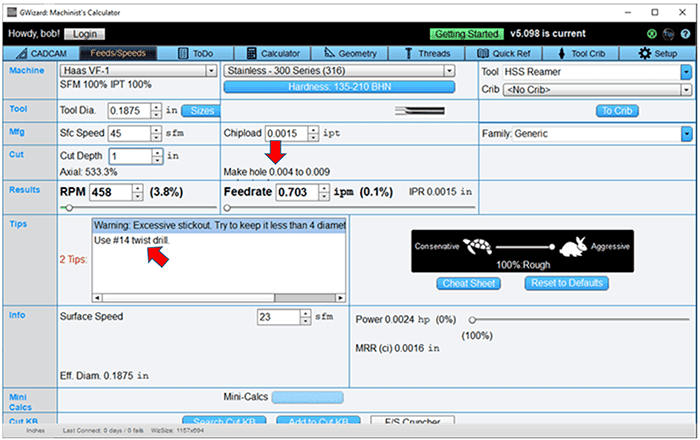
G-Wizard says to make the hole 0.010 - 0.025" undersized for a 1/2" reamer, and it tells you the closest twist drill size in that range...
Did you notice that down in the Tips area (right above the Tortoise and Hare), G-Wizard tells you the right twist drill size?
Give G-Wizard a try. It's gives you the starting hole size and good feeds and speeds for both HSS and carbide reamers. Best of all, it's free during your 30 day trial.
Pre-ream Drill Size Chart
The hole that will be reamed must first be drilled to an undersized diameter. Typically, the rule of thumb is to keep 0.010" to 0.015" material after drilling for the reamer to remove. Very small diameters, say 1/32" or less, should have 0.003" to 0.006" of material to remove by reaming. Rather than using a fixed range, it is better to use a percentage. Make the hole 2-3% smaller than the reamer's diameter. If conditions are good, you can have the hole be up to 5% smaller than the reamer's diameter.
If the hole is poorly drilled, more material may need to be available to allow the reamer to clean up the hole sufficiently.
One of the most common mistakes using a reamer is to leave insufficient stock for the reamer to cut. If this happens, the reamer will rub instead of cutting which will result in excessive wear, poor tool life, and inability to hold diameter tolerances.
BTW, our G-Wizard Calculator will tell you the hole size as part of a Feeds and Speeds Calculation for Reamers. But, for those who want an old-fashioned chart, here you go:
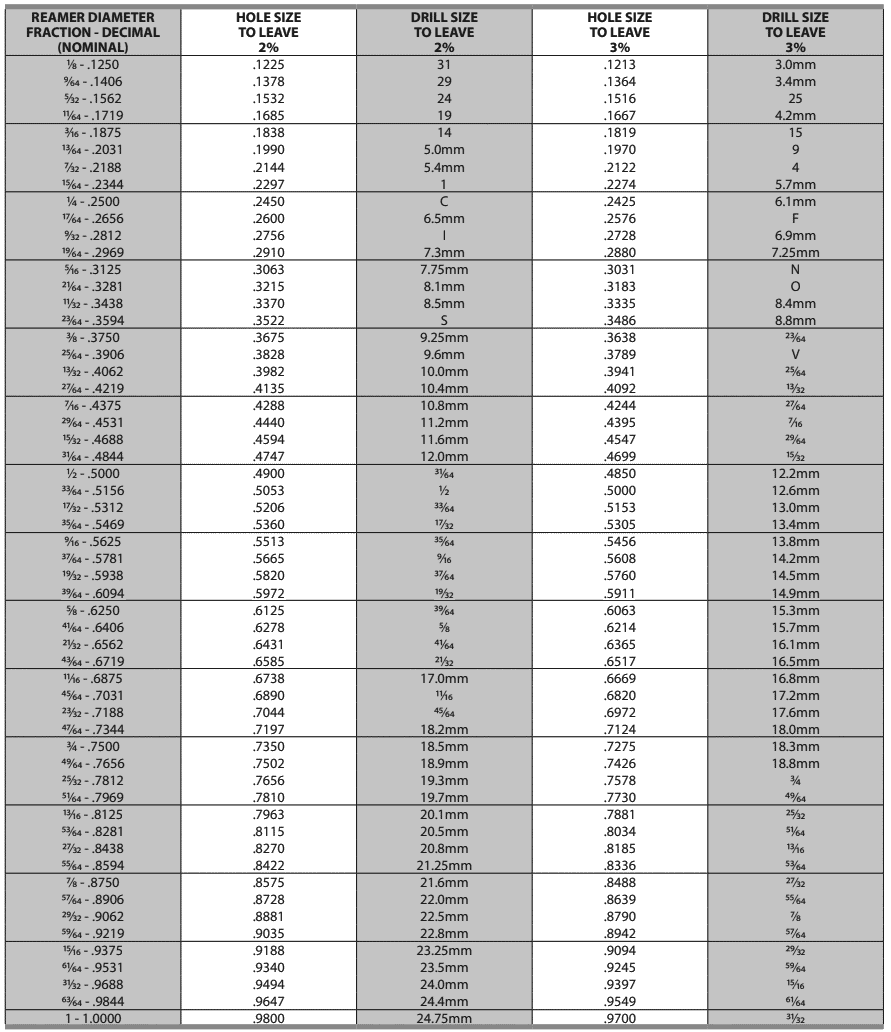
Optimum Operating Conditions
Given a decent hole and the proper reamer selected, here are some of the remaining operating conditions that must be met for optimal performance:
- Make sure the workpiece is held tightly so it can't flex, shift, or vibrate/chatter.
- Use a good quality chuck to hold the reamer.
- Use recommended cutting fluids for the reamer.
- Do not allow the reamer's flutes to become blocked with chips.
- Line up the reamer's centerline as closely as possible on the hole's centerline.
- Reaming an angled surface is not recommended if the angle is more than 5 degrees.
- Uses the shortest tool overhang (stickout) possible.
Reamer Holding
Reamers are typically held by precision collets or hydraulic chucks.
Other Reaming Tips
How to program a reamer in CNC
CNC’ers use a G85 canned cycle rather than a drilling cycle for reamers. The drilling cycles rapid out of the hole which can mar the surface finish.
Maximum Reaming Depth for HSS
HSS (High Speed Steel) is MUCH less rigid than Carbide. If the hole depth is greater than the limits below, you should be using a carbide reamer to ensure the reamer can't flex and the hole stays straight.
Hole Diameter
Max Hole Depth with HSS Reamer
0.1875" to 0.3125"
0.500"
0.3126" to 0.7188"
0.625"
0.7189" to 1.0625"
0.750"
1.0626" to 1.5000"
0.875"
Workhardening materials like Titanium and Stainless Steel
In materials that can workharden, such as Titanium, it's desirable to keep a light DOC (Depth of Cut). The light DOC keeps chips thin so they're easier to evacuate.
Reaming Twice
If two much stock remains after drilling, it is possible to use 2 sizes of reamer to open up the hole.
Heat Treating Reamed Holes
Heat Treatment will often shrink a reamed hole so do some experiments to determine exactly how oversized the hole should be before any shrinkage will bring it right down to spec and tolerances.
Interrupted Reaming

A spiral flute reamer...
If there are hole interruptions, such as a keyway or cross hole, you should use a spiral-flute reamer rather than a straight flute. The spiral will help bridge the gap so the reamer is supported at all times. A straight flute reamer will bang like crazy as every tooth catches on the interrupted edge.
Reamer Types and Selection
Reamer Geometry and Flute Styles
Reamers typically have one of the following flute styles:
- Straight: Best suited to non-chip forming materials. The work best in thru holes as the lack of helix makes it hard for them to life chips out of a blind hole.
- Right Hand Spiral: May be used to pull chips out of a blind hole. Spirals are also better than straight flutes for making interrupted cuts. Due to aggressive geometry, they may cut slightly oversized.
- Left Hand Spiral: Preferred thru holes as the reverse spiral pushes chips down into the hole. Good for interrupted cuts and hard materials. Can potentially provide the very best size and finish.
- Expansion Reamers: Useful in in applications with abrasive materials that change the reamer's size through wear very quickly. You can expand the diameter by turning a set screw.
In addition to flute style, reamer is geometry may be modified by these reamer types:
Types of reamers
Chucking reamer
The most common type of reamer, pictured at the very top of this article, is a Chucking Reamer.
Tapered reamer
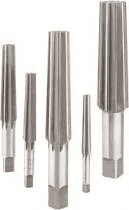
A variety of uses required a tapered reamer than can finish a tapered hole:
- Taper Pin Reamers are designed to ream holes for standard taper pins. Cut the pilot hole a few thousands smaller than the small daimeter of the tapered hole.
- Car Reamers are made for Railroad Car work.
- Taper Pipe Reamers are used before tapping a tapered thread such as NPTF, Dryseal, or ANPT threads.
- Bridge Reamers are used in structural steel applications such as bridge building and ship construction.
You can find tapered reamers especially made for most standard tapered holes. For example, here's a 5 piece collection of Morse Taper reamers to fit 1 MT to 5 MT:
Hand reamer
Hand Reamers are designed to be used by hand. Since the human hand is not capable of exerting as much force as a machine, Hand Reamers have special features to make reaming easier:
- tapered lead for easy entry
- Square on the end for use with a wrench
Even so, they're not recommended for removing very much material.
Ring reamers / Cutting Rings
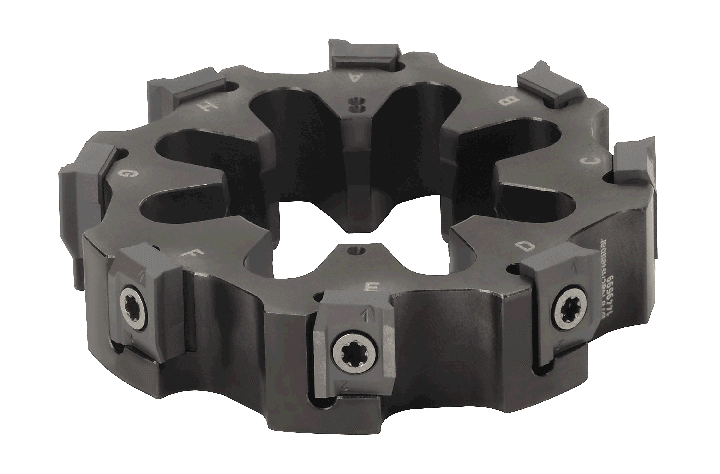
Cutting ring adjustable reamer...
These reamers can use replaceable inserts and they are often expandable to adapt to tool wear.
Piloted Reamer

When alignment is critical the best tool may be a piloted reamer. The pilot is non-cutting and acts as a guide to ensure alignment of multi-diameter holes.
Drill Reaming
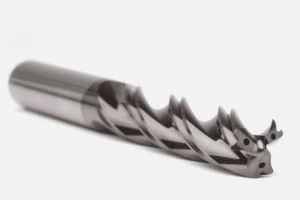
Drill Reamers combine a reamer and a drill into one tool. They only work for through holes, but they can save tool change time and really help lower costs.
Coolant Options
Good quality cutting fluid can enhance surface finish and prolong the reamer's useful life. Through spindle coolant can be even more effective as it has a positive effect on chip control and chip breaking.
Center Feed coolant aids chip clearing. Use a Right Hand Spiral Reamer with Center Fed Coolant to maximize chip clearing, especially in highly ductile materials.
Cost Effective Reamer Selection: Carbide vs HSS and Cobalt
This is basically a function of the number of parts to be made and the hardness of the material being reamed. For most materials, it's probably worth spending for carbide if you need to ream more than about 40 parts. Even 20 parts should go carbide if you are reaming all but the very softest kinds of materials.
Reamer Troubleshooting
Poor Finish
- Unequal chamfers: Reamer must be reground
- Incorrect Margins: Reamer must be reground
- Excessive Spindle Runout: Try a bushing 2 or 3 ten thousandths over reamer diameter.
- Chatter: Increase feed and reduce spindle rpms. Use power feed. Use spiral fluted reamer.
- Insufficient Cutting Action: Get a reamer with positive radial rake to reduce cutting pressure.
Oversized Holes, Tapered Holes, & Bell Mouth Holes
- Misalignment: Make sure your fixturing and setup allow the reamer to be right on center of the hole. Use a floating holder if necessary. Consider using precision bushings or piloted reamers.
- Incorrect Feed and/or Speed: use correct Feeds & Speeds.
Excessive Tool Wear
- Improper stock removal: Pre-ream hole should be 2-3% of reamer diameter
- Excessive Reaming Pressure: Reduce feed rate
- Misalignment: Make sure your fixturing and setup allow the reamer to be right on center of the hole. Use a floating holder if necessary. Consider using precision bushings or piloted reamers.
Crooked Holes
- Drill walking or incorrect sharpening: Make sure your pre-ream hole is good.
Tool Breakage
- Excessive reaming pressure: Reduce feed rate.
- Misalignment: Make sure your fixturing and setup allow the reamer to be right on center of the hole. Use a floating holder if necessary. Consider using precision bushings or piloted reamers.
Be the first to know about updates at CNC Cookbook
Join our newsletter to get updates on what's next at CNC Cookbook.