What is Deburring?
When you deburr, it is the process of removing all the burrs. A burr is a raised edge or small piece of metal that remains attached to a workpiece after a machining process. Deburring is an essential finishing process for any CNC job.
Another way to look at deburring is it is the process of removing all rough edges and sharp edges from your part.
In this guide, we’ll show you all the methods for Deburring and help you select the best deburring tool to remove burrs for your application.
Chapter 1
Quick overview of Deburring Tools
Chapter 2
Manual Deburring Tools for quick and easy jobs
[
Chapter 3
Mass Finishing: Vibratory Tumblers and Polishers
](#chapter3)
[
Chapter 4
CNC Deburring Tools: Use these cutters to let your CNC machine deburr parts
](#chapter4)
[
Chapter 5
Abrasive Blasting for Deburring
](#chapter5)
[
Chapter 6
Magnetic, Electro-Chemical, and Thermal Deburring
](#chapter6)
Chapter 1: Deburring Tools
Deburring Tools and processes fall into the following categories:
- Manual Deburring
- Vibratory Deburring
- CNC Machining Center Deburring Tools
- Abrasive Blasting
- Electrochemical Deburring and Electropolishing
- Thermal Deburring
Each method has it's own strengths, weaknesses, and suitability to particular jobs. We'll go through each deburring tool category in detail so you can learn how to choose the best deburring tools for your job.
Chapter 2: Manual Deburring Tools
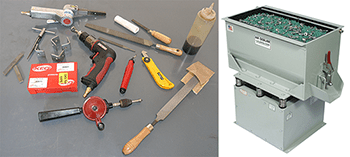
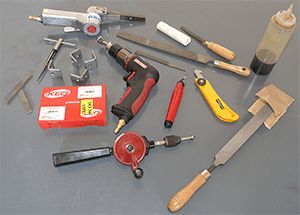
Manual Deburring is done by hand, possibly with the help of handheld power deburring tools. Here's an assortment of the deburring tools that I use in my shop to remove burrs:
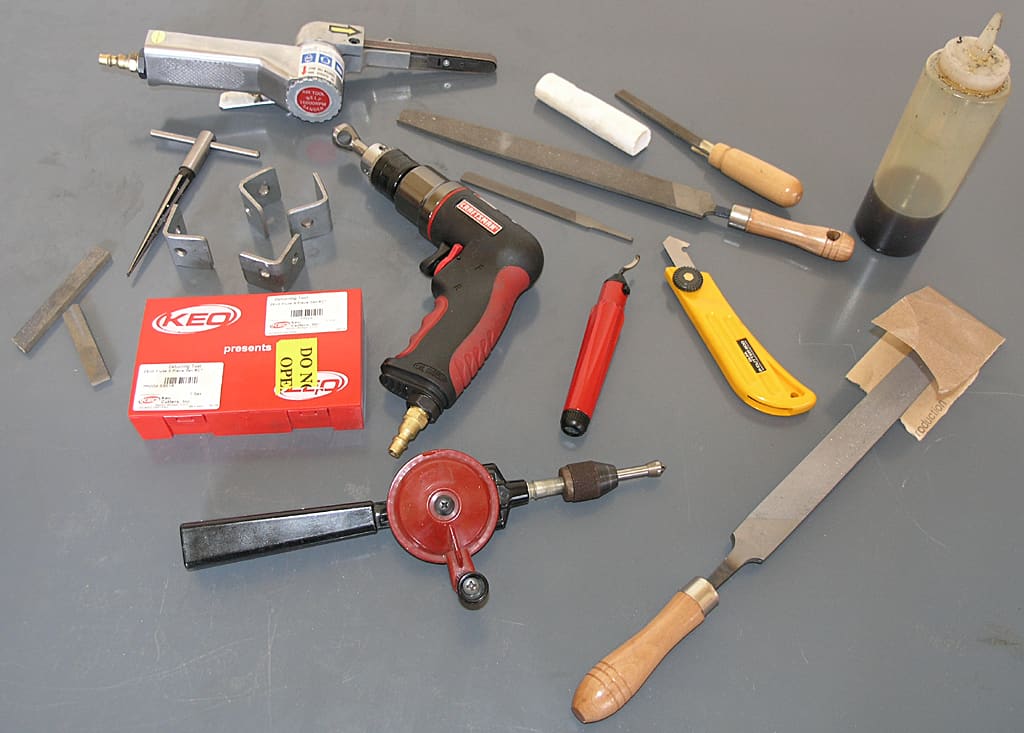
Let's go left to right, top to bottom and have a look at these helpful finishing products:
- Top left is my 1/4" mini-belt sander. That thing is very good at removing burrs and sharp edges! The best brands are called "Dynafile" from "Dynabrade". Too much money. Mine is a cheap Asian knock off and it has worked flawlessly. What a nice little "power file".
- Next we have some files, railroad chalk, and heavy cutting oil. The two tiny little files are Grobet. They're European and can be bought from a seller in Europe on eBay. Shipping is cheap and the files are excellent quality. I found them one time by noticing an eBay buyer was one of the long time posters at one of the boards and checking into what he'd been buying to get some ideas. The larger files are Nicholson's. One is a normal mill file, while the other is a "Lathe" file. Lathe files are superb for use on the lathe. I use the chalk and heavy sulfurized cutting oil to keep the files from loading up. It helps. I should've pictured my file brush too, but didn't grab it.
- Back to the left we have a tapered reamer. This is the one I remembered dad using in my childhood. I got one, but almost never use it.
- The air drill with Keo Zero Flute is my favorite fast way to deburr a hole. Watch for the Keo's to be on sale at Enco and other places as they're not cheap otherwise. I've got a smaller Keo in the little hand crank drill too.
- Two scrapers. One is a conventional blade scraper with swiveling blade, usually made by Noga or called "Noga Deburring Tools". It works fantastically well for a lot of things. Larger holes are easily deburred with a quick swipe as are long straight edges. Use only sharp blades or they start to catch and leave nicks. The other is actually a plastics and laminate cutter made by Olfa. I got the idea for the latter from Bogstandard on the HMEM boards.
- Far left are two pieces of 220 grit stone. They're a real handy size for the lathe and other work. I think mine are made by Gesswein, which is a good brand. I got a box of them on ebay for cheap that will last a lifetime.
- All the way on the right I'm demonstrating a Guy Lautard technique of using a file with a bit of sandpaper wrapped over it. This works well on the lathe too and will leave a finer finish than a straight file.
My favorite manual deburring tools are the handheld air-powered belt sanders called "air files" that are similar to this one:
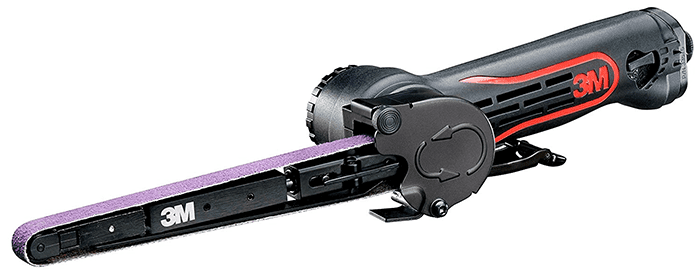
They're really effective at getting into difficult spots, but the little belts do wear out pretty quickly.
Satin Finish Burnishing Machine
Another handheld power deburring tool that can come in handy for deburring and finishing is the Satin Finish Burnishing Machine.
There’s nothing quite like a really nicely finished metal surface. Sometimes the machining marks are the look you want (someday I am going to write a little software utility that will pattern those marks for appearance sake!), but more often you’re looking for something a little more refined–typically either a satin or polished look. Being as lazy as I am, this is also the part of shop work that I am always on the lookout for labor savers to minimize the elbow grease. Labor saving comes in all kinds of formats, from learning how to use a file properly to having the right power tools on hand. For example, I have a 12″ disc sander I built and use constantly as well as a couple of those miniature belt sanding air tools where the belt is about a 1/4″ wide and it’s like a file. I keep a deburring tool permanently chucked up in another air tool as well as having a couple of angle grinders handy that have both an abrasive wheel and a wire wheel. There’s a blast cabinet, a vibratory polisher (my fave for saving the labor but not for every part or finish), a big 5 HP buffer, a giant drawer full of files in every shape and size, lots of scotchbrite pads, flap wheels, and, well, you get the idea.
Naturally, when I came across these burnishing machines over on the Garage Journal (thanks to Monte for posting about them), I was intrigued.
The machine is a hand held power tool aimed at strategically placing scratches on the material with an abrasive to create a satin finish. They make it easy to change the grits and offer a variety of styles. I’ve used a random orbital palm sander to apply a satin finish, and they work pretty good, but this tool looks to me like it would be faster and easier, especially for welded/fabricated projects like the one shown in the video. Here’s a couple more pictures of this type of tool:
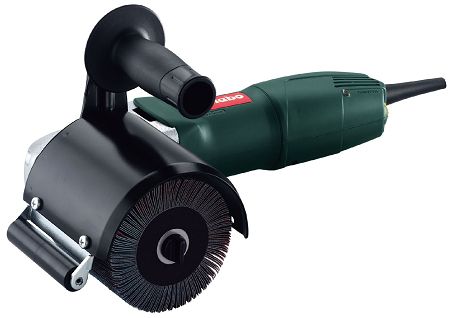
Metabo Burnishing Machine
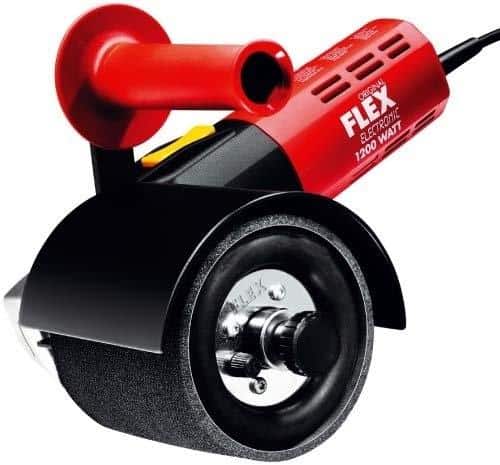
Flex Burnishing Machine
These tools are German made and not exactly cheap, but they sure look handy.
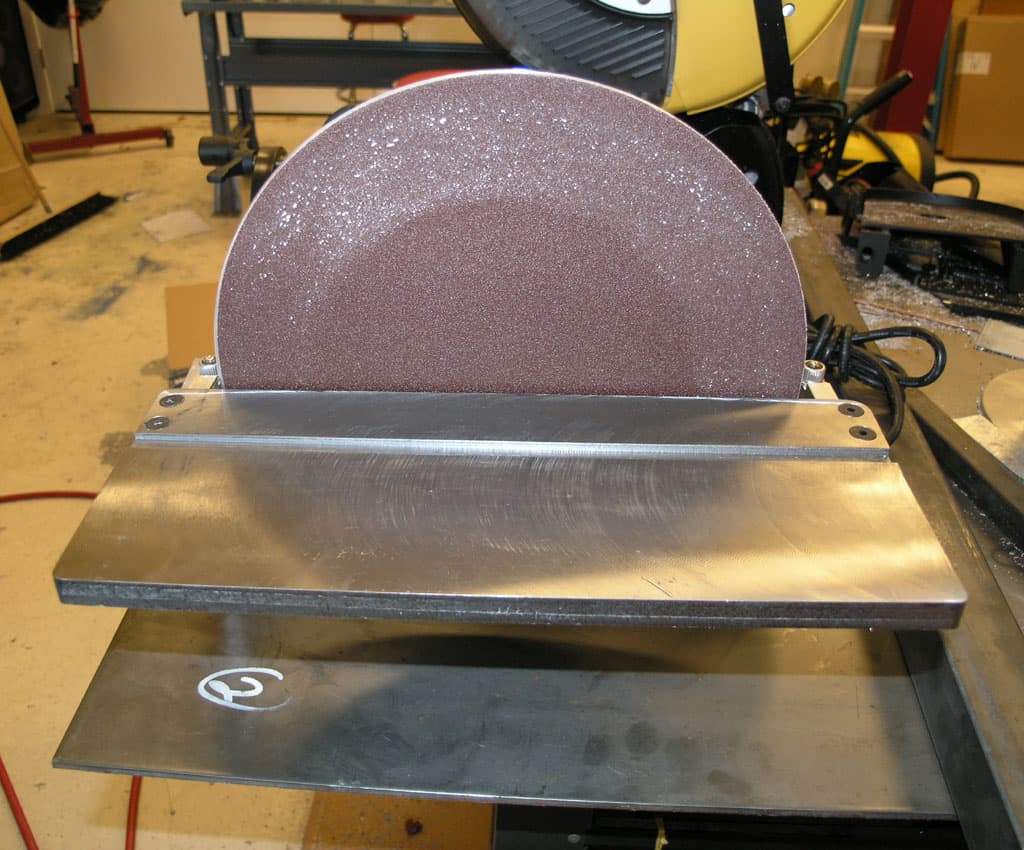
Stationary Disc and Belt Sanders
Stationary Disc and Belt Sanders of various kinds can also make short work of deburring jobs and rough edges.
Here's a 12" disc sander I built for my shop:
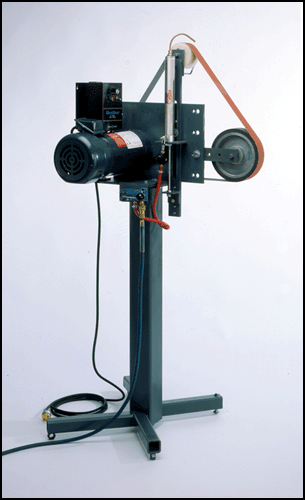
Belt Sanders can be even more versatile for some jobs and come in a variety of styles:
Every shop should have these manual deburring tools ready to go for quick and dirty applications, but you'll soon be looking for more automated ways to remove burrs.
Chapter 3: Mass Finishing
Vibratory Tumblers and Polishers
What is Mass Finishing?
Mass Finishing is the process of submerging parts in some sort of media whose qualities, such as abrasiveness, serve to finish the material and then creating motion between the parts and media. It is probably the most popular deburring tool because it will remove burrs without need of human intervention.
Mass Finishing Processes
Vibratory Tumbler / Finisher / Polisher
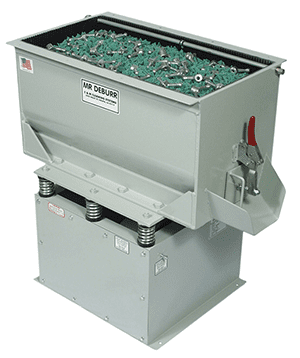
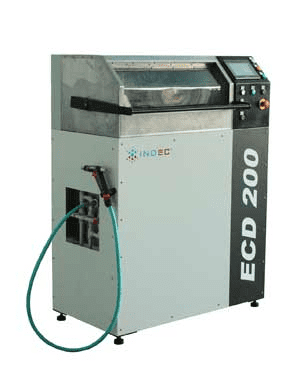
The most common mass finishing deburring tool is Vibratory Finishing. Here, the parts and media sit together in a container that is vibrated to create motion and friction between the two.
Here's a smaller model designed for the firearms ammo reloading community:
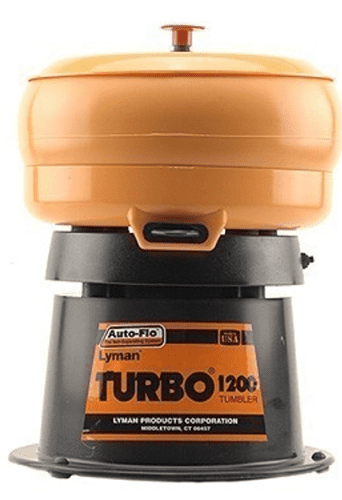
I've got one like that in my shop. For commercial shops, much larger models are available:

These big models can remove burrs from a lot of parts pretty quickly.
Barrel Tumbling
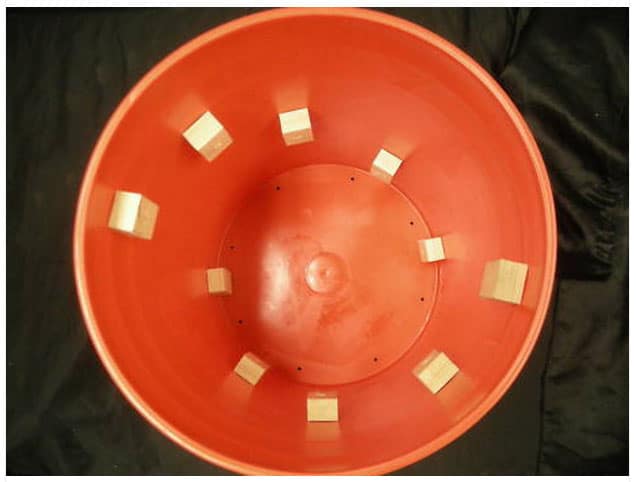
Another Mass Finishing process is Barrel Tumbling, where the parts and media are in a container that rotates along a horizontal axis. This motion causes the two to tumble against one another repeatedly.
Here's a quick and dirty Barrel Tumbler made from a 5 Gallon bucket, plasma cut sheet metal with some folding and additional hardware thrown in:

It’s a pretty simple device. Take a couple bicycle sprockets and some chain, a 5 gallon bucket, and some casters for it to roll in, and you have a part tumbler that can be powered by an electric drill.
Bucket has wooden blocks to make sure the is enough agitation. Big sprocket is just bolted to the bucket to spin it:
If you don't want to make one of these from scratch, contact Fred Nelson Fabrication.
They'll sell you a kit without a drill motor for just $169 and you're off to the races.
Centrifugal Disc and Barrel Finishing
Centrifugal Disc and Barrel finishing involve spinning the parts and media together at rates that are 20-50 times faster than vibratory finishing. This is a high-energy process that can speed up finishing, albeit at a greater cost.
In a centrifugal barrel finishing machine, multiple cylindrical barrels spin in one direction and are mounted on a base that spins in the opposite direction. This process, also called "Harperizing", generates high forces that deburr and finish parts in a fraction of the time for conventional vibratory methods, but it is still gentle enough for delicate parts.
A centrifugal disc finisher has a container for parts and media, and a disc at the bottom that spins at high speeds. This causes the contents to circulate around the bottom of the machine moving towards the walls, then up into the non-rotating container, and back around again.
Spindle Finishing
Spindle Finishing involves mounting the parts on a rotating spindle that is immersed in a container of media.
Comparison of these methods
According to Tony Kenton, president of Nova Finishing, Inc., "For every 100 minutes a standard barrel tumbler operates at 1G, a vibratory system will produce the same result in 10 minutes at about 8 g's, and a centrifugal disc in 1 minute at 24 g's."
Vibratory Tumbler Media
Here are some before and after pics of a little part I ran through my Vibratory Tumbler:
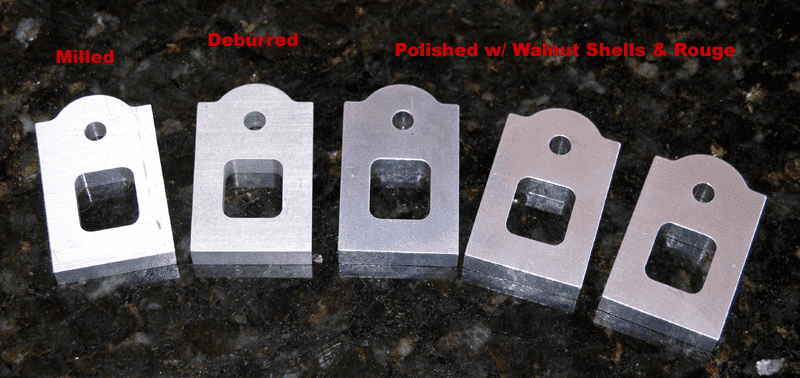
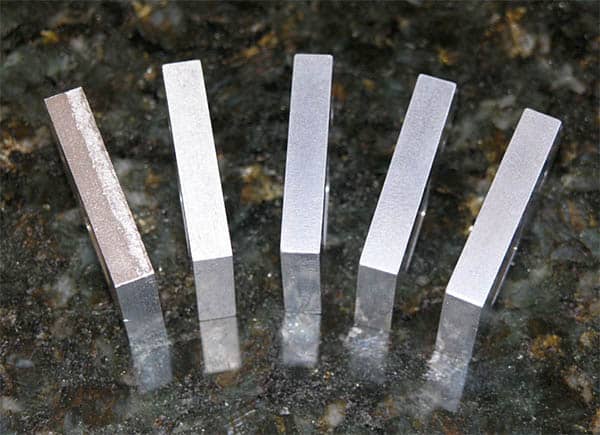
The type of media used makes a huge difference. I used the green media shown here:
The pebbly finish is typical before polishing.
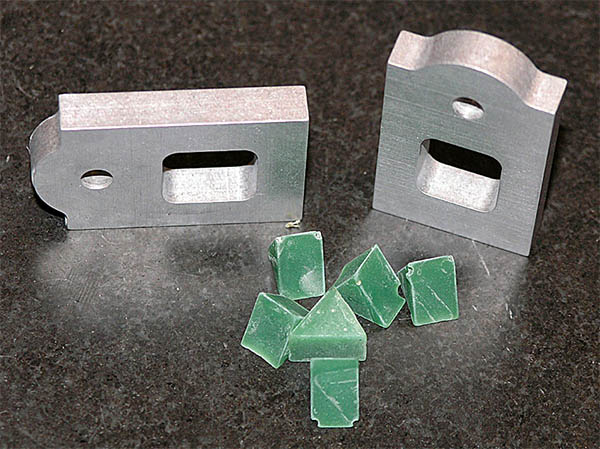
I used media from Grainger that was listed as:
Deburring Media, 3/8 Inch Styrene Triangles, 6 Pounds per Box, For 6A898 and 6A899
This media was recommended to me by a machinist friend largely because it was similar to what he uses (a 1" wedge shaped product from CandMTopline), but it was available in smaller quantities more suited to my small vibrating tumbler.
A huge variety of media are available for these machines including:
- Ceramic Media
- Plastic Media
- Synthetic Media
- Steel Shot: Shot contains no abrasive and is commonly used for polishing and burnishing
- Corn Cob and other Polishing Media: Works in conjunction with rouge and other polishing compounds
Chapter 4: CNC Deburring Tools
Chamfer, Corner Rounding, Hole Deburring and More
As nice as it is to just dump your parts in a Mass Finishing Machine and walk away while it does the work, it's often also nice to deburr as part of the CNC process. There are a number of CNC deburring tools specially made expressly for this purpose.
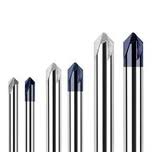
Chamfer Tools & Corner Rounding Tools
The most common means of deburring via CNC cutter is chamfering and corner rounding. These tools are specifically intended to break the sharp edges the machining process can leave behind. Pictured above are a collection of chamfering tools. A corner rounding tool puts a radius on an edge:
Considerably more information on these tools can be found on our Milling Form Cutter page.
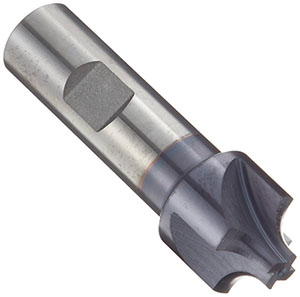
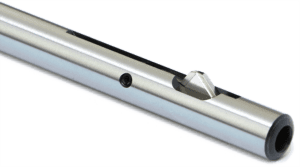
Hole Deburring Tools
Holes are the most common feature found in CNC work, so it should come as no surprise that there are special deburring tools aimed at deburring and improving the surface finish of holes. Here's a typical "zero flute" style cutter:

There are even tools designed to deburr the back side of a hole:
Cogsdill is one of the more well-known providers of such tools.
Deburring Brushes
Abrasive brushes are also available that are designed for deburring when operated in a CNC machine. Here's a typical model:
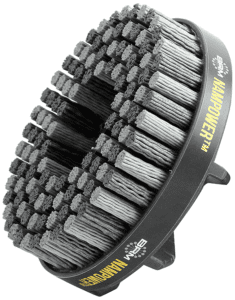
These abrasive brushes are available in a variety of styles. They have abrasive grit embedded in stiff nylon bristles.
Chapter 5: Abrasive Blasting
Abrasive Blasting can be done either wet or dry. A stream of abrasive material is propelled by air and is focused on specific areas to deburr and polish the part. Wet applications use a slurry with water as the liquid.
Abrasive Flow deburring involves extruding semi-solid material impregnated with abrasives through passages in the part. It was invented for applications such as cylinder head porting.
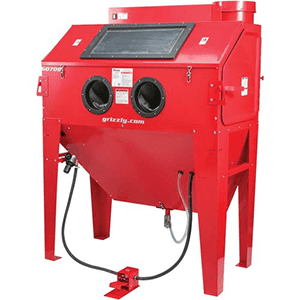
A blast cabinet is a very handy thing to have for any shop:
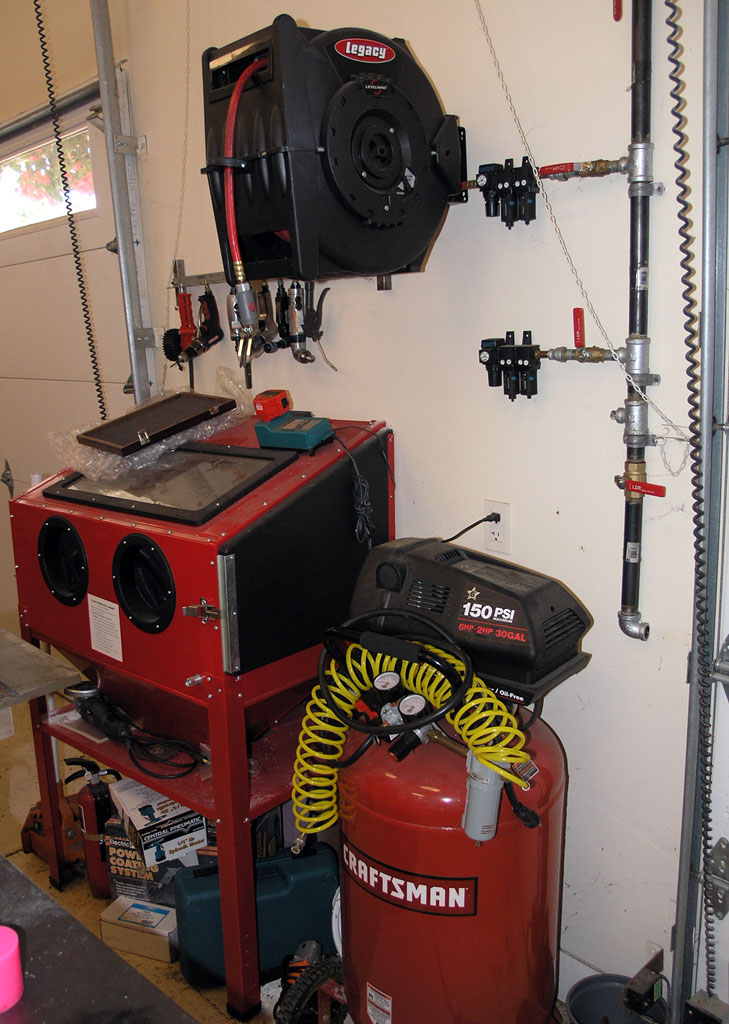
The blast cabinet in my home shop is pictured above. You can run a blast cabinet with a variety of media to remove burrs, such as:
- Non-cutting media such as glass beads, plastic, and soda.
- Cutting media such as aluminum oxide in various grit sizes.
Your choice of media depends on a variety of issues including what finish you desire, whether the part has to avoid contaminated metallurgy (common in aerospace and medical applications) and what downstream finishing processes will be used. For example, if you are working with aluminum and you intend to anodize it, the media choice has to ensure that it doesn't close the grain structure in the aluminum which is essential for the anodizing process.
Chapter 6: Magnetic, Electro-Chemical, and Thermal Deburring
Magnetic Deburring
In this method, magnetic fields excite tiny magnetic pins to create deburring action on small parts.
Electrochemical Deburring
In Electrochemical Deburring, a neutral-salt electrolyte flows through a gap between the tool or cathode, and the workpiece, which is the anode. This dissolves burrs through natural electrolytic action. This process can be very fast and can maintain precision as well. The residue (dissolved burrs) are carried away and can be filtered from the electrolyte to allow its reuse.
Any areas that are not to be deburred can be insulated by non-conductive material to prevent the electrolyte from acting on those areas.
Thermal Deburring
In Thermal Deburring, the part is placed in a chamber filled with oxygen and a fuel such as natural gas. The mixture is ignited and the resulting heat vaporizes the burrs and sharp corners. A mild acid bath is often used to remove any oxidation that occurs on the metal from the combustion process.
Be the first to know about updates at CNC Cookbook
Join our newsletter to get updates on what's next at CNC Cookbook.