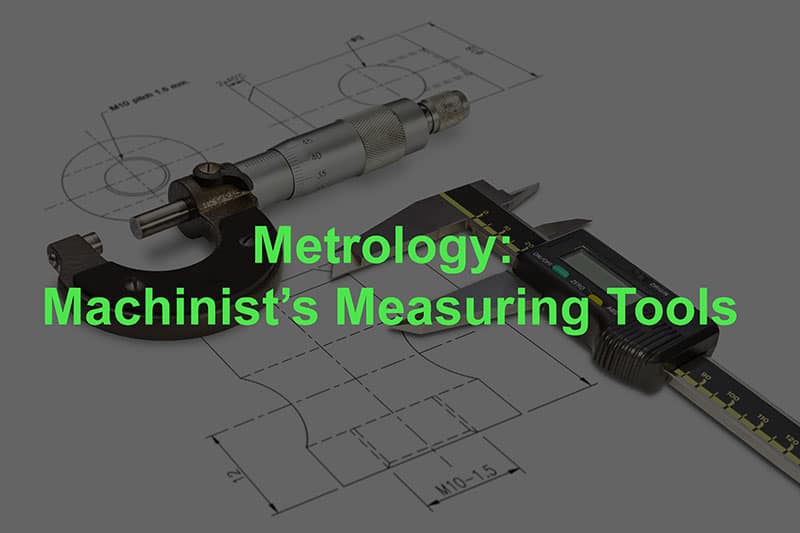
This article is your complete omnibus guide to machinist's measurement tools, or Metrology, the science of measurement.
What is Metrology? (Metrology Definition, Metrology Meaning)
Definition: Metrology is the scientific study of measurement.
Metrology and Inspection (Metrology and Measurements)
Like the definition says, Metrology is all about taking accurate measurements. But in machining, we often refer to taking measurements as Inspection.
3 Types of Metrology
There are three types of Metrology:
- Industrial Metrology: This is what we CNC'ers are concerned with and the subject of this article.
- Scientific Metrology: This is all about creating standard units for measurement. It also involves research into how to improve Industrial Metrology.
- Legal Metrology: Legal Metrology will be the least useful to CNC'ers. It's all about economic measurements, and we won't talk further about it here.
Metrology and Quality Control
Metrology goes hand in hand with Quality Control (QC) as it is practiced in CNC manufacturing. The strict definition of Quality Control is checking to be sure that Requirements for a manufactured part have been met.
The leading system of defining these tolerances is called GD&T or Geometric Dimensioning and Tolerancing. We offer a free course on GD&T Basics if you want to learn, get a refresher or to better understand how it works.
Metrology provides the science, techniques, and precision measuring machines that are used to determine if parts or features of parts fit within the tolerances and dimensions specified for the part.
Metrology and Reverse Engineering
Inspection of new parts isn't the only use for Metrology. It can also be used for Reverse Engineering.
Reverse engineering refers to the process of analyzing a physical object to determine its dimensions, properties, and design features, often with the intent of reproducing or improving upon it. This can involve using various measurement tools and techniques to capture precise dimensions, shapes, and surface details of the object. Once the data is collected, it can be used to create digital models, blueprints, or to understand the object's design principles. Reverse engineering in metrology is particularly useful in industries like manufacturing, where understanding the specifics of a part or component can be crucial for replication, quality control, or design enhancement.
Metrology Lab

Image courtesy of UNC Charlotte...
To reach the highest degrees of accuracy in measurement, Metrology may be conducted in a Metrology Lab. The essential characteristics of a Metrology Lab are that it be temperature controlled, clean, and well organized so delicate Metrology Instruments can be well taken care of.
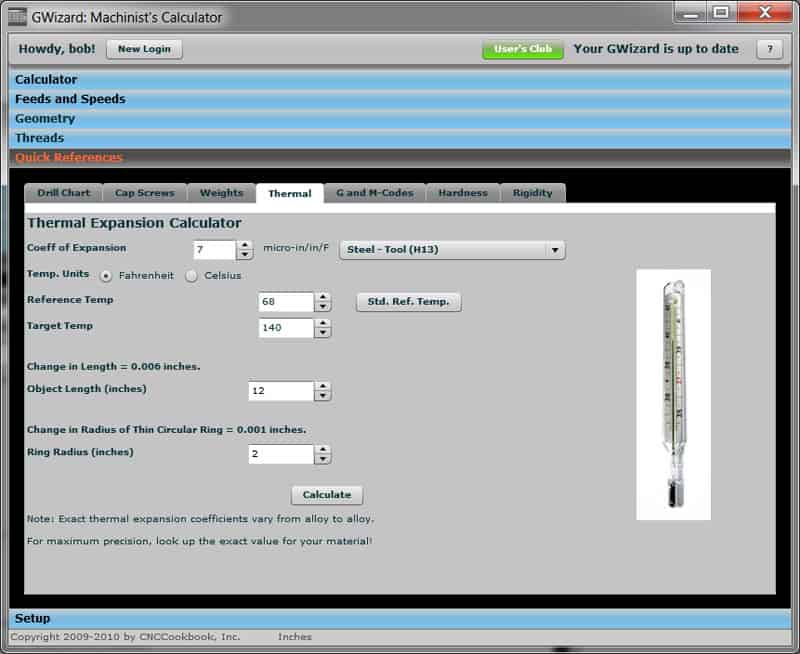
A Metrology Lab should be clean because contaminants can get between Metrology Instruments and the parts they are measuring to affect the measurement. They should be temperature controlled because both parts and Metrology Instruments change size based on the temperature of a room. The most accurate measurements are expressed in terms of a Standard Reference Temperature.
Our G-Wizard Calculator software includes a Thermal Expansion Calculator if you're curious about how much temperature can change the size of an object:
How Machinists refer to measurements
In math class, they taught us to refer to numbers, particularly decimal numbers, in a certain way. You will find that machinists refer to numbers slightly differently. For example, in math class, everything is based on 1.0. In a machine shop using inch measurements, everything is based on .001" (one thousandth of an inch). As a result, most measurements in inches will be expressed as either three decimal places or four decimal places.
So how would we say these numbers:
Machine Shop Examples
0.1000
In math class = "one tenth"
In a machine shop = "one hundred thousandths"
0.0010
In math class = "one thousandth"
In a machine shop = "one thousandth" or "one thou"
0.0001
In math class = "one ten-thousandth"
In a machine shop = "one tenth"
Building Your Metrology Toolkit
As a machinist and CNC'er, you're going to need some measuring tools. I confess, I'm a Metrology Junkie. I have more measuring tools than I need. In this section, I will try to map out what the minimum metrology equipment might be at different levels.
Just Starting Out
Of course when you're just starting out, it's all about having the most common measuring tools.
There are three measuring machines every CNC'er needs when they start out:
- Digital Calipers
- Micrometer(s)
- Dial Test Indicator with Magnetic Stand
Each one serves a different purpose, and taken together you can do a lot of measuring. Don't skimp on these 3. Buy good quality versions of each. Even after you've gotten past the Beginner stage of the trade, you'll find you still use these three more than all the rest.
Intermediate
precision measuring tools here fall into two categories. First, are measuring tools I think every CNC'er will want sooner or later.
I think everyone should add Height Gauges and a Surface Plate to their toolkit. They enable a lot more measuring to be done and are really helpful. I use mine constantly. I would also put a nice Micrometer Stand into this category.
You can use a DTI (Dial Test Indicator) to clock a 4 jaw chuck in a lathe, but it's touchy work if all you've got is a tenths indicator. For quicker work, I prefer a Dial Indicator. I'll explain the difference between a DTI and a Dial Indicator below.
Second, there will be a collection of measuring tools that are dictated by the projects you're working on. For example, if you need to make accurate bores, you might invest in Bore Gauges. Or, you might purchase additional micrometers in size ranges your original micrometer won't cover.
Buying Measurement Tools as needed by projects will eventually land you in the Advanced category just by the sheer weight of your tool collection.
Advanced
The sky is the limit at the more advanced levels. Shop Floor CMM (Coordinate Measuring Machine)? Wow, very powerful instrument. Optical Comparator? Again, very useful and not something you see very often in an individual CNC'ers tool kit. Perhaps one of those slick motorized and computerized height gauges? They're the next best thing to a true CMM. I have coveted one for years, but never pulled the trigger.
What is a lot more common would be the reference standards such as Gage Blocks, Pin Gages, and perhaps even a Cylindrical Square.
Metrology Tools (Measuring Tools, Instruments, and Equipment)
In this section we will walk through a list of Metrology Measuring Tools, Instruments, and Equipment so you're familiar with what they are and how they're used.
Contents
-
Gauge Measurement
-
Measuring Tools for Length or Thickness
- Caliper (Digital, Vernier, Dial, etc.)
- Micrometer
- Depth Gauge
- Dial Indicator & Dial Test Indicator
- Height Gauge
- Planer Gages & Adjustable Parallels
-
Edge Finders, 3D Sensors, and Coaxial Indicators
-
Measurement References
- Surface Plate
- Gauge Blocks
- Gauge Balls
- Squares
- Cylindrical Squares & Angle Blocks
- Pin Gages
- Plug Gages
- Go / No-Go Gages
- Ring & Outside Gages
- 1-2-3 & 2-4-6 Blocks
- Feeler Gages
- Angle Gages
-
Bore Measuring Tools
-
Angle Measuring Tools (Angle Measuring Devices)
- Precision Levels
- Digital Protractor
- Sine Bar & Sine Plate
- Thread Measuring Tools
- Thread Micrometers
- Thread Pitch Gages
- 3-Wire Thread Measurement
- Surface Roughness Measurement
- Optical Metrology (Optical Measurement)
- Optical Comparator
- Coordinate Measuring (CMM, CMM Machine, Coordinate Measuring Machine, Measuring Machine)
- CMM Programming
- CMM Inspection
- Portable CMM / CMM Arms
- CMM Training
- Coordinate Measuring Machine PDF
- CMM Metrology
- CMM Fixtures
- Optical CMM
- CMM Probe
- Laser Metrology (Laser Measuring Tool, Laser Measuring Device)
- 3D Touch Probes
Gauge Measurement & Gauge vs Gage Spellings
This is just a quick aside to talk about the word "Gauge" which has two spellings for machinists-"Gauge" and "Gage".
In the strictest sense, a Gage is a Measurement Device that acts as a standard. We use it comparatively. For example, a Gage Block is a rectangular piece of metal that has a certain length known with great accuracy. We can use it to measure that one length (or by combing with multiple Gage Blocks, multiple lengths). That's Gage Measurement.
A Caliper, on the other hand, can read many different lengths.
This distinction is not at all hard and fast. In fact there are many Measuring Devices that are called Gages but don't act at all like one in the sense they measure many dimensions. A Height Gage or Depth Gage would be two good examples.
Don't get too wrapped up in the word. Just be aware it refers to measurement and that either spelling is correct.
Measuring Tools for Length or Thickness
Digital Caliper Complete Guide [ Vernier, Dial, Best Ones, and More ]
Calipers are probably the most common measuring tool for length or thickness. There are a number of types beyond just digital including vernier, dial, inside, and outside calipers. We've got a complete chapter written that takes you through all aspects of Calipers:
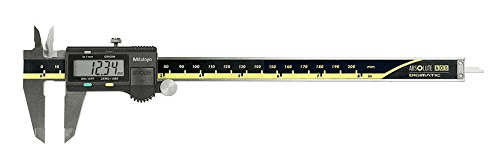
Digital Caliper Complete Guide [ Vernier, Dial, Best Ones, and More ]
Micrometer
When a pair of digital calipers just isn't accurate enough (i.e. need to measure a tolerance that is less than 0.002"), most machinists will turn to a Micrometer. They come in digital, dial, and vernier styles, much like calipers:
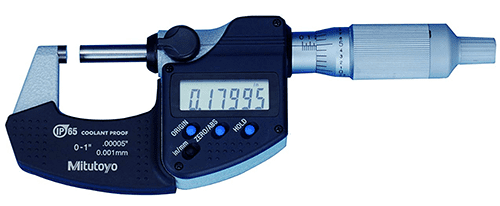
Mitutoyo Digital Micrometer...
Micrometers as measuring tools can generally make accurate measurements to ten thousandths or tenths.
Check our Easy Guide to Micrometer Reading, Use & Measurement for full details:
Easy Guide to Micrometer Reading, Use & Measurement
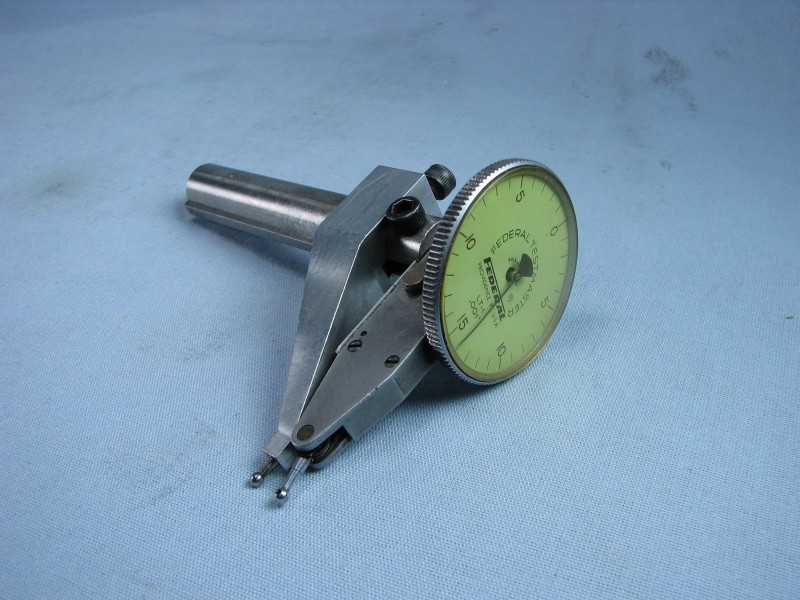
Dial Test Indicators & Dial Indicators (DTI, Dial Gauge, Digital Dial Indicator, Digital Dial Gauge)
First, what's the difference between a Dial Indicator and a Dial Test Indicator?
It's pretty simple. The Dial Indicator has a plunger and reads how far the plunger is raised by the surface below. The Dial Test Indicator has an arm that sweeps an angle. It measures how far the arm is pushed sideways. Both are handy, but you'll tend to use a Dial Test Indicator more often.
These photos should make the differences clear:
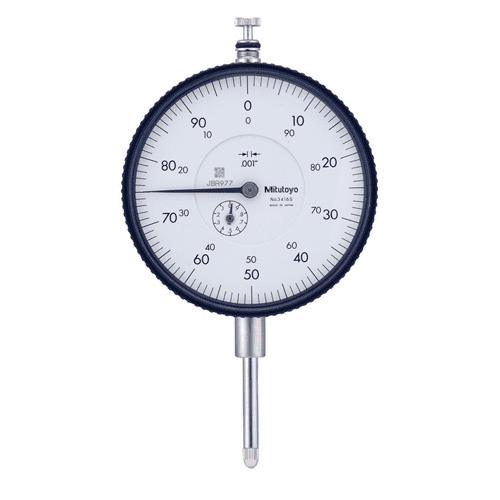
Mitutoyo Dial Indicator reads how far plunger moves up to nearest thousandth of an inch (0.001")...
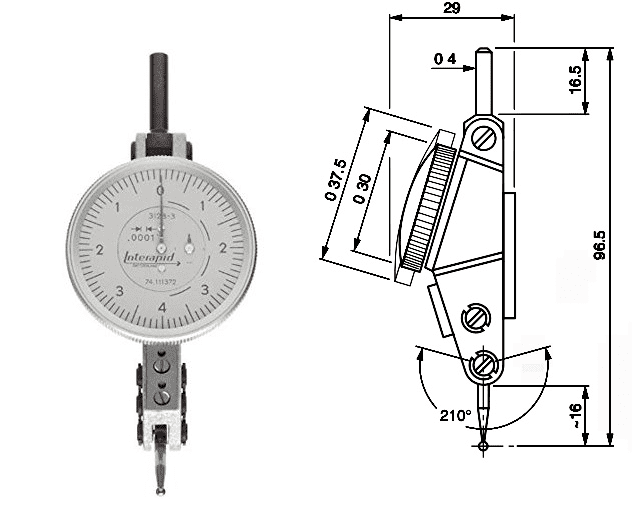
Interapid Dial Test Indicator, Tenths Accuracy (0.0001")...
Easy Guide to Dial Indicators & Dial Test Indicators
Height Gauge
A Height Gauge and Granite Surface Plate should be one of your earliest investments in Metrology Tooling. I got mine right after Digital Calipers and Micrometers.
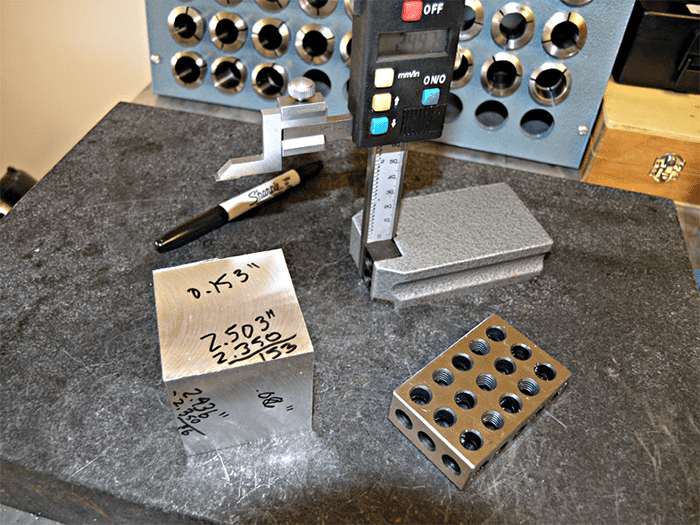
Measuring a workpiece with height gage and granite surface plate for a Turner's Cube...
Planer Gage & Adjustable Parallels
Sometimes you want to capture a particular distance, and use it to set some other tool up. You can take great care setting it up with precision measuring devices, then you just want to lock it down and transfer to where it will be used. Often the place it will be used is no place for precision measure devices. There's either not enough room, it's too dirty, or some such.
When I think of applications like this, I think of Planer Gages and Adjustable Parallels.
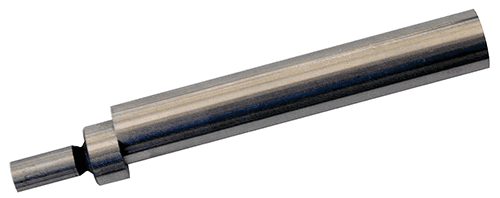
Planer Gage (Planer Gauge, Planer Shaper Gauge)
Here's a typical Planer Gage by Fowler:
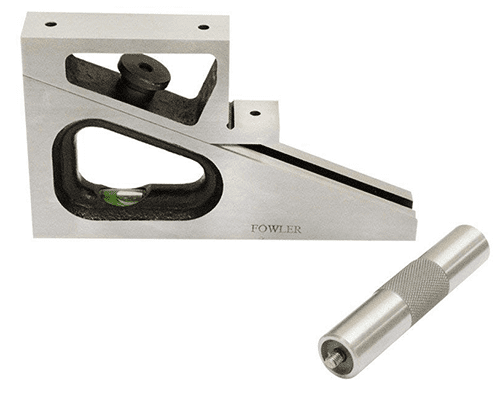
Planer Gage by Fowler. About $59.88 on Amazon.
Using one couldn't be simpler. Set it on the bottom surface to be measured. Unlock the locking thumbscrew and slide until one of the surfaces on the sliding piece is the correct distance from the bottom, perhaps because it has come into contact with what you're measuring. Now you can take it back to your surface plate and height gage to see what the measurement is. Or mic it or use calipers, whatever is convenient and offers enough accuracy for your purposes.
You can also do the reverse. Set the Planer Gage up to a precise distance, take it to the setup, and use it as a stop that is exactly the right distance for your purpose.
Other uses:
- As an adjustable Gage Block on a Sine Bar.
- Setting tool height on lathe tools. They're called planer shaper gages because they were originally used to set tool height on those machines.
- As an adjustable machinist's jack, especially if the height is to be precisely controlled for a setup that will be repeated.
Adjustable Parallels
Adjustable parallels are very similar in function to a Planer Gage, but they're much more compact and fit into smaller spaces. I tend to use the Planer Gage when I want to stand it up and Adjustable Parallels when I want to lay them down.
Here's a nice Starrett set of Adjustable Parallels:
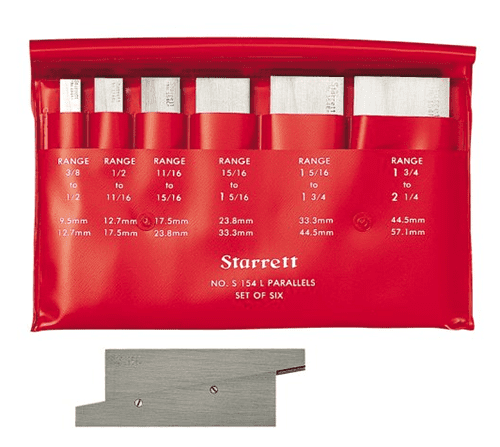
Starrett Adjustable Parallels. About $266.31 on Amazon...
You can get cheaper sets by either choosing cheaper brands or a set with fewer parallels.
Edge Finders, 3D Sensors, and Coaxial Indicators
If you use a milling machine, you will need to be able to find edges, corners, and hole centers. This is all part and parcel of setup work on these machines. Often it's done to locate Part Zero, so be sure to also check out our article on all the different ways you can locate Part Zero.
Here's a typical mechanical edge finder:
Mitutoyo Mechanical Edge Finder. About $12.77 from Amazon...
To see how all these measuring tools work, check out our complete guide:
Complete Guide to Edge Finders, 3D Tasters, and Center Finders
Measurement References
At some point, before you get too far along collecting measurement tools, you will want some precision Measurement References. These are measuring tools whose size is known with very high precision. They can be used for calibration and various other purposes.
Surface Plate
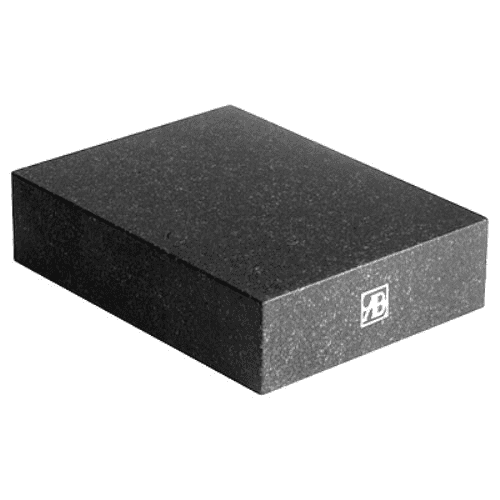
The purpose of a Surface Plate is to mimic a perfect 2D plane as accurately as possible to facilitate other measurements being made on top that plane. One of the most common measurements is done with a Height Gauge (see above for details on height gauges).
Complete Guide to Surface Plates
Gauge Blocks (Gage Blocks, Johansson Gauges, Slip Gauges, Jo Blocks)
After the Surface Plate, Gauge Blocks are probably the most common reference used by machinists. Here's a typical Mitutoyo Gauge Block Set:
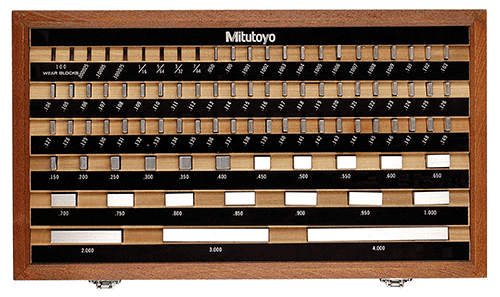
Each individual gauge block is made of either metal or ceramic that has been precision ground and lapped to a specific thickness with very great accuracy. Blocks can be stacked to make up a specific length.
Joining gauge blocks together is a process called wringing. The ultra-flat surfaces cling together naturally. A normal set of 30 gauge blocks lets you take 3 blocks to make up any length from 3.000 to 3.999 mm in 0.001 mm steps (or 0.3000 to 0.3999 inches in 0.0001" steps). That's pretty cool.
Gauge blocks are typically used as a reference for the calibration of other measurement tools. They were invented in 1896 by Swedish machinist Carl edvard Johansson, hence the name "Jo Blocks."
Now for the weird and wonderful-we don't actually know for sure exactly how wringing holds the blocks together. It is believed to be a combination of:
- Air pressure: All air is squeezed out between the blocks so it's like a vacuum force holding them together.
- Surface Tension from oil and water that is present between the blocks.
- Molecular attraction that occurs whenever two very flat surfaces come into contact. Since it is known that gauge blocks will stick together strongly even in a vacuum, these last two forces are believed to be the main cause.
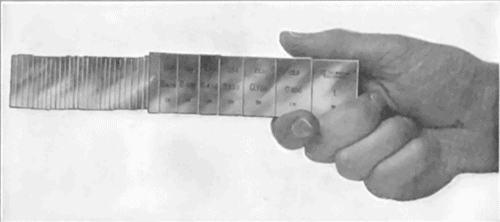
In practice, you have to wring two blocks together to feel the effect. It's like two magnets that want to bond. And the force is quite strong. Here's a shot of 36 blocks wrung together and supporting their own weight:
Gauge Blocks are typically used with two pads. One is oiled, and the other is clean. To wring two blocks together:
- Wipe the clean blocks across the oiled pad.
- Wipe any extra oil off on the clean pad.
- Slide one block perpendicularly across the other.
- Once the block is in the middle of its travel, rotate it so it is aligned with the other block.
After use, it is important to keep your Gauge Blocks clean of debris and contaminants, and oiled to preven corrosion.
If a block becomes dinged or damaged, it won't wring properly. You can gently stone the nick out to restore wringability.
Gauge Block Grades
As in many things Metrology oriented, there are different precision grades for Gauge Blocks. And, there are different formal specifications for these grades. Here are some typical grading systems described by Wikipedia:
- reference (AAA): Have the smallest tolerance (±0.05 μm) and are used to establish standards
- calibration (AA): (tolerance +0.10 μm to −0.05 μm) May be used to calibrate inspection blocks and very high precision gauging
- inspection (A): (tolerance +0.15 μm to −0.05 μm) May be used as toolroom standards for setting other gauging tools
- workshop (B): large tolerance (tolerance +0.25 μm to −0.15 μm) May be used as shop standards for precision measurement
Here are grade designations from U.S. Federal Specification GGG-G-15C:
- 0.5 — generally equivalent to grade AAA
- 1 — generally equivalent to grade AA
- 2 — generally equivalent to grade A+
- 3 — compromise grade between A and B
and ANSI/ASME B89.1.9M, which defines both absolute deviations from nominal dimensions and parallelism limits as criteria for grade determination. Generally, grades are equivalent to former U.S. Federal grades as follows:
- 00 — generally equivalent to grade 1 (most exacting flatness and accuracy requirements)
- 0 — generally equivalent to grade 2
- AS-1 — generally equivalent to grade 3 (reportedly stands for American Standard - 1)
- AS-2 — generally less accurate than grade 3
- K — generally equivalent to grade 00 flatness (parallelism) with grade AS-1 accuracy
Achieving the level of accuracy these grades suggest will require careful temperature control as these tolerances are easily subject to thermal expansion.
Gauge Block Materials
Gauge Blocks should be made of either hardened steel, tungsten carbide (much harder than steel), or ceramic. Hardness reduces wear during use and prolongs the life of the Gauge Blocks. Ceramic blocks have better thermal properties than metal Gauge Blocks.
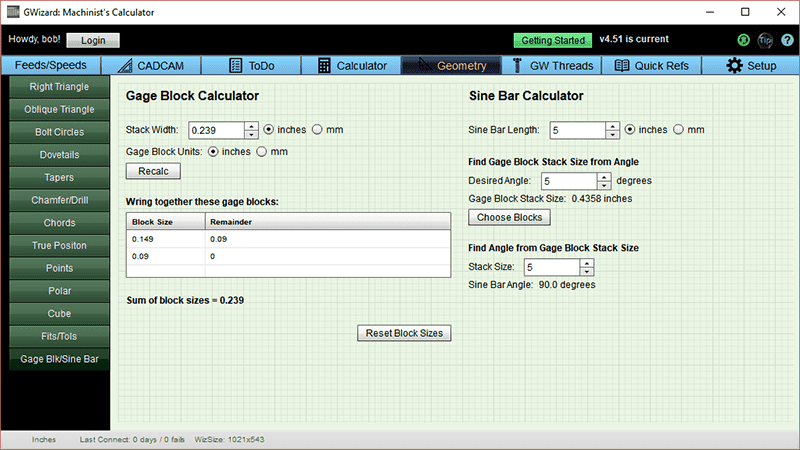
Gage Block Calculator
Did you know we have a Free Gage Block Calculator? It knows the standard sizes of gage blocks and will tell you which ones to wring together for a particular length.
Gauge Block Cost
You can spend thousands on a good set of high grade gauge blocks from a name manufacturer. That'll be out of reach of many, as well as more than you really need. Fortunately, you can get a decent set of Grade B (workshop quality) gauge blocks for as little as $82.99 on Amazon.
A higher quality Grade 2 set can be had for $168.00 on Amazon.
Those prices put Gauge Blocks within the reach of most CNC'ers.
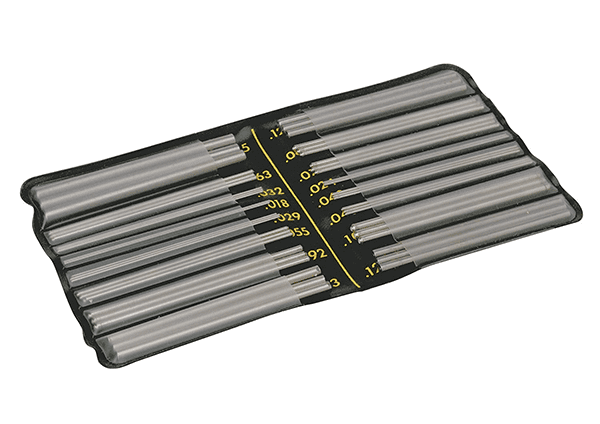
Pin Gages (Pin Gauges, Gauge Pins, Go / No-Go Gauges)
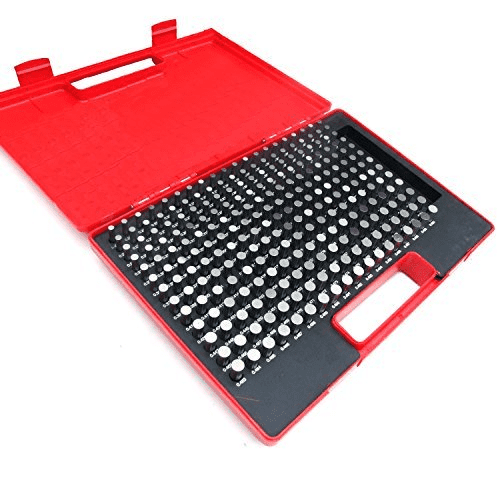
HFS 250 pc 0.251" - 0.500" M2 Class ZZ Steel Pin Gauge Minus Set. About $93.99 on Amazon...
Pin Gauges are not as handy as Gauge Blocks, but they can still come in plenty handy depending on your application. Pin Gauges are cylinders that come in precise sizes. Typically they are used to determine the diameter of small holes. The idea is to find the largest pin size that will drop into the hole unaided by any force but gravity.
Gauge Pins come in different grades, with the most common being Class Z. They can be either "Plus" or "Minus" pins, and the most common are "Minus." A Class Z Minus Pin is toleranced to be -0.0002". So, a 1.000" Minus Pin is actually 0.9998" in diameter.
One commonly uses a "Go" "No-Go" Pin Setup. So, for a hole that is specified as 0.150" diameter, +0.004" / -0.002" tolerance, you'd use a Go Pin of 0.152" (largest pin that can fit) and a No-Go Pin of 0.154". If the NoGo pin fits without interference, the part is oversized.
In other words, the role of a "Go" gauge is to fit the smallest acceptable diameter, while the No-Go gauge is chosen to be large enough that it won't fit the largest acceptible diameter. If the No-Go fits or the Go won't fit, the hole is out of tolerance.
Keep in mind that issues with Go/NoGo Pin fit may also be due to out of round or surface finish issues with the hole.
Here's a nice video on the use of Gauge Pins:
Gauge Balls
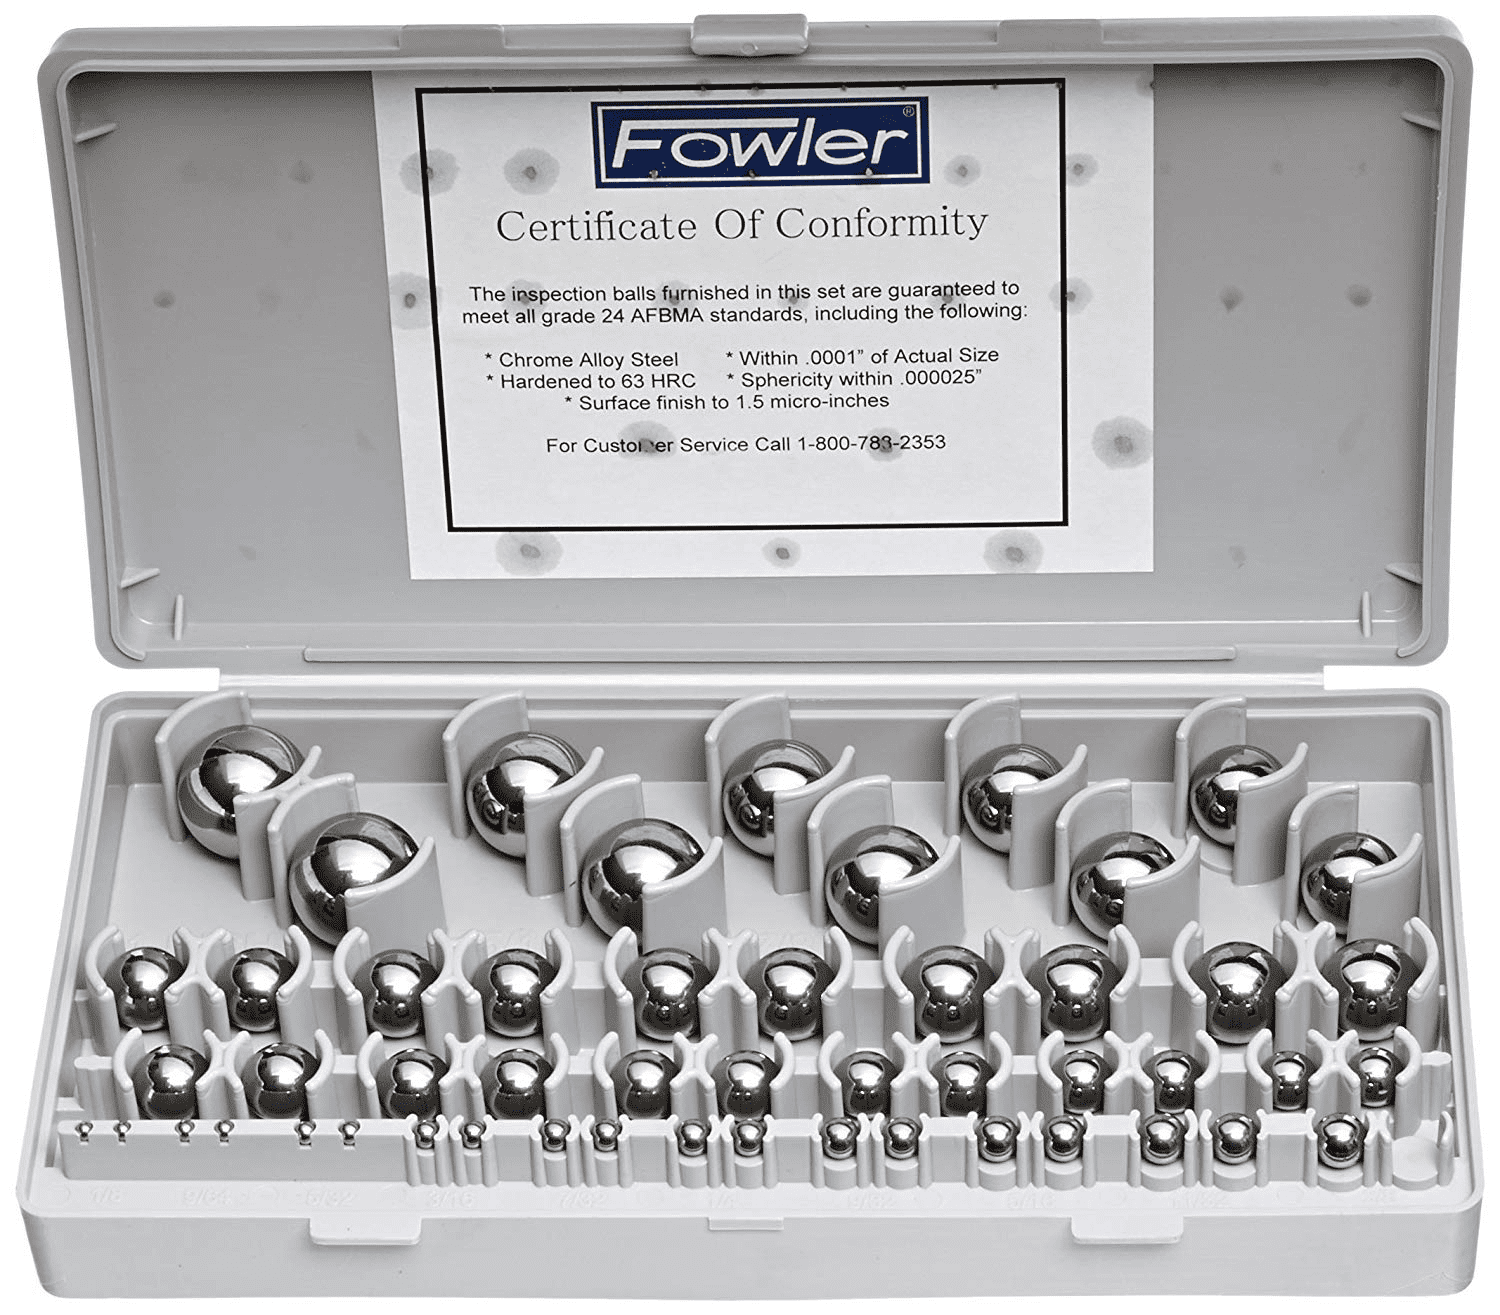
Fowler Gauge Ball Set, 52 piece. About $71.02 on Amazon...
Gauge Balls, as the name suggests, are precision balls in specific accurately made diameters. They're handy for a variety of applications, but typically you'll need to be a bit handy with math to use them.
For example, this diagram shows how to use a Gauge Ball to measure the major diameter of a countersink:
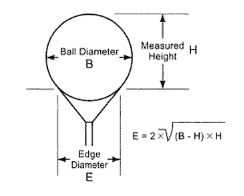
For more information on Gauge Balls, be sure to check out our dedicated article:
Ball Gage Guide [ Tips & Calculator ]
Angle-Related Measuring References
Cylindrical Square (Cylinder Square)
3" x 6" Cylindrical Square. About $169.99 on Amazon...
For certain kinds of Metrology tasks, Cylindrical Squares are handy. They're simply upright cylinders that are very accurately made so that when they sit flat on a surface the cylinder's circumference is truly perpendicular to that surface. The accuracy of the 6" tall square pictured is such that the top edge is within 0.0001" of where it should be.
Cylinder Squares are typically used to check and measure squareness. For example, you could check the squareness of an angle plate by placing it on a surface plate adjacent to a cylinder square. If the contact is continuous for the whole contact area between the two, the angle plate is square. Shine a light to show up any gaps and you can tell to within a tenth (0.0001") the squareness.
Another use is to have the square be a standard while we sweep an indicator up and down the square. For example, we can check the tram of a milling machine by placing the square on the table, a DTI in the spindle, and sweeping up and down the cylinder square.
Here's a photo I took while checking squareness of a CNC Mill:
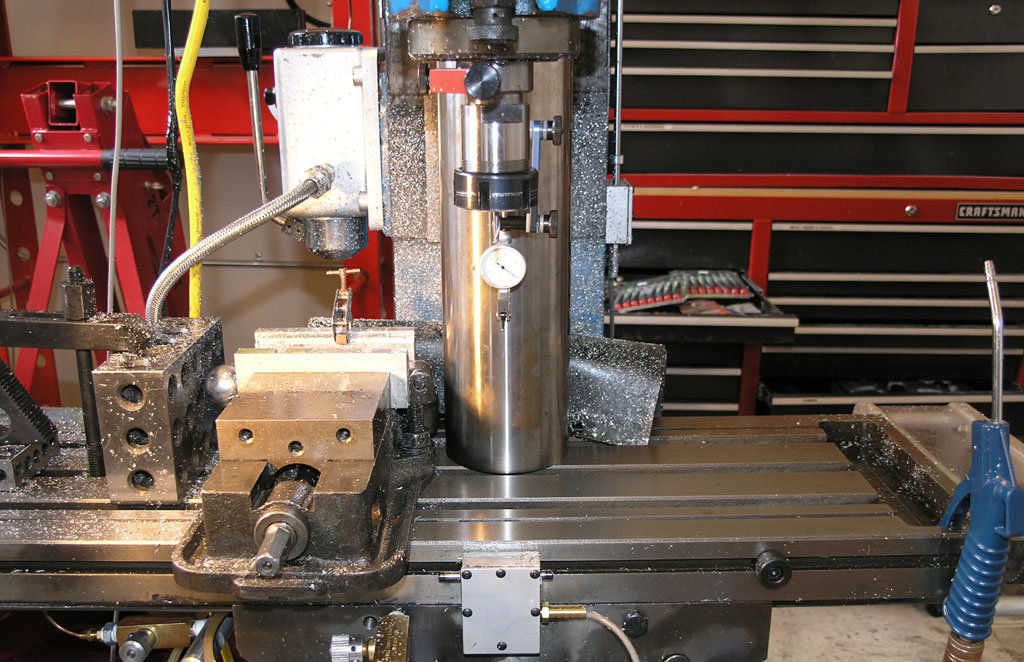
As you can see, the DTI is in the spindle, the square is flat on the table (I cleaned that area before putting the square down) and I can evaluate how well the mill is in tram by raising or lowering the Z-axis and watching the behavior of the DTI.
Cylindrical Square Calibration
Given the right measuring tools and a lapping plate, Cylindrical Squares can be corrected for errors pretty easily. Here's a great video from Suburban Tool on how to calibrate and repair your cylindrical square:
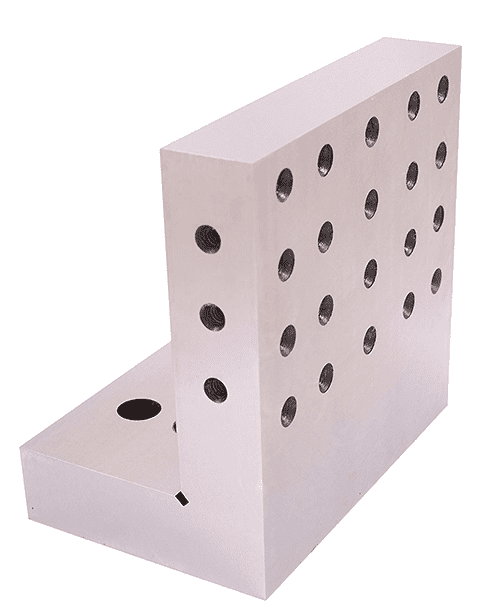
Angle Plate
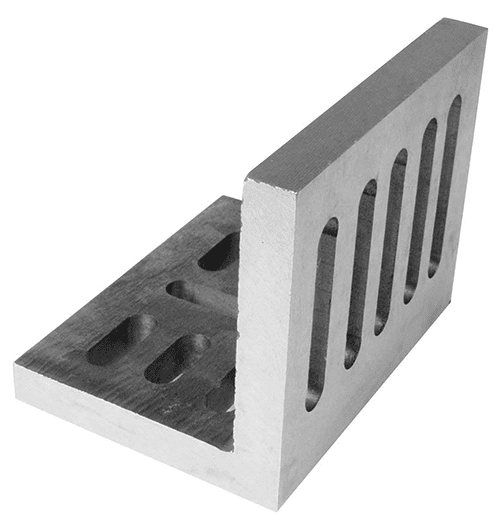
6" x 5" Cast Iron Angle Plate. About $50.79 on Amazon...
If you don't have a Cylinder Square, and I admit they are something of a luxury, your next best bet is an Angle Plate. These are typically made of cast iron, and are more commonly used for setups than for Metrology purposes.
Using the typical cast iron angle block is pretty rough and tumble. The plate pictured above is only rated to 0.002" per 6". So that top edge could be 0.002" off what it should be if the angle was perfect. That's pretty terrible for metrology purposes.
6" x 6" Ground Angle Plate. About $182.28 on Amazon...
They do make precision ground angle plate that are high accuracy but they're a lot more money. Typically, they are made for grinding and other applications requiring high accuracy. The one pictured above is accurate to 0.0002" at the top edge. That's about twice the cylinder square, but way better than the cheaper angle plate.
You can, of course, buy higher quality angle plates for more money than either of the models pictured here.
Precision Angle Blocks
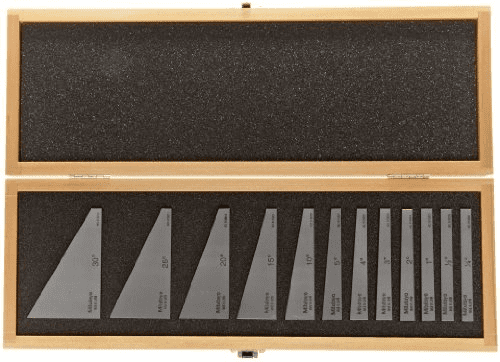
Precision Angle Block Set. About $37.99 on Amazon...
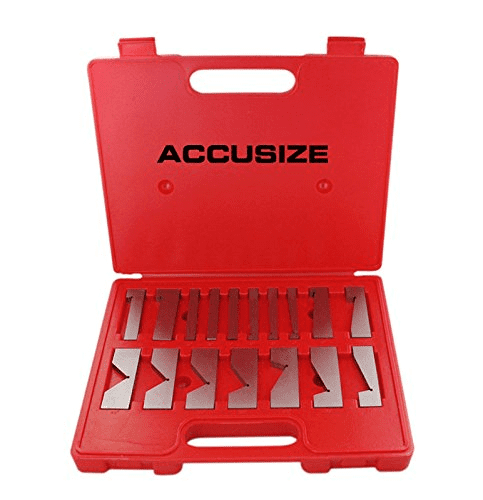
Precision Angle Block Set. About $86.40 on Amazon...
Suppose you want to setup a part quickly in your machinist vise, but it needs to be cocked at a particular angle and not square?
Try some Precision Angle Blocks. They're the equivalent of Gauge Blocks for setting angles. Pretty nifty, eh?
Of the two versions shown, I prefer the top style just because I can more easily stack to make up different angles.
1-2-3 Blocks and 2-4-6 Blocks
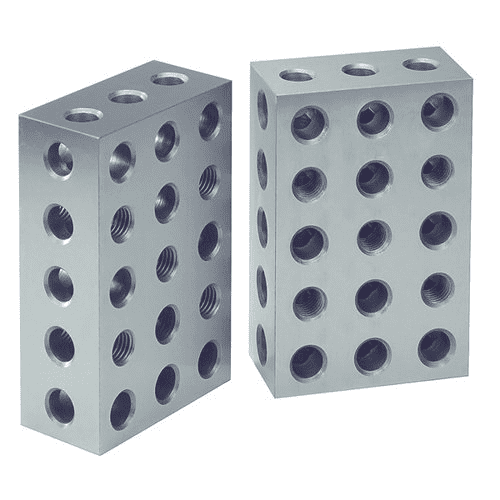
Precision ground 2-4-6 blocks. About $99.99 on Amazon...
So you don't have a Cylinder Square or an Angle Plate that's accurately made enough to work. How to get things square? Your last avenue is to use your 1-2-3 or 2-4-6 Blocks. If they're accurately made, they should be square. The ones pictured above are spec'd to be within 0.00024", which is not bad. If it were me, I am buying a nice set of 2-4-6 blocks before any cylinder squares, angle plates, or precision angle blocks. They're just so darned useful for various setups.
Tip: Have you got a friend with a surface plate and cylinder square? Haul your angle plates, 1-2-3 blocks, and 2-4-6 blocks over and check their squareness. You may be very pleasantly surprised at how good they are. And if not, at least you'll know!
Feeler Gauges (Feeler Gage)
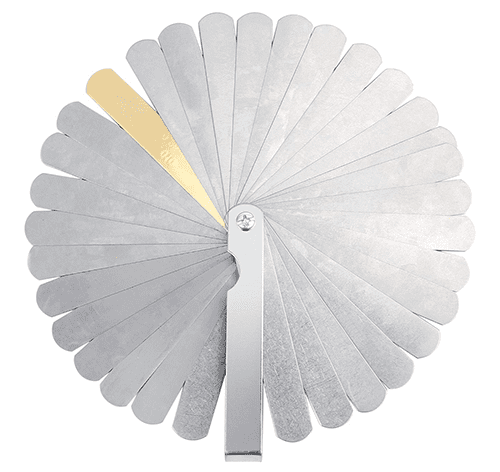
Imperial & Metric Feeler Gauge Set. About $5.95 from Amazon...
Feeler Gauges. You probably came across them for the first time as an aid to setting spark plug gaps when working on your car. But, they're also viable metrology tools for measuring very small gaps.
Bore Measuring Tools
Measuring Bores can be one of the most difficult CNC measuring chores. We've already seen how to use Pin Gauges to measure small bores, but what to do about larger bores?
Read on to discover the arsenal of tools that were developed for Bore Measurement.
Telescoping Hole Gages (Snap Gages)
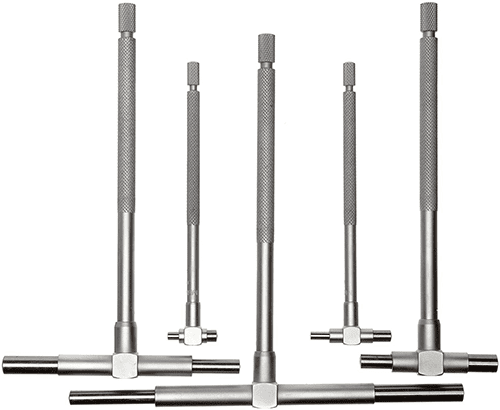
Mitutoyo Telescoping Gage Set for 1/2" to 6" holes. About $152.99 on Amazon...
A set of Telescoping Gages is one of the first bore measuring tools most CNC'ers acquire. The Mitutoyo set I have featured above is more expensive than what most machinists purchase, but there is a method to the madness. You see, it takes a fair bit of touch and technique to use Telescoping Gages successfully. Having a nicer set of Gages helps, because they have better feel, though you will still need to practice your technique until it is accurate and repeatable.
Telescoping Gage Accuracy
If you know what you're doing, and it takes a ton of practice, you can measure measure bore diameters to within a few tenths. Read on to be sure you understand what it takes to master these gadgets.
How to Use Telescoping Gages
The idea behind Telescoping Gages is you insert them into the bore. The bore causes them to retract, then you withdraw them and measure the end to end distance between the contact points with a micrometer. The end of the handle has a knurled knob that controls a lock.
Sounds easy, right? Except you've got to make the measurement while keeping the Gages across a true diameter and not cocked in any way. In practice, this is done with a sort of rocking motion and simultaneous use of the lock.
I refer you to one of Suburban Tool's excellent videos to see just how it's done:
Ideally, get a few different bores to play with whose size you know very accurately. Try working the feel with your eyes closed until you can get repeatable accurate measurements.
Ball Gages
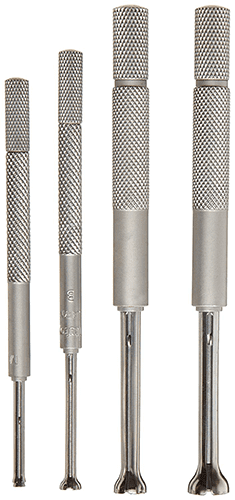
Mitutoyo Ball Gage set, 3mm to 13mm. About $106.00 on Amazon...
Ball Gages are a close cousin to Telescoping Gages that are intended for smaller bores.
Dial Bore Gauges (dial bore gage)
If I left you with the impression that telescoping gages can be difficult to use consistently, good because it's true. So what do you do if you want an easier, albeit much more expensive method of measuring bores?
Commonly the answer is to use a Dial Bore Gauge. Here's a beautiful (if costly) Mitutoyo Dial Bore Gauge set:
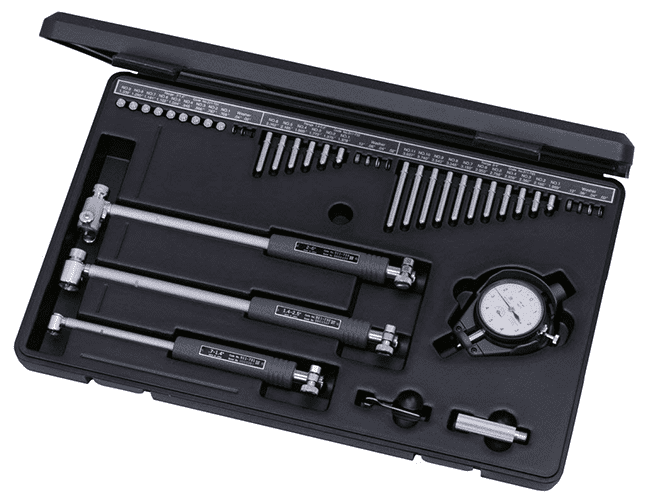
Mitutoyo Dial Bore Gauge Set, 0.7" to 6" range. About $875.14 on Amazon...
In practice, you set the dial bore gauge up with the correct anvils and other attachment for your bore's size, insert it in the bore, and gently rock it to get the maximum reading of the diameter.
Dial Bore Gauge Accuracy
Good dial bore gauges are accurate to perhaps a few tenths, and they're faster and require much less touch than telescoping gages.
Ouch, what about the cost?
There are a few ways to get your hands on dial bore gauges without totally breaking the bank. First, you could simply buy sizes as needed. Single-size Mitutoyo Dial Bore Gauges are less than half the cost of the set. Second, you could haunt eBay until a used model comes up at a decent price. Lastly, you could investigate cheaper brands.
Brands like Fowler cost 1/3 to less what the Mitutoyo bore gauges go for.
Indi-Calipers
These are a great shopmade tool for accurately measuring bores:
I've written an article about Indi-Calipers with more details, but the idea is pretty simple. You've got two adjustable points with one end being a DTI. Adjust to the nearest reference (for example using a mic), the read off the difference on the DTI when you probe the bore with the Indi-Caliper.
Simple, accurate, and relatively inexpensive compared to Dial Bore Gauges.
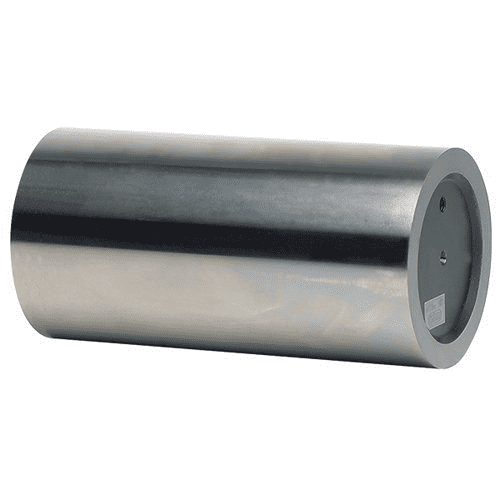
Ring Gages (outside gages)
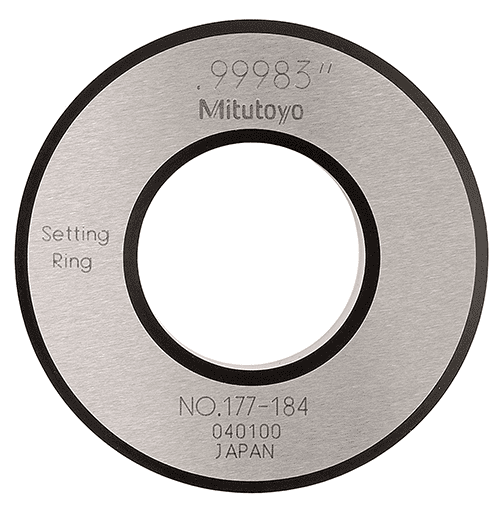
Mitutoyo Ring Gage, 1.000", +/- 0.00004". About $192 on Amazon...
Ring Gauges are useful for measuring diameters and for calibrating ID bore measurement tools. They're often the "gold standard" for such calibration, in fact.
Hole Micrometer (Brown & Sharpe Intrimik, Mitutoyo Holtest, Fowler Holemike, Tubular Inside Micrometer, Bore Gage)
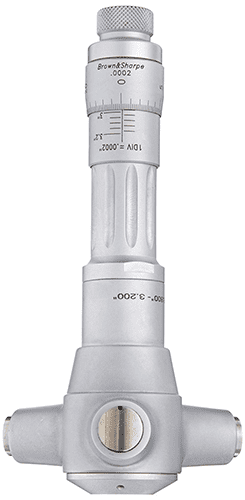
Brown & Sharpe Intrimik Inside Micrometer, 2.8-3.2" Range. About $277.10 on Amazon.
Inside Micrometers come in a variety of styles and tradenames. Pictured is one of the classics, a Brown & Sharpe Intrimik. It has 3 measuring anvils that meet the bore, so it is less susceptible to the types of errors caused by 2 point measuring instruments.
Some 3-point mics also space the mics asymmetrically, such as the Etalon brand. The purpose of this is to allow multiple readings to determine the roundness of the bore.
Many prefer a Dial Bore Gauge to these inside mics, because the measurement is affected less by heat transfer from the hand holding the instrument. They do make clamp on handles for these mics to minimize the heat transfer. A good 3-point inside micrometer with the handle is typically a bit more accurate than a dial bore gauge.
Tip: It's a good practice to use an outside mic to verify the measurement of an inside mic assuming you have a diametral reading and not a 3-point inside mic.
Go No-Go Gauges
We talked a bit about Go No-Go Gauges in the section on pin gauges where we described how to use pin gauges for Go No-Go. For convenience, we gave this example:
For a hole that is specified as 0.150″ diameter, +0.004″ / -0.002″ tolerance, you’d use a Go Pin of 0.152″ (largest pin that can fit) and a NoGo Pin of 0.154″. If the NoGo pin fits without interference, the part is oversized.
In other words, the role of a “Go” gauge is to fit the smallest acceptable diameter, while the NoGo gauge is chosen to be large enough that it won’t fit the largest acceptible diameter. If the NoGo fits or the Go won’t fit, the hole is out of tolerance.
Keep in mind that issues with Go/NoGo Pin fit may also be due to out of round or surface finish issues with the hole.
Here's another style of Go No-Go Gauge that one frequently sees in machine shops:
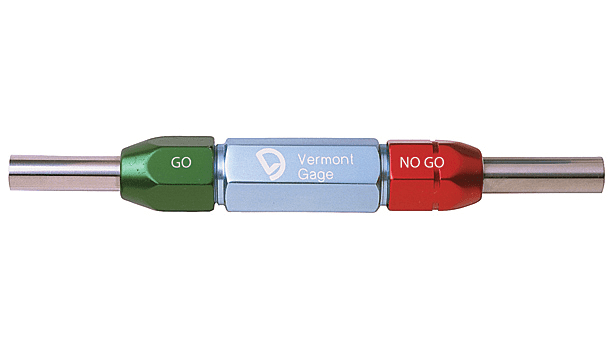
Note how the pins are kept together and the "Go" and "No Go" ends are clearly marked and color coded.
Angle Measuring Tool (Angle Measuring Devices, Angle Measuring Instruments)
Precision angle measurement may be concerned with either leveling or the actual measurement of an angle as a feature on a part, fixture, or other component in a machine shop.
Sine Bars, Sine Vises and Sine Plates
See our detailed article for more on these precision tools and for a free sine bar calculator.
Machinists Levels (Precision Levels)
Most machinery works better if it is leveled when installed. The preferred tool for leveling is a machinist's level, and there are both old-style and new digital tools available.
Here's the slick digital version:
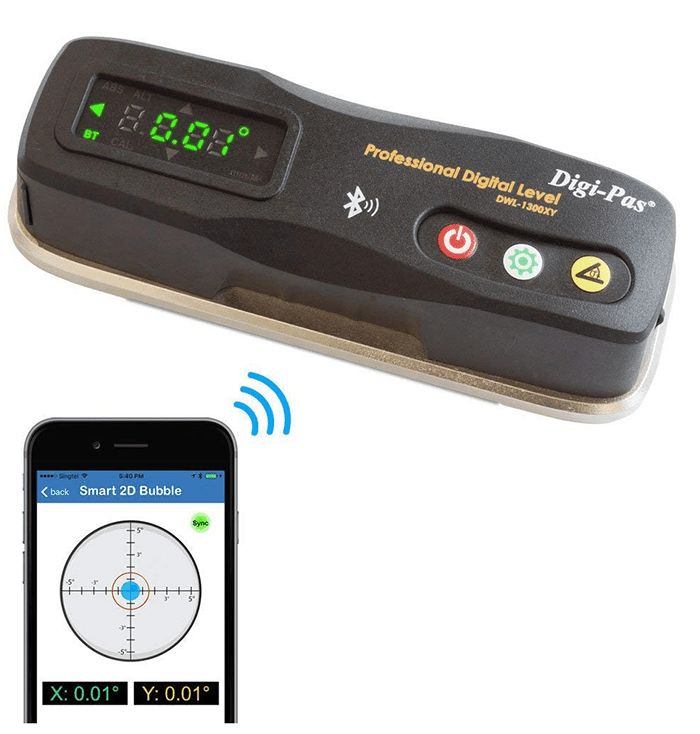
Digi-Pas Digital Level. About $239 on Amazon...
Note how it even has a phone app to assist.
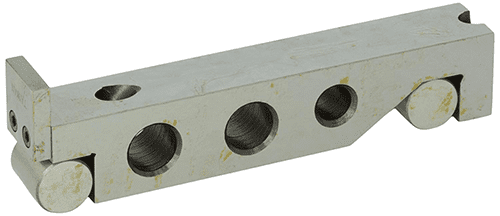
And here is the old-fashioned analog precision level from Starrett:
Starrett 6" Precision Level. About $131 on Amazon...
I own a Starrett level like that and have used it to level all of my CNC Machines. It works great, but clearly the digital version has a lot more bells and whistles for not a lot more money. If the digital level had been available when I bought the Starrett years ago, I probably would've gone digital. If nothing else, the digital protractor function of the digital level would sure be handy a lot of times.
Digital Protractor (Inclinometer)
Speaking of Digital Protractors, they're readily available, and yes, I've got a cheap one that I use from time to time. Mine is similar to this model:
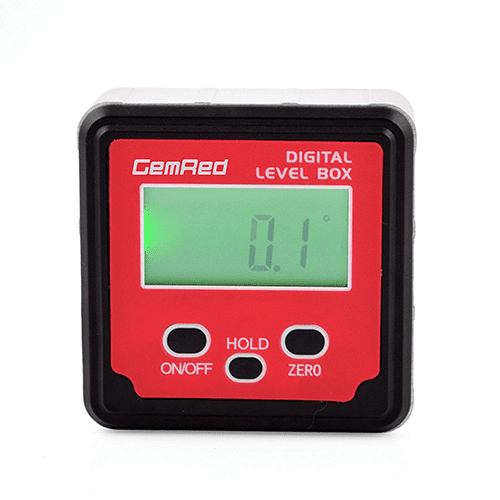
GemRad Digital Protractor and Inclinometer. About $25.99 on Amazon...
These inexpensive inclinometers are handy, but I don't know how much I trust their accuracy versus a unit made for the machinist market like the Digi-Pas.
Sine Bar, Sine Plate & Sine Vise
We give the Sine Bar, Sine Plate, and Sine Vise a special place in angle measurement because they're used both for measuring and for fixturing when specific angles other than 90 degrees are important to make a part correctly.
Here's a typical Sine Bar:
Fowler Sine Bar. About $145 on Amazon...
We've put together a complete guide to Sine Bars, Sine Plates, and Sine Vises for you. It even includes a free Sine Bar Calculator:
Complete Guide to Sine Bar, Sine Plate & Sine Vise with Free Calculator
Thread Measuring Tools
Screw Thread Micrometer
It should come as no surprise that screw threads are fickle beasts that take lots of measurements requiring a degree of precision. The cheap method is to use 3 wires. The more convenient and probably more accurate method is to use a Screw Thread Micrometer:
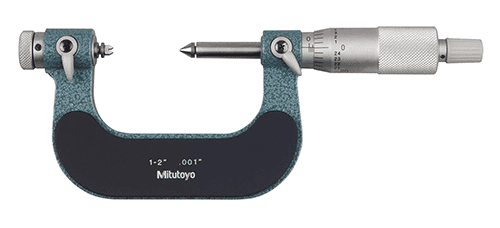
Screw Thread Micrometers have interchangeable tips because they have to match the angle of threads. For a source of all the key dimensional data on thousands of threads, check out our G-Wizard Thread Calculator.
Thread Pitch Gages
Thread Pitch Gauges can quickly tell you the pitch of an external thread:
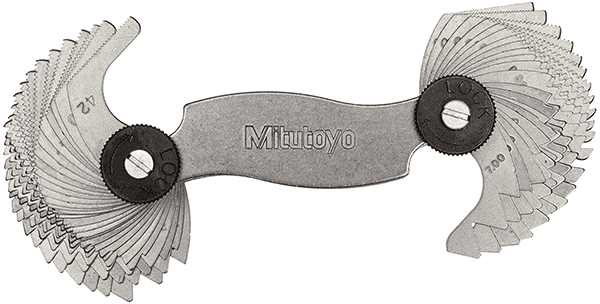
Mitutoyo Thread Pitch Gauge. About $47 on Amazon...
Each leaf has a set of serrations that match the teeth of the thread to help you decide what the thread pitch is.
3-wire Thread Measurement
Three Wire Thread Measurement is the most common way to take precision thread measurements. The three wires go into the teeth of an external thread and are measured by a micrometer like this:
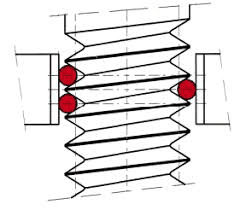
Given the diameter of the wires and the measurement with the micrometer, the thread's pitch diameter can be determined very accurately.
Three Wire Calculator or Data Tables
Converting a three wire measurement to a pitch diameter requires either data tables or a three wire calculator. Our G-Wizard Thread Calculator has a built-in three wire calculator that covers thousands of thread profiles:
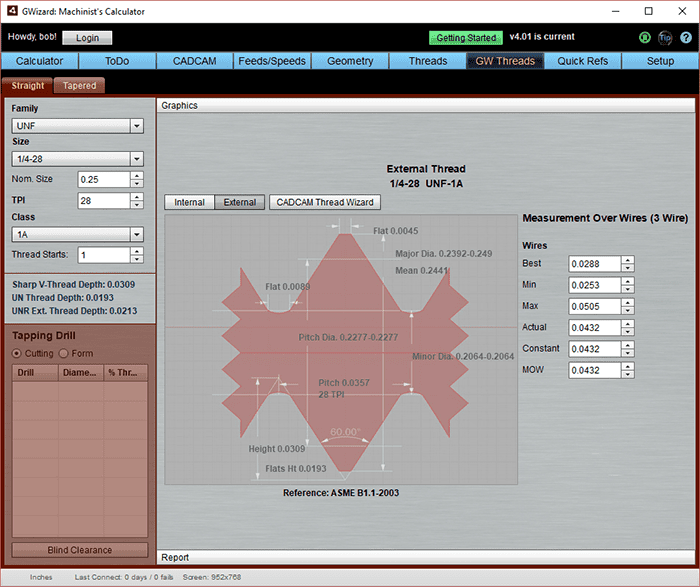
For a given thread, it'll tell you the preferred wires and what the MOW (Measurement Over Wires) should be if the thread is correct.
Three Wire Thread Measurement Sets
The precision wires used for Three Wire Thread Measurement come in sets of standard sizes like this:
Brown & Sharpe Three Wire Thread Measurement Set. About $35 on Amazon...
Surface Roughness Measurement
Surface Roughness is one aspect of Surface Finish.
Here’s a chart table showing the relative surface roughness of various manufacturing processes:
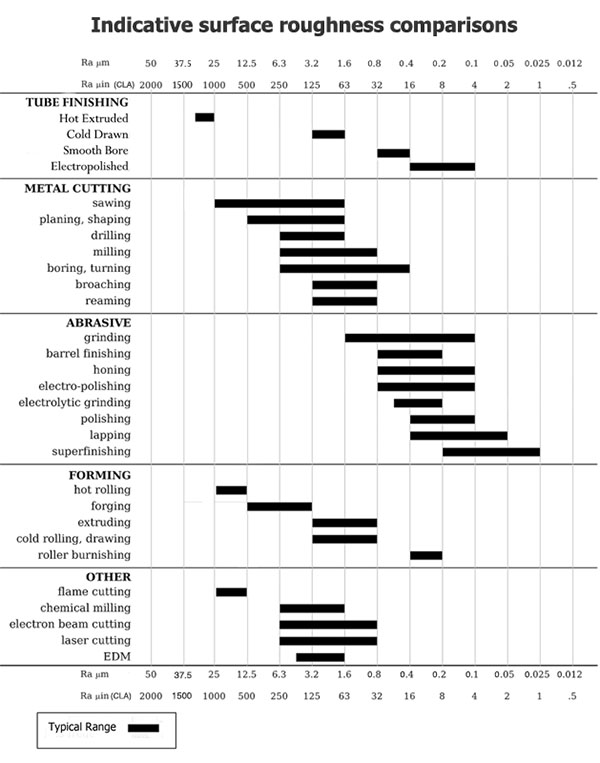
Relative Surface Finish Roughness of Manufacturing Processes…
For more on measuring Surface Roughness as well as units for expressing Surface Roughness that we cover in our detailed Surface Finish article.
Complete Guide to Surface Finish
Optical Metrology (Optical Measurement)
Optical Comparator
Optical Flats
Coordinate Measuring
What is a CMM Machine?
Imagine a CNC-style machine capable of making extremely precise measurements in a highly automated way. That’s what CMM Machines do!
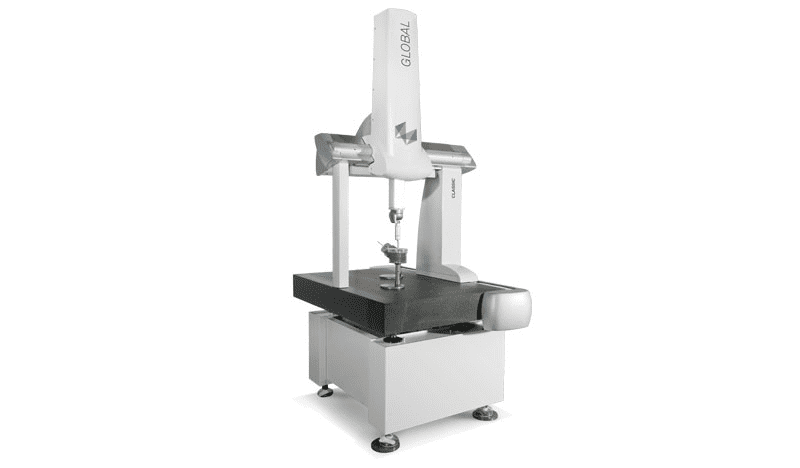
Hexagon Global Classic CMM, a typical coordinate measurement machine…
CMM stands for “Coordinate Measuring Machine”. They’re perhaps the ultimate 3D measuring devices in terms of their combination of overall flexibility, accuracy, and speed.
Check out our Complete Guide to Coordinate Measuring Machines for much more on these powerful metrology tools.
Laser Metrology (Laser Measuring Tool, Laser Measuring Devices)
3D Touch Probes
Measurement for Reverse Engineering
Use your Machine as a CMM
Accurately Measuring Distance Between Two Hole Centers
Calibration and Traceability
gauge calibration
micrometer calibration
metrological traceability
nist traceable calibration
caliper calibration
gauge block calibration
hardness tester calibration
Be the first to know about updates at CNC Cookbook
Join our newsletter to get updates on what's next at CNC Cookbook.