The Geometry tab in the G-Wizard Calculator houses a range of calculators specifically designed to tackle trigonometry and geometry issues often encountered by machinists.
Note: These geometry calculators are all free for life if you sign up for the G-Wizard Calculator free trial.
Right Triangle Trigonometry Calculator
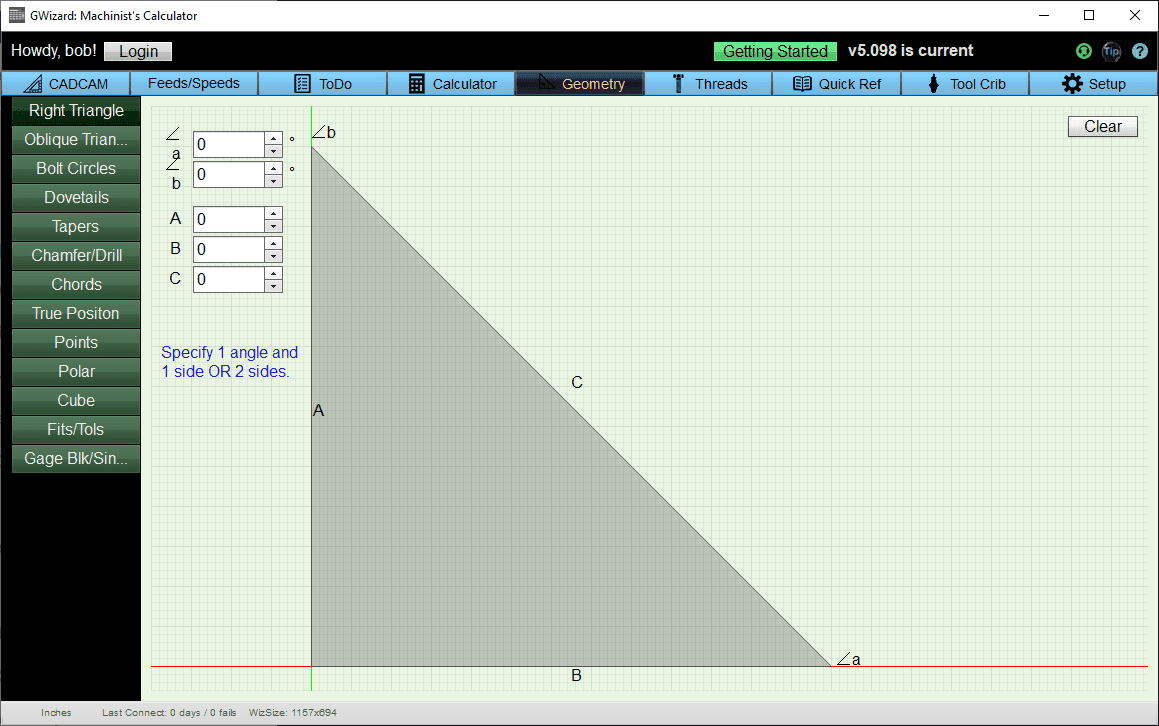
The Right Triangle calculator solves problems involving triangles that have a 90 degree angle. Just enter any two lengths or any length and any angle and press the "Calc" button. G-Wizard will figure out all the remaining lengths and angles. To try a different set of parameters press the "Clear" button and start over. You can't just change values once you have calculated without starting again with "Clear".
Sine Bar Calculator and Gage Block Calculator
Yes, of course G-Wizard includes a Sine Bar Calculator!
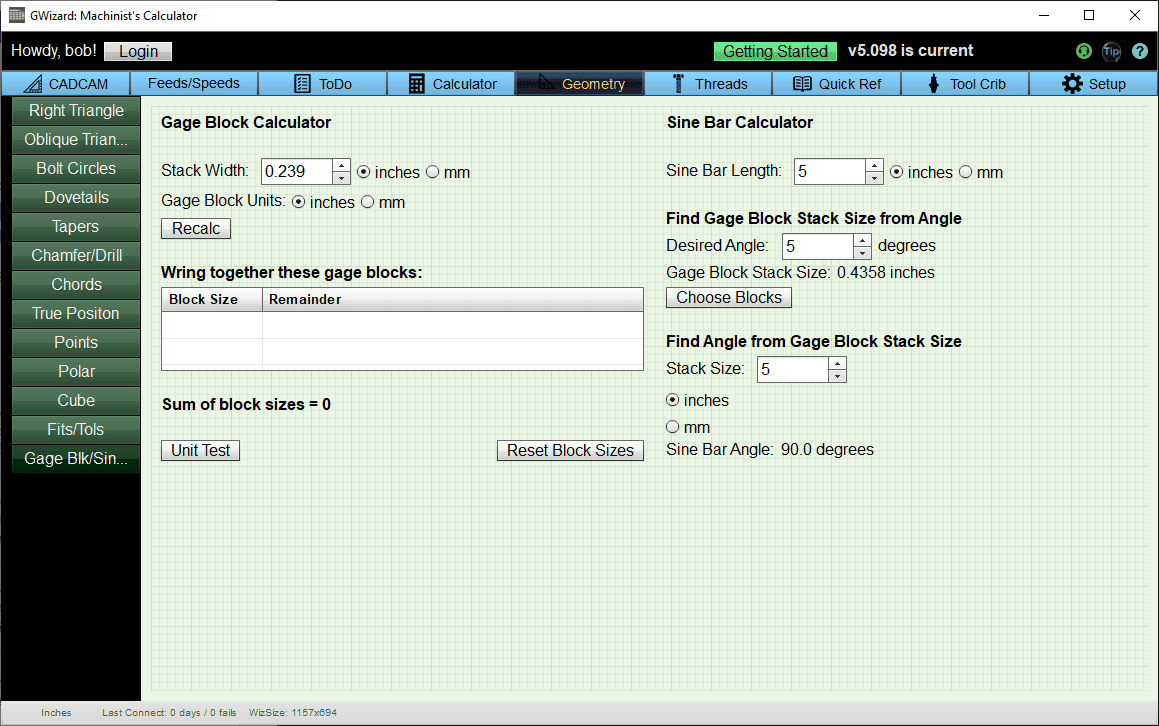
It's part of the Gage Block Calculator. It knows standard Gage Block sizes and will figure out the correct gage blocks to wring together to create a particular width. It will also figure out which gage blocks to use to set your sine bar to a particular angle, or If you have a measurement of the sine bar stack it will tell you what angle that creates.
For full details on this calculator as well as how to use a Sine Bar (or Sine Vise) click through to our full article.
Don't forget the Right Triangle Calculator for Sign Bars too!
It's very easy to use the Right Triangle calculator to do sine bar calculations. The following diagram shows how:
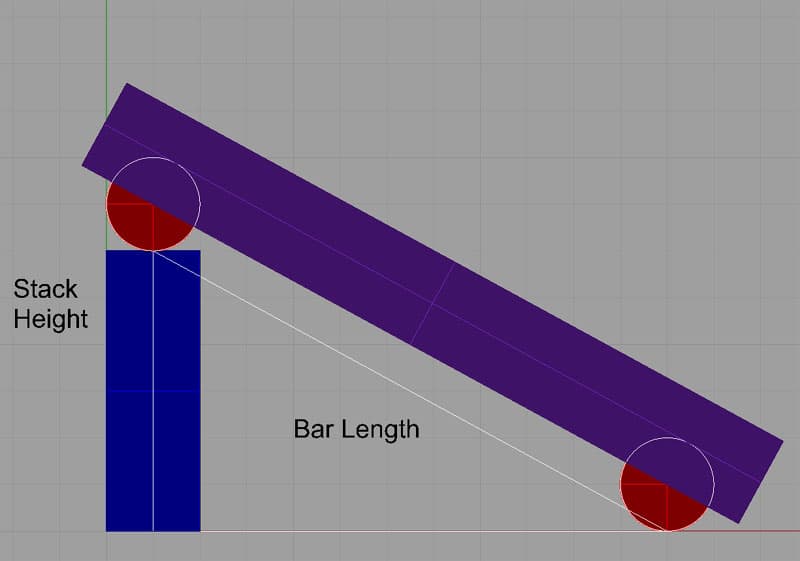
Calculate the angle based on the sine bar length and stack height
This one is easy:
1. Enter the sine bar length as the hypotenuse of the triangle. You can see the outline of the triangle on the sine bar diagram. The hypotenuse is the diagonal length opposite the 90 degree angle.
2. Enter the Stack Height in the length on the left.
3. Press "Calc" and you'll have the angle of the sine bar in the Angle indicator on the lower right.
Calculate the stack height needed to set the sine bar to a particular angle
Suppose you need to figure out what stack height is needed to set your sine bar to a particular angle.
1. Enter the sine bar length as the hypotenuse of the triangle. You can see the outline of the triangle on the sine bar diagram. The hypotenuse is the diagonal length opposite the 90 degree angle.
2. Enter the angle in the lower right.
3. Press "Calc" and you can read off the other parameters.
For example, a 5" sine bar set to 30 degrees requires a 2.500" stack height.
Oblique Triangle Calculator
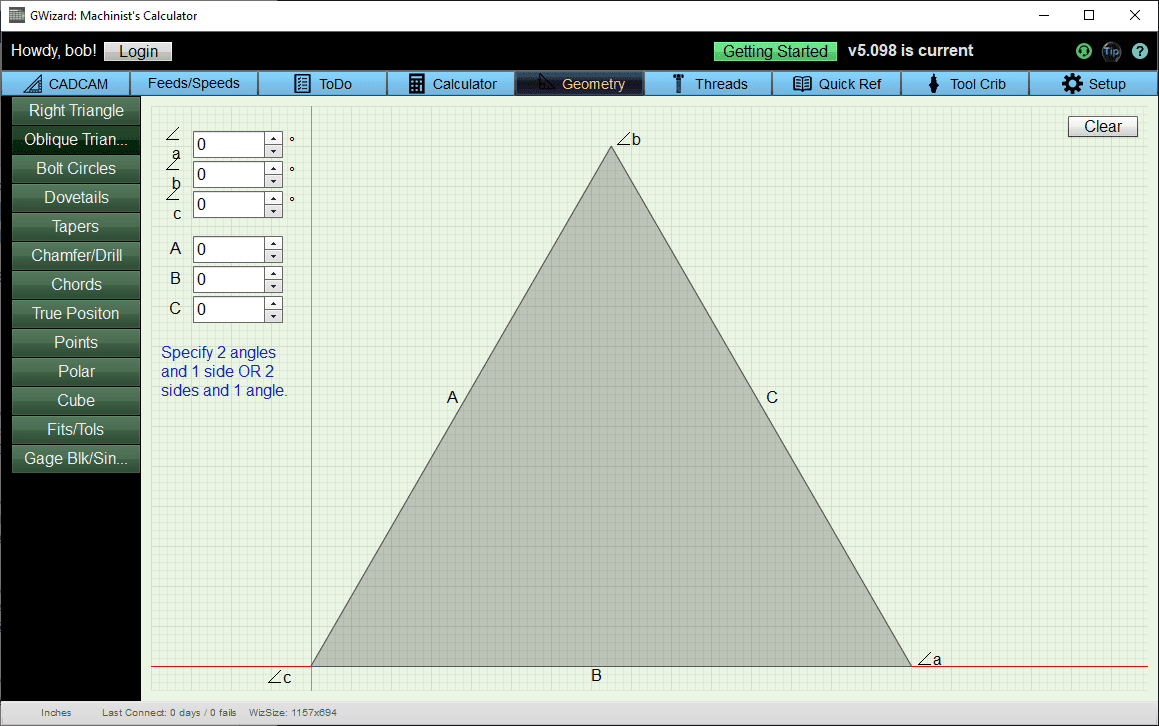
If your triangle has no 90 degree angle in it, you want the Oblique Triangle calculator. You have three choices to figure out all the parameters of an oblique triangle:
1. Enter one length and any 2 angles.
2. Enter two lengths and the included angle (the angle between the two lengths you specify).
3. Enter all three lengths and G-Wizard will figure out all of the angle.
When you've entered the parameters, press the "Calc" button to see the answers. Just like the Right Triangle, you'll need to press "Clear" and re-enter your parameters to try new values.
Bolt Circle Calculator
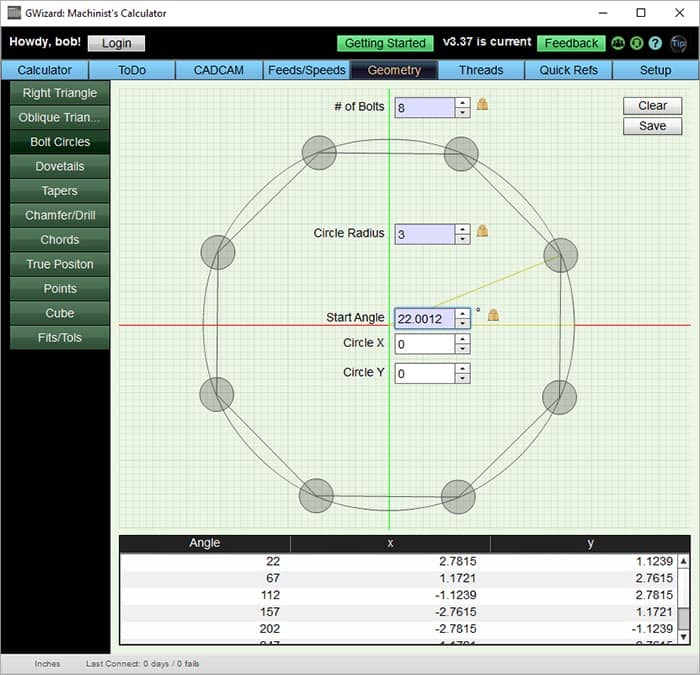
The Bolt Circle calculator will provide a table of the X and Y coordinates for the bolt centers. Start by entering number of bolts and circle radius. You can leave the other values as 0's and just press "Calculate" for a simple bolt circle centered at X=0, Y=0.
If the bolt circle's first bolt is not aligned on the X-axis from the origin, you can enter the angle off 0 for that first bolt. Lastly, you can enter a different Circle X and Circle Y to move the bolt circle off the 0,0 origin.
Press "Calculate" and the X and Y coordinates for the bolt centers will appear in the table. Press "Clear" to start a new bolt circle.
Dovetail Calculator
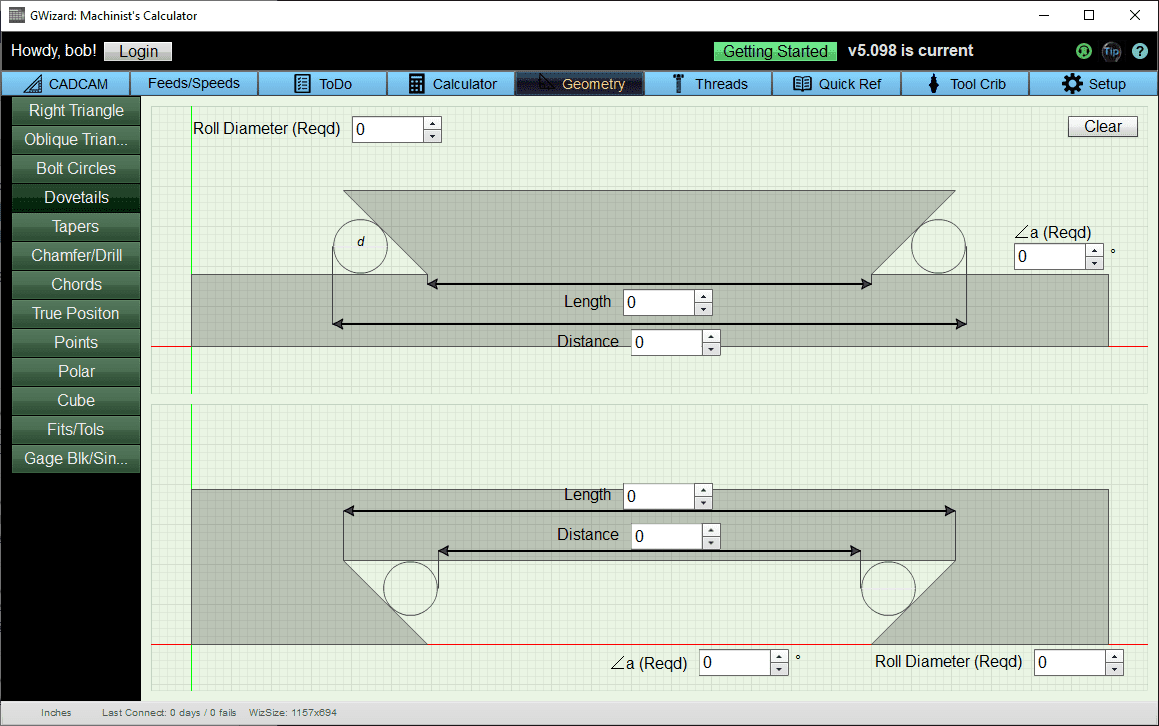
The Dovetail calculator lets you figure out the dimensions for male and female dovetails. Note that the two are independent (some have suggested they be made dependent), so you must enter parameters for both to see both sets of dimensions. To use the calculator, fill in the fields marked "Required" or "Red'd" and press the "Calc" button. To try a different set of parameters you'll need to press "Clear" and try again.
Taper Angle Calculator
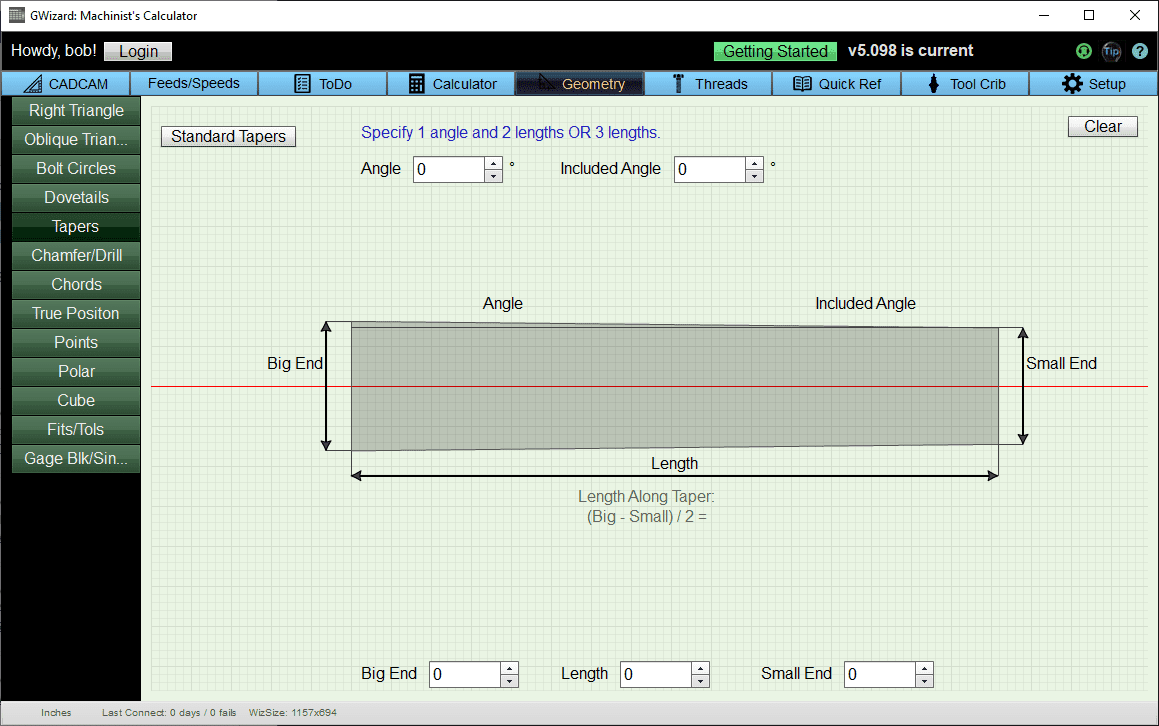
To use the Taper calculator you have several choices:
1. Choose one of the standard tapers by pressing the button. Standard tapers include MT (Morse Tapers), JT, Brown & Sharpe, and Jarno.
2. Enter a length, big diameter, and small diameter
3. Enter an angle, length, and either the big or small diameter.
Once you've entered the parameters, press "Calc" to see the rest of the dimensions filled out. To enter parameters for a new taper, press "Clear" first.
Chamfer Calculator, Center Drill Calculator, Countersink Diameter Calculator
The Chamfer and Drilling calculator provides functions for a variety of tools including spot drills, center drills, twist drills, chamfering tools, and countersinks.
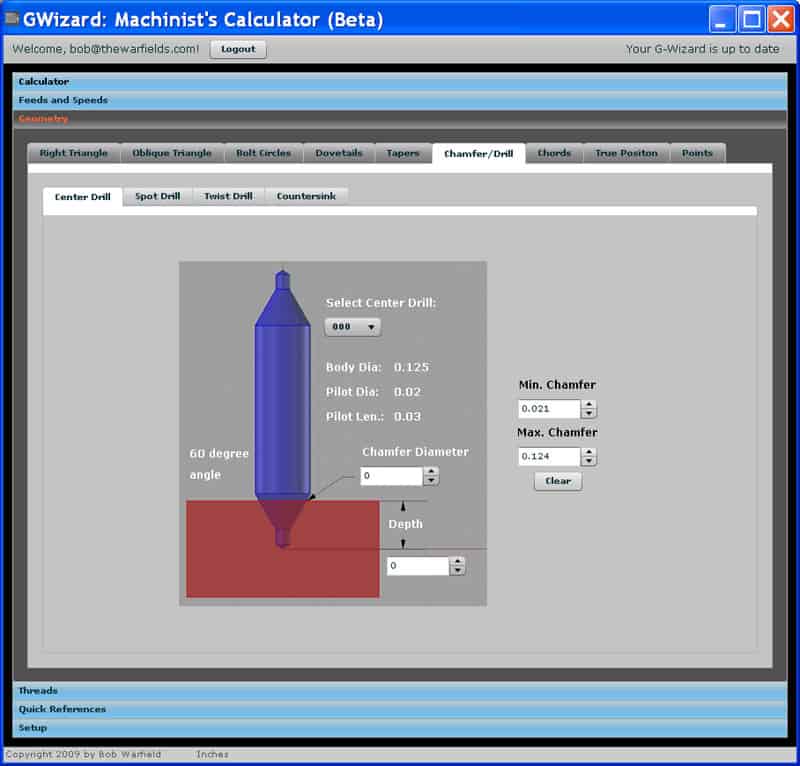
To use the Center Drill calculator, choose a center drill from the list. That will determine the drill's Body Diameter, Pilot Diameter, and Pilot Length as well as the Minimum and Maximum recommended Chamfers that can be achieved. Next, enter the desired Chamfer Diameter and the calculator will figure the depth needed to achieve that Chamfer Diameter. Or, enter a depth and the calculator will determine the Chamfer Diameter that results from that depth.
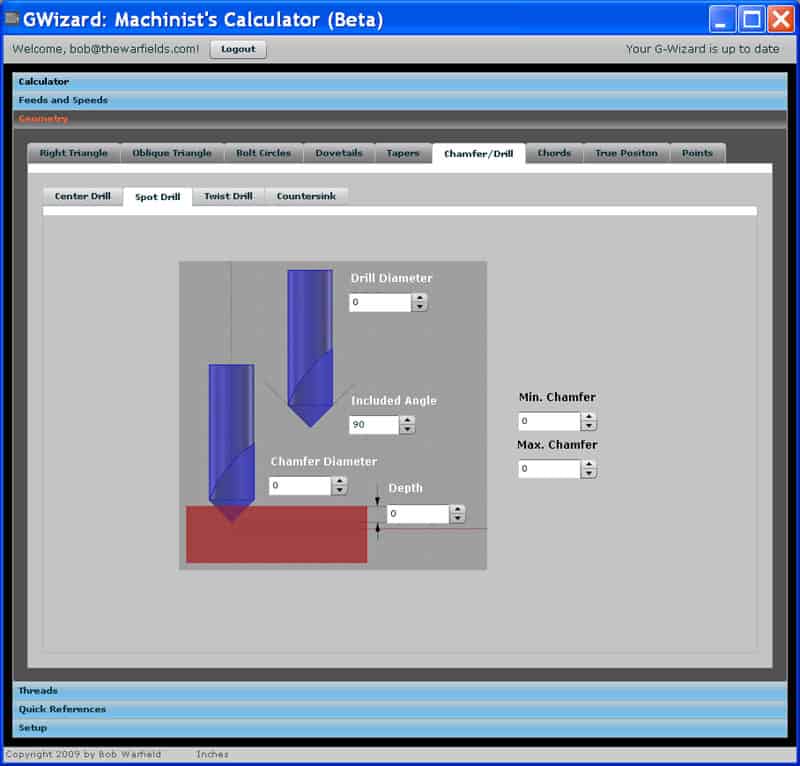
To use the Spot Drill calculator, enter the Drill's Diameter and Included Angle. That will determine the Minimum and Maximum Chamfers possible with that spot drill. Next, enter the desired Chamfer Diameter and the calculator will figure the depth needed to achieve that Chamfer Diameter. Or, enter a depth and the calculator will determine the Chamfer Diameter that results from that depth.
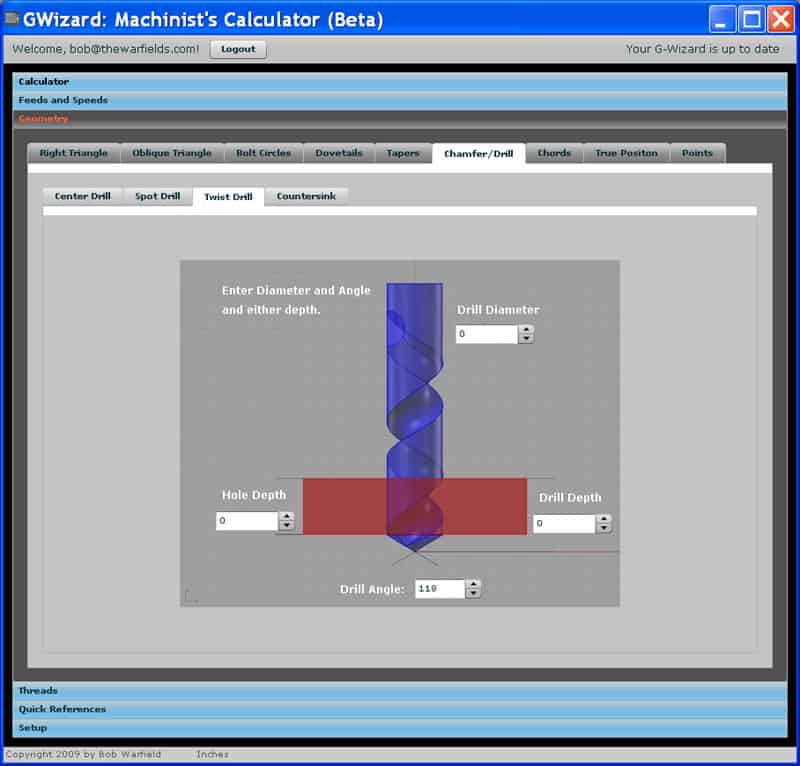
The Twist Drill calculator is useful for determining how deeply you must drill to full break through the hole or to reach a particular blind depth to full drill diameter. To use it, enter the Drill's Diameter and the Drill Angle (if it differs from the 100 degree default).
Now you can enter Hole Depth (the depth for full diameter) and see how much deeper the tip of the drill goes in Drill Depth. Or, enter a Drill Depth and see in Hole Depth the maximum depth that is the drill's full diameter.
Countersink Calculator:
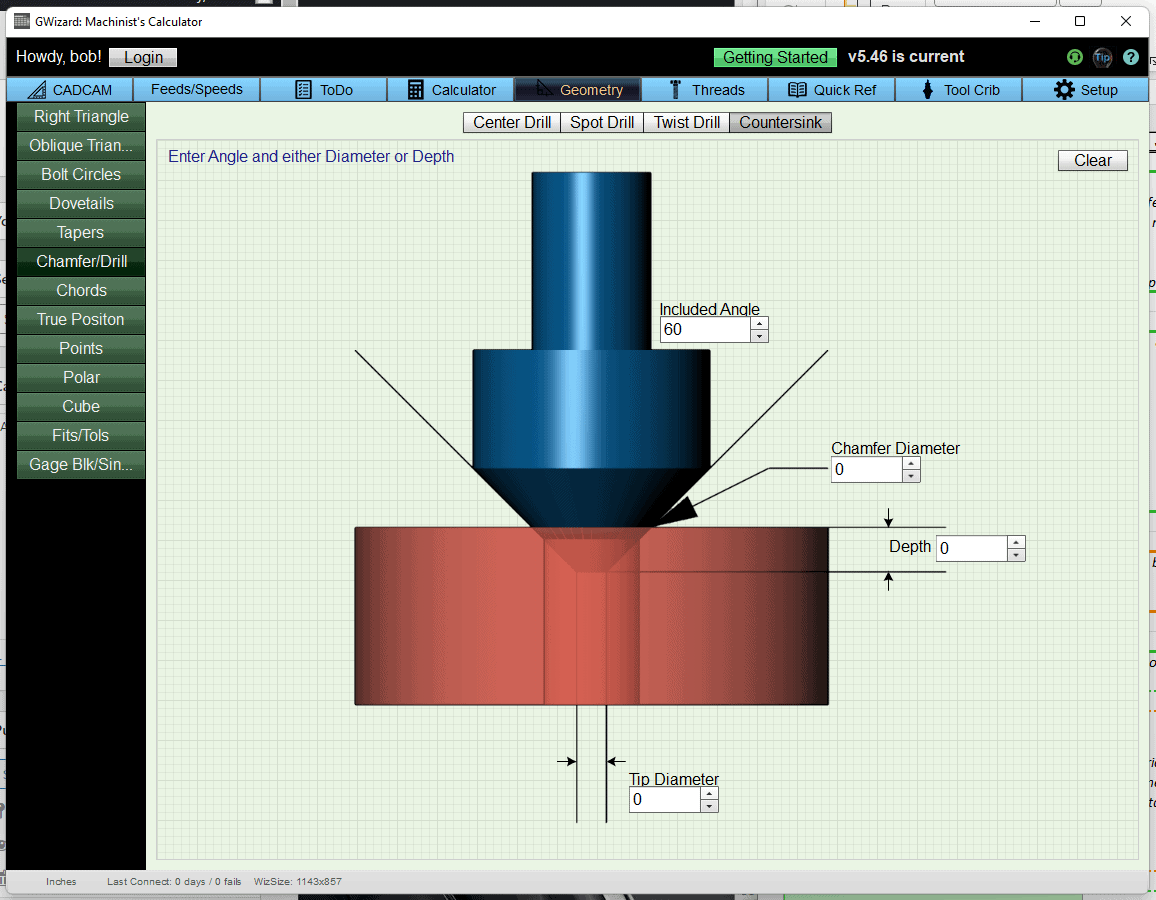
To use the Countersink calculator, enter the Included Angle of the countersink, and either the Chamfer Diameter or the Depth. More details here on Countersink Calculations.
Chord Calculator
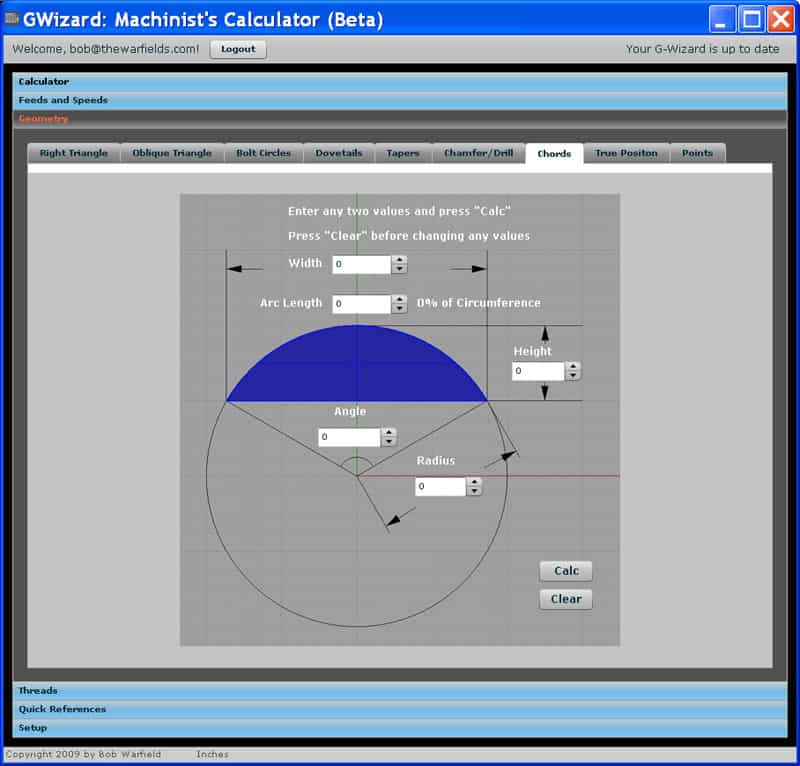
To use the Chord Calculator, simply enter any two of the five parameters and press "Calc". To try different values, press "Clear" first.
True Position Calculator

True Position (also called Position Tolerance) is a concept from Geometric Dimensioning and Tolerancing. It quantifies how far off a point in space is from its theoretically exact position. To use it, simply enter the error in X, Y, and Z and the True Position will be calculated in both Diametral and Radial forms. If the type of True Position is not specified, people almost always mean the Diametral form.
Distance Between Points Calculator
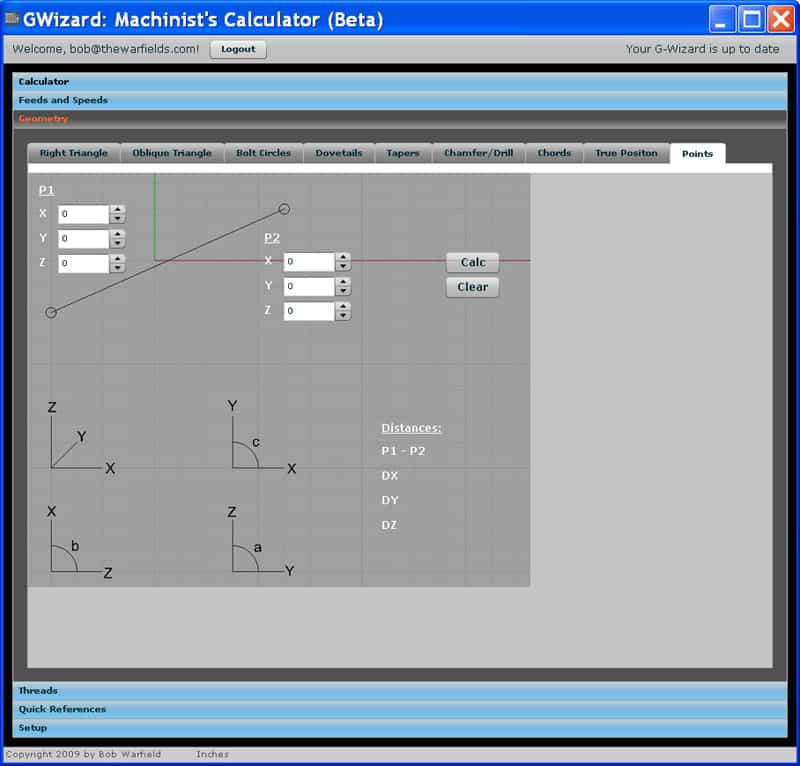
The Points calculator is handy for all sorts of problems involving CNC or a DRO. Enter the coordinates for 2 points and it will tell you the angle from P1 to P2 in the various planes. It will also tell you the distance between the points, including the amount of distance along X (DX), Y (DY), and Z (DY).
Ball Gage Calculator
Here are the two ball gage calculators that are included with a G-Wizard Machinist’s Calculator:
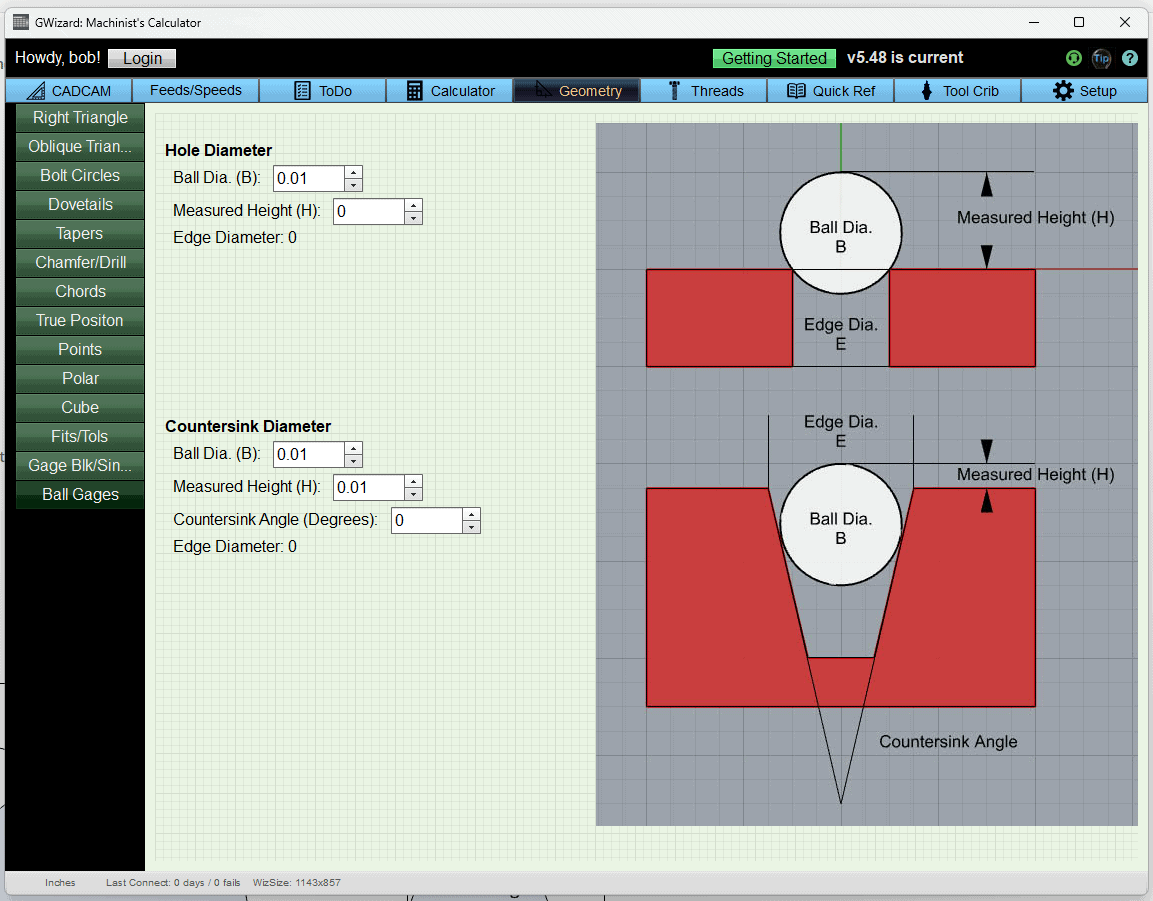
The Calculator is dead simple to use. Simply enter the Ball dia, measured height, and if using the countersink calculator the angle and the resulting diameter at the edge will be displayed. BTW, you’re welcome to continue using the geometry calculator after the free trial expires. Just consider it our gift to you for signing up;
Get Started with G-Wizard Now!
Turner's Cube Calculator
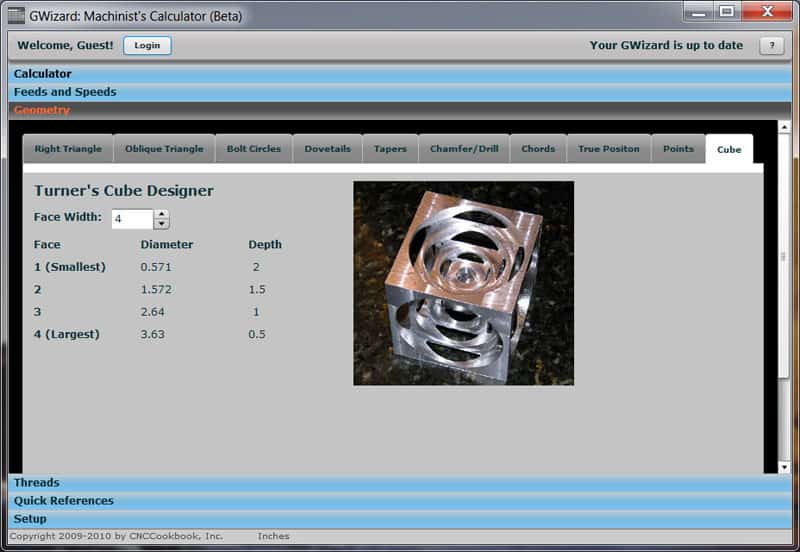
The Turner's Cube Calculator is accessed using the "Cube" tab. It makes it super easy to figure out the dimensions for Turner's Cubes. Just enter your desired face width and the necessary hole diameters and depths will be calculated.
Geometry Examples
How Much Error is Introduced if My DRO isn't Mounted Parallel to the Travel?
This is a common question. Most DRO's want you to take great care to mount your DRO exactly parallel to the travel. Consider the long travel of the X-axis on a mill. The longer the travel, the more an error in parallelism is magnified. Assume we have 30" of travel and wonder how far off the DRO can be for an accuracy of 0.001". Here's how to set that problem up in G-Wizard's right triangle calculator:
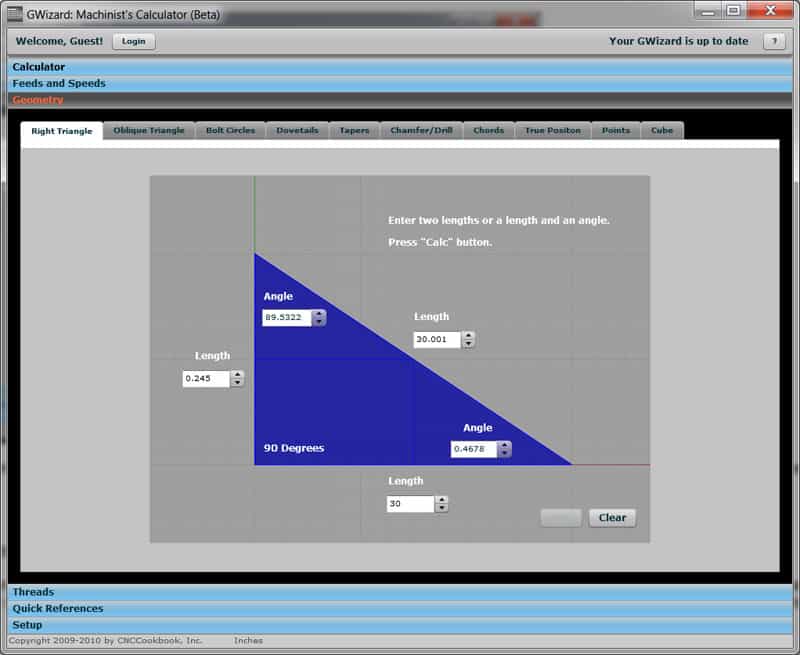
What's the allowable error in parallelism for a 30" long DRO travel to get 0.001" of accuracy?
Think of the bottom length of the triangle as being the actual machine tool axis, so we mark its length as 30". The top length is the DRO, which is cocked up at an angle because we didn't mount it parallel. Since we're looking at a maximum error of 0.001", we set its length as 30.001". Now the vertical length is telling us how far off the left end of the DRO can be relative to the place where it would be parallel. It's quite a lot for an error of a thousandth-almost a quarter inch.
Why then do the DRO manufacturers insist on their scales being mounted much more parallel? The answer is interference of the reader head. It can't afford to move around too much relative to the scale or something will get broken. It may also affect the head's ability to read the scale accurately. So, the mounting requirements have more to do with not breaking the DRO and letting it work right than minimizing geometric errors.
Threads have some of the most interesting and exacting geometry ever. Read about G-Wizard's Thread Calculator...
Be the first to know about updates at CNC Cookbook
Join our newsletter to get updates on what's next at CNC Cookbook.
