Note: This article is Lesson 8 of our Feeds & Speeds Master Class.
End Mill Coatings, Grades & Geometries? Why are some end mills so much more expensive, and are they worth it?
Every machinist must have wondered about this question at some point. Many develop fierce loyalties to the brand that has worked for them. Manufacturer's recommended speeds and feeds fall into bands depending on the material and type of cut, but they are not all the same. Different endmills really do perform differently, and they sure do come in a wide range of prices.
In this article, we'll take a look at the four main factors that cause end mills to perform differently: the grade or quality of the carbide they're made from, their geometry, the end mill coatings, and premium quality control. We'll also tell you the secret to evaluating the economics of whether premium endmills make sense for you or not.
This article is from a fairly general point of view. Certain materials, like Titanium, place very specific requirements on tooling if you want to be productive and competitive. Our article linked to the left gives you the full details on what's called for with Titanium.
Here's a video from my CNC Chef series for Cutting Tool Engineering that covers the basics:
Carbide Grades and Quality
Let's start with the material carbide end mills are made from. While end mill manufacturers frequently refer to their cutters as "solid carbide", in truth, they are more accurately called "cemented carbide". BTW, I don't think they're trying to pull the wool over anyone's eyes, marketing just can't resist more adjectives and you could as easily say they use "solid" to refer to endmills that don't use inserts.
Nevertheless, The material is not a solid metal at all, but a matrix composed of tungsten carbide (which itself is tungsten and carbon in equal parts) held together with a binder-typically cobalt. In addition, there may be a very thin end mill coating to further enhance performance. More about end mill coatings below.
As one would expect, it is the tungsten carbide and not the binder that does the serious cutting. Hence, a lot of the quality of the carbide is a function of how much tungsten carbide grains there are versus how much binder. Cheap carbide has a lot more binder than expensive high quality carbide. This can come about either by way of how the material is prepared or because of the grain size.
Manufacturers use terms like "sub micron" and "micrograin" to describe the better grades. As the grains of tungsten carbide get smaller, there are more of them relative to the binder.
Imagine a container of ball bearings. Suppose we fill one container with large balls and another same-sized container with much smaller balls. Then we proceed to fill each container with water until it is full to the top. Which container can hold more water? The container with the larger balls has more space between the balls for the water, and hence holds more water. Think of the ball bearings as the tungsten carbide grains and the water as the binder.
Here is an illustration of this large grain/small grain packing phenomenon:
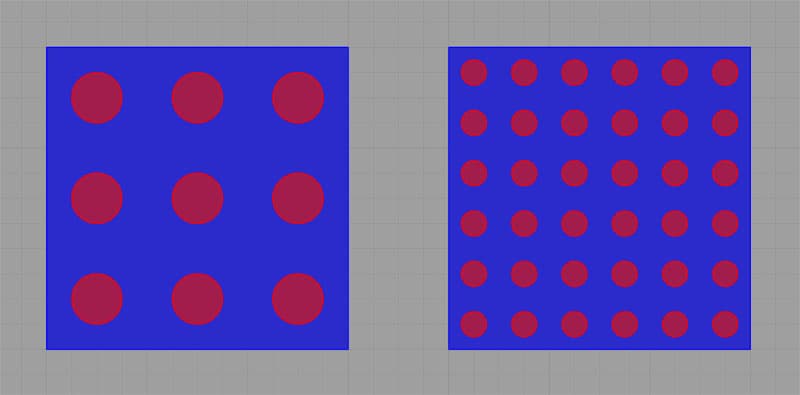
Smaller carbide grains are better for end mills because you get more carbide and less filler...
As it turns out, the smaller grained cemented carbide formulations are more expensive to prepare, especially if the highest quality standards are maintained. Yet, by doing so, we get much better performance from our cutters. They stay sharp longer because they expose more of the extremely hard and heat resistant tungsten carbide and less of the relatively delicate filler.
By the way, some of the best carbide grades are made from carbide recycling, plus it takes 70% less energy to use recycled carbide.
Geometry
 Geometry is a huge determinant of end mill performance, and there is a lot to cover. Exotic geometries serve many functions and we can't possibly describe all the many variations out there in one article, but let's go through a few of the more common examples.
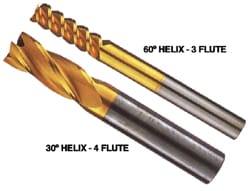
Let's start with the basic helix itself. We have high helix, low helix, roughing/finishing helixes, and variable helixes. What does it all mean and what does it do for the machinist?
The "high" and "low" terms refer to the helix angle of the endmill. Imagine the angle between the edge of the helix (the spiral flute) and the flat bottom of a standard endmill. A low helix endmill has an angle of 35 degrees or less whereas a high helix endmill has more than 35 degrees. A good roughing + finishing in one cutter compromise is a 38 degree helix angle. The highest helix angle possible would be a straight flute cutter like some CNC router bits. If you're familiar with their disadvantages, you may be wondering what the pros and cons of high versus low helix cutters are:
High Helix Advantages:
- Cutting forces are directed more vertically and less horizontally, which reduces tool deflection.
- Chips are evacuated more quickly.
- Axial rake is more positive, which makes for better shearing and lower cutting forces. This typically means they can be fed faster. The lower cutting forces mean lower horsepower requirements.
- The core of the tool is thicker due to the shape of the helix, so therefore the tool is stronger.
High Helix endmills are typically used in tougher harder materials because they wear better, although they can also be used in aluminum.
The biggest disadvantages of High Helix endmills are that they tend to chatter more, and they really bite into the material. With soft materials, they're much more likely to pull out of the holder. Surface finish may also suffer relative to a low helix design.
Low Helix Advantages:
- Less likely to chatter
- Typically perform better in soft materials
Their disadvantage is that for their target tough materials, they have lower feedrates and hence lower material removal rates.
Variable Helix end mills are considered state of the art these days. The idea is to vary the helix along its length in a couple of ways. The flutes may not be evenly spaced and the helix angle may vary along the length. The goal of the variable helix is to fight chatter. Since chatter is a resonance effect, anything we can do to break up the resonance of the flutes beating against the workpiece will reduce chatter.
Varying the flute spacing means they don't hit on a regular beat, for example. Now to make it even trickier, most designs will orchestrate the variable spacing of the flutes with the helix angle so that the combination of the two means the flutes are equally spaced but that spacing is different at every point along the length of the tool to reduce the chatter. Needless to say, there are many variations among manufacturers, many patents, and a whole lot of potent voodoo magic!
Another variety of exotic geometry involves various tweaks that affect the rake of the edge. As mentioned, more positive rake like we find in a high helix has a lot of benefits. For starters, manufacturers employ variable rake along the edges as yet another way to fight chatter. Too much rake leads to a weak tool. But wait, there is a technique called a "ski-flute" that puts a little dish right under the edge to provide maximum rake at the edge while keeping more core strength characteristic of lower rake designs.
Some manufacturer's put chip-breaker type features inside the flute to help performance too. Check out Mitsubishi's MSTAR high helix end mills for one example.
How about a chamfer or corner radius end mill? Typically these features prolong tool life and may also enhance surface finish. End mills that lack these treatments are called Square End Mills or Flat End Mill.
And while we're at it, how about a serrated roughing end mill?
We've barely scratched the surface on end mill geometries. By now you must be getting the idea that it gets very complex. With that complexity comes increased manufacturing costs. Adding all these clever features means each endmill requires a full-fledged CNC tool grinder. And, the more complex the features, the longer and more difficult will be the grind. Micro-polishing the edges is yet another treatment that could be regarded as geometry and that certainly adds more grinding time. Sharpening a modern endmill is no longer possible with a manual tool grinding machine. If you try it, you'll just destroy the exotic geometry the cutter was meant to have.
End Mill Coatings
 The cheapest way to improve the performance of an endmill is to add a good coating.
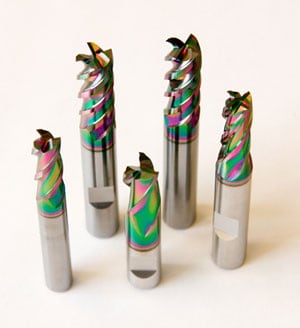
Some end mill coatings are nothing short of magic when it comes to their performance impact. G-Wizard calculator's default surface speed is 20% higher for a TiAlN coated end mill versus an uncoated carbide end mill, and that's on the conservative side. These days, TiAlN is very mainstream, and there are much more exotic coatings out there such as the Hydrogen Free Diamond Like Carbon coating featured in the image to the right.
In addition to higher material removal rates, the right coating can extend tool life, particularly when used in exotic materials like hardened stainless or aerospace materials. Considering how short tool life can be in such materials, the extended tool life is always welcome.
Coatings are often proprietary in nature, and even the same chemical composition may not guarantee the same results. I don't want to get into a big discussion of coatings here. Since they are proprietary, the finer points are often not well documented anyway. Suffice it to say coating is another way to add performance and cost to a cutter.
Tool Coatings for Ferrous and Exotic Materials (Titanium Alloys, Stainless Steels, Hardened Steels, etc.)
Where exotic materials such as Titanium Alloys are concerned, a good tool coating is not an optional luxury. It's a requirement to achieving reasonable tool life. These difficult to machine materials will do their hardest to destroy your end mills through excessive heat and highly abrasive textures. Uncoated tools have a very hard time operating under such conditions.
TiN
TiN or Titanium Nitride, is a good general-purpose coating for machining ferrous materials. Its maximum working temperature of 1000F is less than AlTiN's and it is also not as hard as AlTiN, so it is less durable and will likely have shorter tool life. It will also be somewhat less performant. That said, TiN improves wear resistance vs uncoated tools and it can also aid in decreasing built-up edge during machining because it improves lubricity.
TiCN
TiCN, or Titanium Carbo-Nitride, is good for cast iron, aluminum alloys, steel, tool steels, copper, Inconel, and titanium alloys.
AlTiN
AlTiN, or Aluminum Titanium Nitride, is a performance tool coating for ferrous materials. It has a high working temperature of 1400F and it is very hard. It's great for dry machining due to its increased lubricity. It is also great for titanium alloys, Inconel, stainless alloys, and cast iron. AlTiN and derivatives like AlTiN Nano are an excellent choice for high heat applications.
AlTiN Nano
AlTiN Nano, or Aluminum Titanium Nitride Nano, is a premium coating for ferrous applications. Compared to AlTiN, it adds silicon to further increase the max working temperature to 2100F while also increasing hardness for longer tool life. It is ideal for hardened steels, hardened stainless alloys, tool steels, titanium alloys, and aerospace materials. These are all applications that can create high levels of heat.
Note that ALTiN and AlTiN Nano are not recommended for use with Aluminum or Aluminum Alloys due to their high affinity for such materials.
Tool Coatings for Non-Ferrous and Non-Metallic Materials
TiB2
TiB2, or Titanium Diboride, is an excellent general-purpose coating for non-abrasive aluminum and magnesium alloys. It has a very low affinity for aluminum compared to other coatings. It has a max working temp of 900F, which is fine for aluminum applications. However, TiB2 is not recommended for abrasive materials as they can cause micro-fractures that may damage the tool at high RPMs.
ZrN
ZrN, or Zirconium Nitride, is an abrasion resistant coating with high hardness. It's max working temp is 1100F with strong lubricity. this is ideal for abrasive materials like Brass, Bronze, and Copper, as well as abrasive aluminum alloys such as high silicon aluminum.
CVD Diamond Tool Coatings
CVD diamond, also called Crystalline CVD Diamond, is a process where the diamond coating is directly grown on the carbide end mill. This process dramatically increases hardness which improves tool life and abrasion resistance. This allows for higher feed rates. There is a trade off in that the coating process rounds the cutting edges making them slightly less sharp.
CVD is best suited for highly abrasive materials like graphite, composite materials, green carbide, and green ceramics. Their max working temp is only 1100F, so they're not suited to most ferrous applications.
Amorphous Diamond
Amorphous Diamond is a PVD diamond coating process, which keeps the cutting edges sharp. This makes the coating most useful in abrasive plastics, graphite, carbon fiber, and aluminum and aluminum alloys with high silica content (due to their abrasiveness). The max working temp is only 750F, and the coating thickness is not very great.
PCD Diamond
PCD Diamond, or Polycrystalline Diamond, is more a tool material than a coating. The material is actually brazed onto the carbide body. So, there are no compromises with respect to edge sharpness. In other words, it has the abrasion resistance of CVD together with the sharper cutting edge of Amorphous Diamond. This coating is well suited to all forms of abrasive, non-ferrous materials including abrasive plastics, graphite, carbon fiber, and composites. It has a max working temp of 1100F, which is too low for ferrous applications.
Premium Quality Control
 Suppose you decide to purchase a particular make and model of endmill. They arrive and you discover that their diameters differ by 2 -3 thousandths of an inch. Now you're going to have to measure each one and make sure there's a proper offset loaded on the machine so it knows the diameter of each cutter.
Wouldn't it be nice if the cutters were made to tight enough tolerances that for most jobs you didn't have to check and adjust for each one's specific dimensions?
That's the value of Premium Quality Control.
Here's another one. Suppose you've tested an endmill within an inch of its life and you know exactly where the maximum performance edge of the envelope is. You're happily cranking out parts and making bank because of how fast those slick new cutters can go. You reorder another batch of them and BANG!
All of a sudden you're dodging broken endmill shrapnell. What happened? More testing and you find the latest batch can only go 20% slower.
That variation costs you money, because you can't go as fast as you thought and because you now have to either live with much more conservative feeds and speeds or take time to test each batch. Maybe even each endmill.
Again, that's the value of Premium Quality Control. Consistency and predictability is worth a price tag.
Are Premium Cutters Worth the Money?
Take the most expensive grade of carbide, the most exotic geometries that require complex CNC grinding to produce. Add a killer coating applied with the latest state-of-the-art techniques and machinery. Inspect each cutter to verify consistent tight tolerance dimensions and performance.
Voila! You've just produced a recipe for a modern super cutter.
By now, you should be able to see both why it is a better endmill from a performance standpoint and also why it costs more to make them. Those bargain basement imported end mill sets don't have any of these things going for them. But do you really need a super end mill in your shop?
Lean forward and let's drill down on this question carefully, because it's not obvious until you run the numbers.
First, if you're a hobbyist, premium endmills are probably not worth it. You're not trying to make money and your machine isn't powerful enough or rigid enough to handle the performance these endmills can deliver. What you want are not cheap endmills-they will make your life harder. You want value endmills that are reputable, but that don't have nearly all the premium features discussed above.
That just leaves folks with shops, and I have an interesting story for you. Here's the breakdown of where the costs are for a typical part being machined:
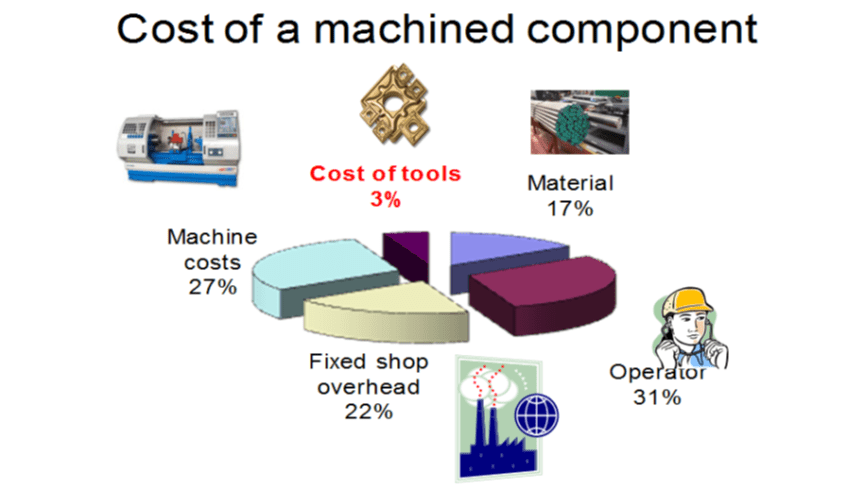
Cost breakdown to machine a part. Source: MSC.
Some machinists are reporting cases where an endmill that costs 3x as much lasts 5x as long. Clearly they're coming out ahead by purchasing a more expensive endmill. But if we look at the costs chart, that's really not where the big savings comes from.
Your tooling costs 3% of the job's costs. Material costs are 17%. Every other cost is a function of time.
That's really important, so let me say it again:
Time-related costs are 80% of the cost of machining a part!
Now here's the real math behind premium endmills:
- Double the cost of your cutting tools and make it 6%
- If you get 25% higher Material Removal Rates and save 25% of time, you just saved 25% (time saved) * 80% (time-related costs) = 20%
In other words, by spending an extra 3% to buy premium tooling, you're saving 20% on costs. The difference can go straight to your bottom line.
Have I got your attention? Are premium cutters a little more interesting?
Most shops should at least look at the impact premium cutters can have on jobs.
While you're at it, don't forget that there's more to life than just end mills. Have a look a premium twist drills too, for starters. Carbide Drill speeds and Feeds are considerably higher than HSS and Cobalt models.
How do I set up G-Wizard for Premium Cutters?
I thought you'd never ask!
BTW, just having good feeds and speeds can make virtually any cutter perform better. I surveyed our customer base to see how much they think G-Wizard helped, and I was shocked at what they told me:
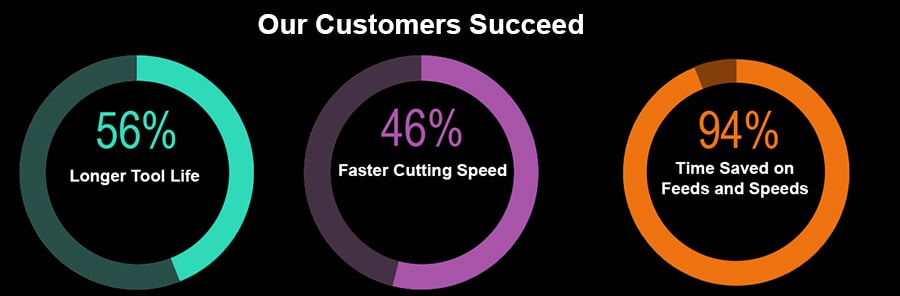
Just remember the impact of saving even a little bit of time on jobs from the discussion above and you'll see why more than one customer told me they saved tens of thousands of dollars during the free trial alone. Plus, if you're going to buy premium cutters, shouldn't you have a tool that helps you maximize their performance under every situation?
Enough of that. How does G-Wizard handle premium cutters for even more performance?
Let's start by talking about where G-Wizard gets its defaults. We analyzed tooling from over 200 manufacturers. All of their tooling catalog data for surface speeds, chiploads, and so forth was entered into a database. Each manufacturer had multiple lines (coated, uncoated, special geometry, etc.), and each of those got its own category.
We then grouped similar tooling along a few dimensions:
- Premium or Standard Geometry
- By Coating
- By Material
- Same # of Flute (i.e. we didn't mix 2 and 3 flute aluminum endmills)
A typical group might have tooling from 5-20 manufacturers in it. We then applied a proprietary statistical analysis to the data that aimed to eliminate outliers and generate conservative results.
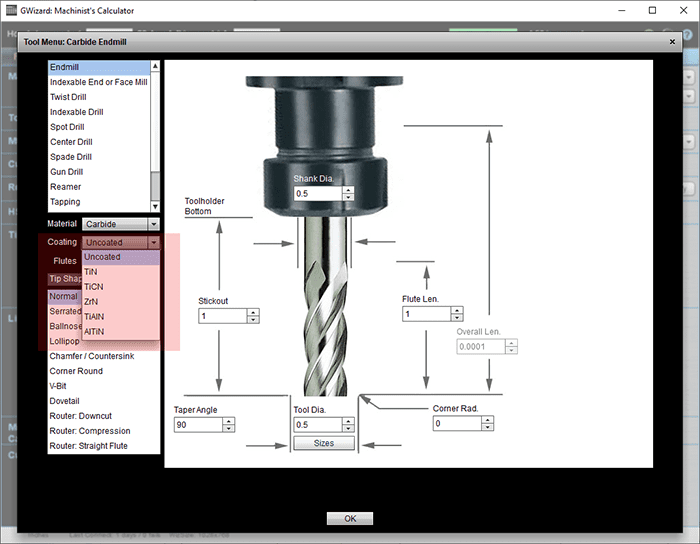
You select the tool by telling G-Wizard some key things.
Tool Material (what's the tool made of - HSS, Carbide, Cobalt, or PCD (Diamond)?)
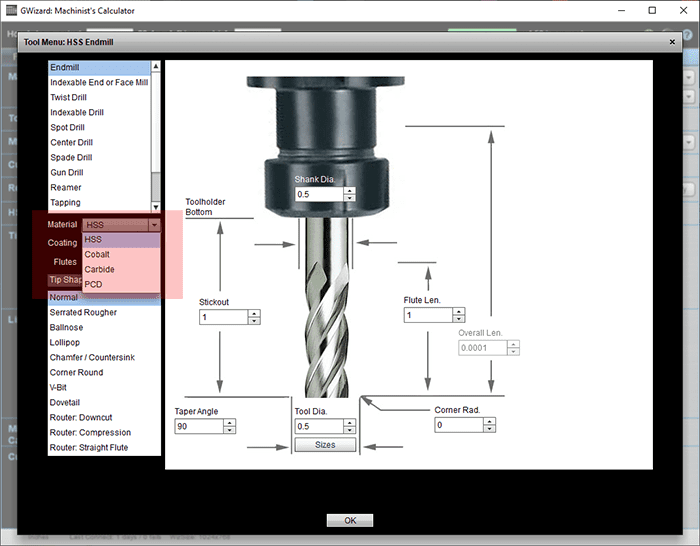
What's the Coating?
Those are G-Wizard's defaults. They work great and you will seldom break a tool. I call them "Toolroom Feeds & Speeds" because they're perfect for low volume product where you want really reliable numbers more than ultimate performance. I can't imagine why a beginner or hobbyist would ever want more, and even experts report awesome savings just because G-Wizard does such a good job optimizing feeds and speeds in other ways.
But, you've paid the price for Premium Cutters. By definition you do want more.
Not surprisingly, G-Wizard gives you a number of ways to get there. To learn about them in detail use the "Getting Started" tour called, "Manufacturer's Data":
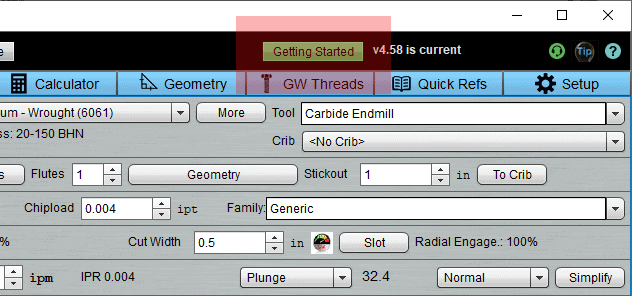
That tour will show you a couple of approaches. If you just want to quickly do some calculations for a particular cutter, you can enter the Manufacturer's Data in the Mfg row:

The tooling catalog will have a lot of different data, and in particular the surface speed and chipload will often appear as ranges. Give G-Wizard the most aggressive end of the range. So, if the endmill says it is good for 800-1600 SFM, give G-Wizard 1600.
G-Wizard is really good at adjusting these numbers for actual cutting conditions-much better than the manufacturer's tables.
OK, that works, but it's kind of a hassle. Do I really have to look that stuff up every time I use an endmill and plug it in?
Good news-G-Wizard has multiple ways to make it easier. First, you could stick the tool in a Tool Table where you can call it up any time. Second, you can use the "Family" feature. Basically, with "Family", you tell G-Wizard about a few of the cutters, say a 1/8", 1/2", and 3/4" end mill from the same Family. It will then learn from that automatically how to deal with other sizes.
It saves you a lot of data entry. The easy way to deal with premium cutters is as-needed. Create the families or the Tool Table entries (Tool Tables can use Families too) as you use the cutters in the job. You only have to do it once, the first time, then it's there going forward.
Are you curious which End Mill brands people buy and why?
Check out our annual End Mill survey for answers.
Be the first to know about updates at CNC Cookbook
Join our newsletter to get updates on what's next at CNC Cookbook.