Quick Wood Cutting with a Shapeoko, Example 4: CADCAM Wizards
We've gone through the basics of Feeds and Speeds calculation. Sure, there is a lot more we could delve into.
But before we do that, I promised I'd show you how to get G-Wizard Calculator to optimize almost everything about your cut.
This is done using an exclusive G-Wizard feature called, "CADCAM Wizards." Just click the CADCAM tab to access it.
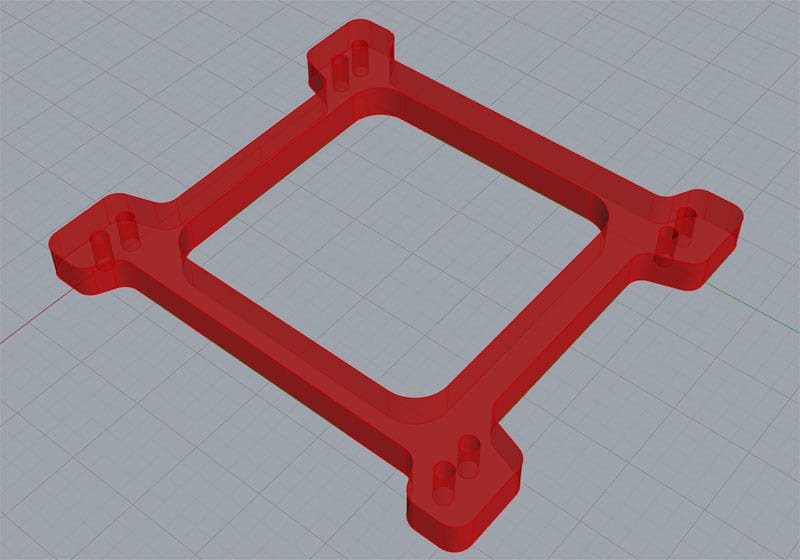
Let's stick with our example of cutting through 1/2" plywood on a Shapeoko. And, let's keep that same part shape:

Cutting outlines like that is what many CAM programs call "2D Profiling." Another name for the same thing is "2D Contouring", which is what Fusion 360 calls this operation.
The CADCAM Wizards feature is designed to "think" like CAM software. It asks as few questions as it can and then optimizes everything automatically. You do give up some control, but Beginners don't need that control, and Pros can take the parameters from CADCAM Wizards, plug them into Feeds and Speeds, and hand twiddle to their heart's content.
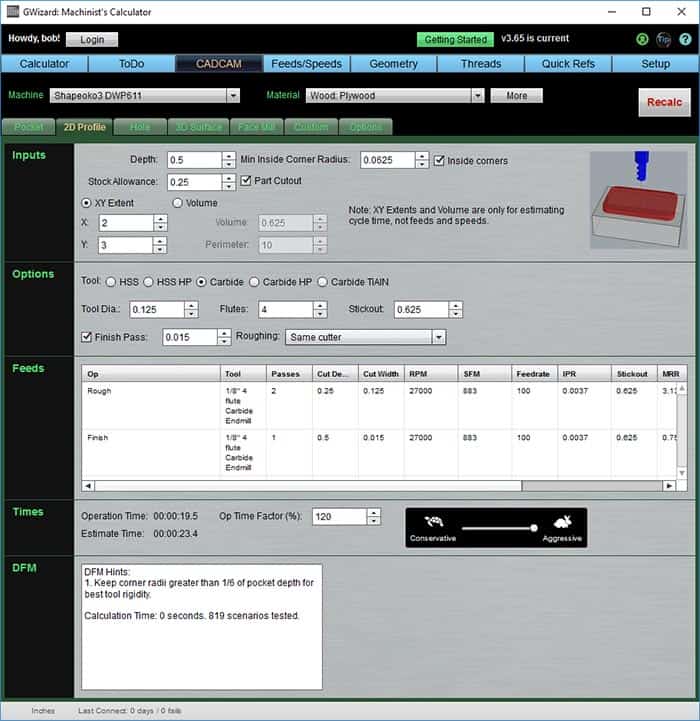
Here is the basic setup for our problem of cutting that shape out of 1/2" Plywood on a Shapeoko:

Here's our plywood cutting problem in CADCAM Wizards...
Whoa! That looks a lot different, doesn't it?
Here's how I set up the problem.
1. Go left to right, top to bottom, just like with Feeds and Speeds.
2. Select a Machine.
3. Select a Material.
4. Choose an operation from the tabs. In this case, I selected "2D Profile".
5. Tell it the depth of the profile. We're cutting 1/2" Plywood, so the depth is 1/2".
6. Tell it about inside corners. As in the first example, I am assuming the corners are tight enough to require a 1/8" endmill, so the radius is half that.
7. Stock allowance is how far from the edge the stock ends. I'm leaving 1/4".
8. Click "Part Cutout," because we're cutting out the parts.
9. Click the "Recalc" at top right.
That's all we need. The rest of it is for fine tuning and for estimating how long it will take.
That's pretty simple, right? Other than needing to know the operation type, it's also very basic information anyone can come up with. The operation types are simple too, and there's a picture to help you understand what's meant by each operation.
The "Recalc" button turns red whenever you change anything. Just click it to recalculate everything. What you get is a complete "Cut Recipe":
- The tool you need is called out.
- Feeds and speeds for both a roughing and finishing pass are listed.
- Cut Depth and Cut Width are automatically optimized.
Note how all of the little problems we had to manually deal with under regular Feeds and Speeds were automatically handled by CADCAM Wizards.
Pretty slick, eh?
See how under the DFM Hints it says it tested 819 scenarios? That means it tried over 800 combinations of variables in the Feeds and Speeds tab and chose the best ones for you.
Who has time to try 800 scenarios? Let the computer do that, it's what it's good for!
When I'm working on a CNC problem, I generally like to start with CADCAM Wizards. They save me a lot of time. I sometimes wonder if I should teach them first to beginners. They're very unconventional-you won't find anything like them outside G-Wizard. I worry that because they're unconventional, I should teach the "regular" Wood Feeds and Speeds Calculator first, so that's what I did here.
We'll delve into some more learnings for Beginners in our next example. Click below to check it out.
Examples Home Page:
Beginner's Examples:
Example 1: Quick wood cutting with a Shapeoko
Example 2: Fine Tune Your Cuts with Tortoise and Hare Slider
Example 3: Avoid Tool Deflection with Cut Optimizer
Example 4: The Easiest Feeds and Speeds Ever: CADCAM Wizards
Experienced CNC'ers Examples:
Example 1: How much faster can I go with High Pressure Through Spindle Coolant?
Example 2: Playing "What-If" to optimize MRR's
Example 3: Optimizing Cut Width and Cut Depth for Higher MRR's and Better Tool Life
Example 4: Mastering High Speed Machining
CNC Router Examples:
Example 1: Figure out proper Feeds and Speeds to cut walnut plaques.
Example 2: Feeds and Speeds that won't pop small parts off our vacuum table.
Example 3: Downcut and other special router cutters.
Note: Many of the early Beginner's Examples use a small Shapeoko CNC Router too.
Be the first to know about updates at CNC Cookbook
Join our newsletter to get updates on what's next at CNC Cookbook.