Refer to where we left off in the first example:

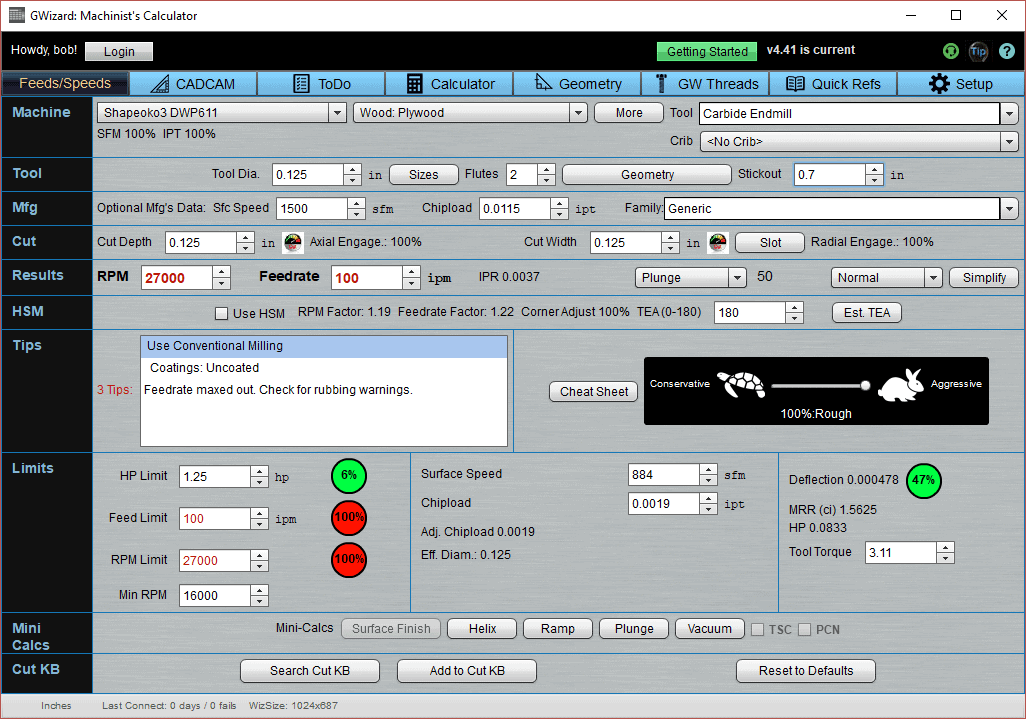
Here's where we left the first example...
All is well there (we talked about what the remaining red means and why we can safely ignore it).
In this example, I want to give you a feel for the Tortoise-Hare slider. You know, that thing in the lower right with the Tortoise and the Bunny. It's a really handy thing to have for fine tuning your cuts.
You'll notice that by default, it is set to "100% Rough." That's what I call "Full Hare." That's the maximum aggressive setting for roughing out material quickly. If you grab the slider and drag it all the way left, or click the Tortoise, you get "Full Tortoise." It looks like this:

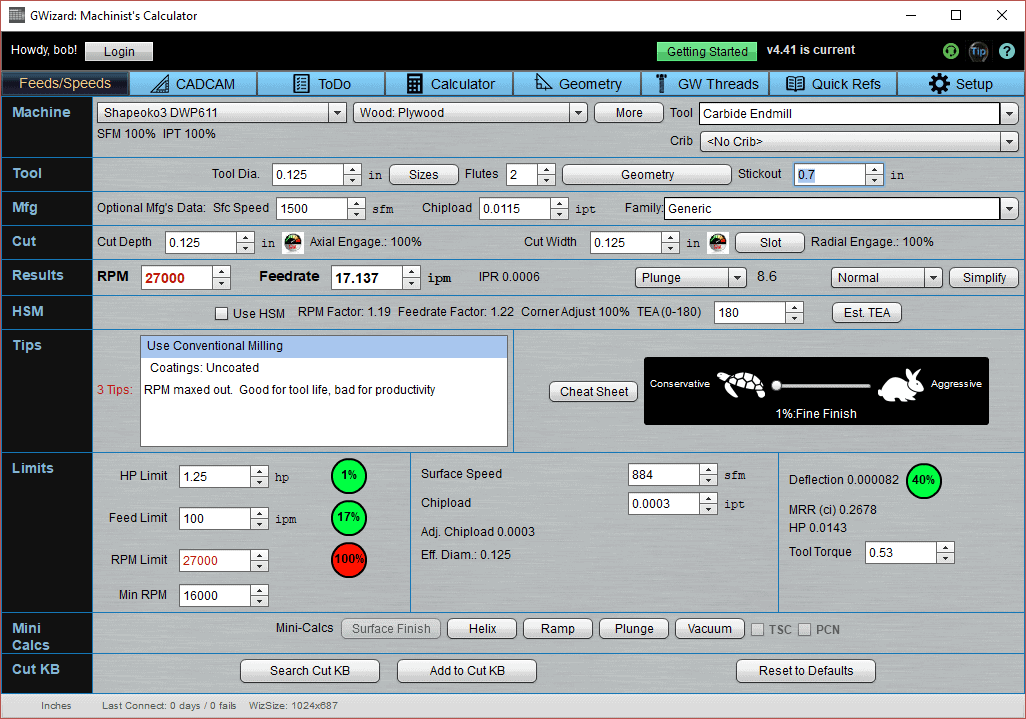
"Full Tortoise" is quite different from "Full Hare"...
What happens when we go from "Full Hare" to "Full Tortoise?"
Well, first thing is the label on the slide changed from "100% Rough" to "1% Fine Finish". There are 100 steps in the slider that go from 1% to 100%. Think of them as "aggressiveness" steps, or steps in surface finish from "Fine Finish" to "Rough."
1% is a very special position. It is the slowest you can feed the cutter into the material without getting a rubbing warning under Tips. Rubbing is very bad for tool life, and we explain why and what is meant by rubbing in chapter 4 of our Free Feeds and Speeds Course. The key takeaway for Beginners is that feeding very slowly makes things more conservative to a point, and then it starts to destroy tools. The reason is if a tool slows down too much, it takes too shallow a cut. Instead of slicing a chip cleanly off, they start scraping along on top and rubbing in the process. This generates heat which dulls the tool.
G-Wizard will warn if it thinks there is a rubbing danger and you should always heed that warning. Sometimes, you can get a little rubbing and especially on materials like wood and plastics that burn or melt, this can show up before G-Wizard warns. If that happens, pick up the feedrate by moving the Tortoise Hare slider a little more to the Hare.
Most of the time, you won't need to make use of that #1 "Full Tortoise" position. It's just too slow. Try a few steps just to the right. You can use the right and left arrow keys to fine tune the Tortoise-Hare Slider one step at a time.
If we compare some of the other values, we can see that while RPM is unchanged, our Feedrate has slowed way down. It went from wanting to go faster than we can go (over 100 inches per minute) to 17 inches per minute.
Note that the MRR value is now 0.2678 instead of 1.5625. That's how many cubic units of material are being removed per minute. It's cubic inches in Imperial and cc's in Metric.
Spindle power went from 0.0833 to 0.0143, so a lot less power is required for this FIne Finish cut.
BTW, less power used means less power converted to tool deflection. We still need to reduce stickout from 1" (as in the first example), but not by as much at this fine finish level.
The Tortoise-Hare slider is a great way to get fine control over how aggressive your cut is. But, while it can help with things like Tool Deflection, it's influence is limited in terms of how much less aggressive it can make a cut before rubbing becomes a problem.
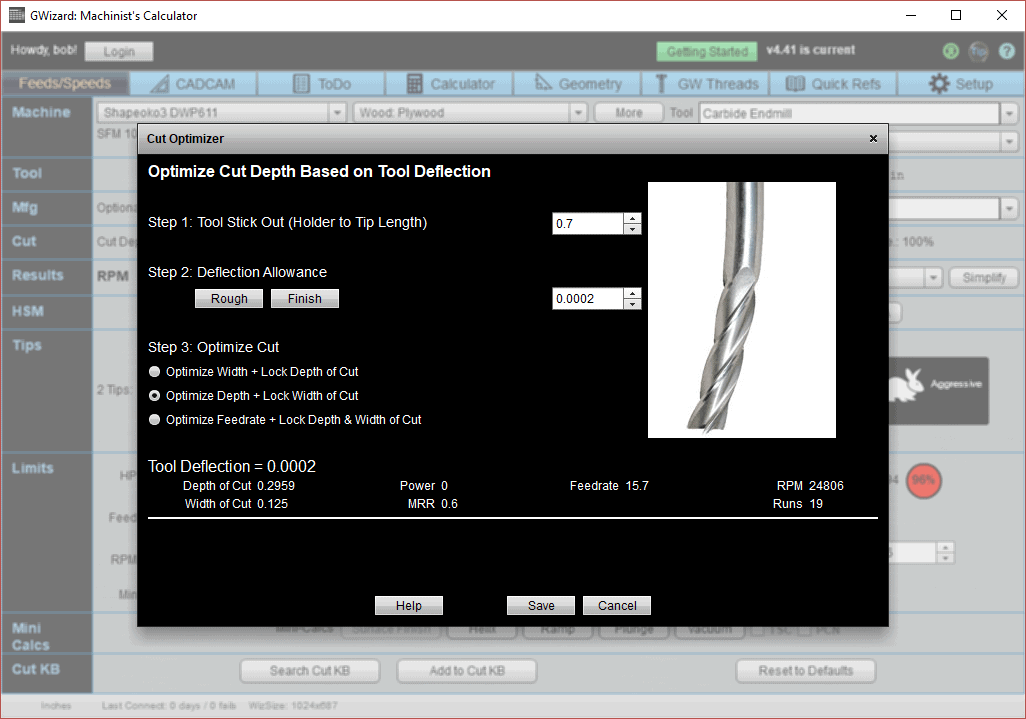
A much more powerful tool for eliminating excess deflection is what we call the "Cut Optimizer":

In Example 3, we'll learn to use the Cut Optimizer.
We'll delve into G-Wizard's Cut Optimizer in our next example. Cut Optimizer will help you to master tool deflection and find the right values for Cut Width and Cut Depth. Click below to check it out.
Beginner's Example #3: Cut Optimizer
Beginner’s Examples:
Example 1: Quick wood cutting with a Shapeoko
Example 2: Fine Tune Your Cuts with Tortoise and Hare Slider
Example 3: Avoid Tool Deflection with Cut Optimizer
Example 4: The Easiest Feeds and Speeds Ever: CADCAM Wizards
Experienced CNC’ers Examples:
Example 1: How much faster can I go with High Pressure Through Spindle Coolant?
Example 2: Playing “What-If” to optimize MRR’s
Example 3: Optimizing Cut Width and Cut Depth for Higher MRR’s and Better Tool Life
Example 4: Mastering High Speed Machining
CNC Router Examples:
Example 1: Figure out proper Feeds and Speeds to cut walnut plaques.
Example 2: Feeds and Speeds that won’t pop small parts off our vacuum table.
Example 3: Downcut and other special router cutters.
Note: Many of the early Beginner’s Examples use a small Shapeoko CNC Router too.
Be the first to know about updates at CNC Cookbook
Join our newsletter to get updates on what's next at CNC Cookbook.