The first lesson in the Master Class gave you all the basic concepts you need to understand how to use G-Wizard Feeds and Speeds Calculator.
Here's a quick refresh on those concepts:
- Sweet Spots: You've got a graphical map of the Sweet Spots that shows what happens as you speed up or slow down either spindle rpms or feedrate.
- Chipload (Inches or MM per Tooth): Tells how thick the chip is that's being sliced off. It's independent of rpm. Go too fast and the cutter is clogged by too many chips and breaks. Go too slow and the cutter will rub, get too hot, dull, and break.
- Surface Speed (Inches or MM per Minute): What is SFM and how do we go from SFM to RPM? Surface Speed tells how fast the cutter slices through the material. Go too fast and the cutter overheats, dulls, and breaks. Go slower and the cutter will last longer, but your job will take longer.
- Material Removal Rate (MRR): A measure of the efficiency of a cut. It's how fast you're removing material - cubic inches per minute or cc's a minute. Higher MRR means your part gets made faster.
Okay, I'm going to quit bugging you about this because we're ready to run some examples in G-Wizard. We offer a free 30-day trial, and that's long enough you can finish this course with it if you skip ahead on the lessons instead of taking them one a week. You really should take advantage of it!

Setup G-Wizard for Your CNC Machine
First thing we need to do is to setup G-Wizard for your CNC Machine. That way, it knows how to tune the feeds and speeds to fit your machine's capabilities. Setup is really easy, so here's a step-by-step walkthrough.
Startup and Login with your Email
After you've installed G-Wizard, start it up and login with your email.
Notice that Getting Started popup and button?
G-Wizard is full of quick tours called "Getting Started..."
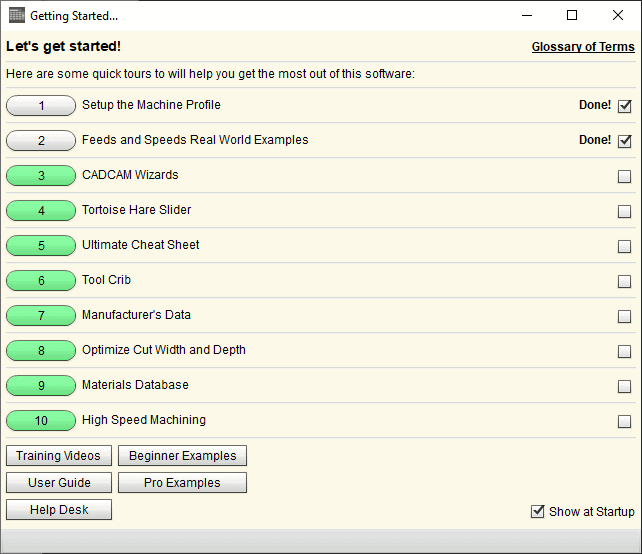
These little tours will get you up to speed with G-Wizard in a hurry!
As long as the "Show at Startup" checkbox is checked, the Getting Started Tours open every time you start G-Wizard. If they don't click the "Getting Started" button near the top right corner of the G-Wizard window.
Take time to go through the "Setup the Machine Profile Tour" and the "Feeds and Speeds Real World Examples" at the very least. Then go play with G-Wizard a bit. When you're ready to pick up even more power, take the other tours.
Did you notice some of the buttons are colored, some are not, and there are little checkboxes on the right that say "Done!"
This helps you track which tours you've already taken.
Note some of the other resources on the Getting Started popup:
- Glossary of Terms at top right. Pop that open to get definitions of all the jargon.
- Buttons at lower left. You get Training Videos, Examples, User Guide, and our Help Desk
It'll be tempting to turn the Getting Started Popup off too soon, without doing all the Tours. Fight the urge, knowledge is power. Get every bit of Feeds and Speeds power you can.
Want to experiment with these concepts with no risk to cutters or CNC machine?
The fastest way to learn how things work is by going hands-on. Do that from the comfort of your armchair with our G-Wizard Feeds and Speeds Calculator. It works for CNC Mills, Routers, and Lathes. Working through the examples in this Guide using G-Wizard will help you become proficient quickly. And guess what? It has a wonderful feature that I call The Ultimate Feeds and Speeds Cheat Sheet.
The cheat sheet button is on the Feeds / Speeds tab right under the Tortoise-Hare Slider:

The Cheat Sheet pops open right in G-Wizard, and it helps you understand exactly how to change the various parameters to create whatever end result you desire. It looks something like this:
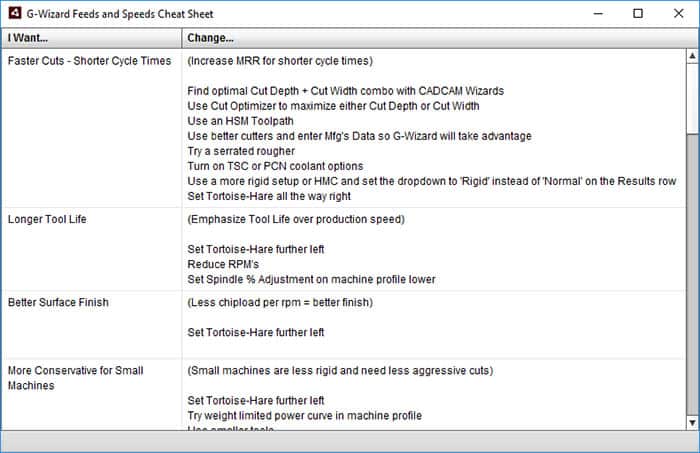
So, for example, there are 8 suggestions for how to create shorter cycle times. And they’re in the order of highest to lowest impact, so you know what to try first. Talk about making it easy to get seriously in control of your feeds and speeds!
Advanced Performance Recipe: Cheating on the 2 Flute Rule for Aluminum and Going to More Flutes Elsewhere
You've got a lot to chew on, having gotten G-Wizard up and running. But I want to leave you with a bonus. This is, after all, a Master Class. You'd expect to pick up some tips that the average bear has not heard of. Here's one now.

Many beginners are taught to use a 2 flute in aluminum for chip clearance, but must we always use 2 (or perhaps 3 flutes) for Aluminum and never 4?
Now that we know why fewer flutes must be used (chip clearance), we can think effectively about when we might not be restricted to fewer flutes.
In general, when you have plenty of room for the chips to escape, you can use a 4 flute cutter, and you’ll get a better surface finish. How much is “plenty” of chip clearance? Forget slots and plunging. Those are the worst cases. Try to avoid tight inside corners or interpolated holes whose diameter is at all close to the tool’s diameter, those are nearly as tough.
But what if we are profiling around the outside of a part and there’s no concave curves, only convex? Let's also keep the width of cut to less than half the cutter's diameter.
In that case, we have tons of chip clearance, so we can use more flutes.
If you have a sufficiently roomy pocket, you may also get away with a 4 flute, especially if you can open up a big hole in the middle of the pocket to get started in. The best case for more flutes is when you have a finishing pass, particularly if you’re already committed to changing tools to get the best possible surface finish from a newer sharper tool that hasn’t been roughing.
The finishing pass will be very shallow and the rougher will have opened up plenty of room for chip clearance. Consider using 2 or 3 flutes for roughing followed by 4 flutes for finishing in materials like aluminum.
In harder materials that don’t need so much chip clearance, tools with as many as 10 flutes may be used. This doesn’t just apply to aluminum either.More exotic tools are available with 5, 6, 10 or more flutes.
Experienced hands will tell you that if you’re profiling (where there’s lots of chip clearance) steel and aren’t using 5 or 6 flutes, you’re leaving money on the table.
Let’s run the numbers in G-Wizard. Suppose we’re profiling some mild steel–1020 or some such. We’re going to profile the outside of a part, so there’s plenty of clearance. Cut depth will be 1/2″, cut width 0.100″, and we’ll use a 1/2″ TiAlN Endmill. Here are the numbers: – 4 Flute: 3158 rpm, 29.8 IPM. MRR is 1.492 cubic inches/minute. A little over 1 HP. – 5 Flute: Same rpms, now 37.3 IPM. MRR = 1.865. 1.3 HP. That’s 30% faster cutting. – 6 Flute: Now 44.8 IPM. MRR = 2.238. 1.6 HP. 60% faster than the 4 flute case.
How much more profitable are your jobs if you could run them 60% faster? What about using a Roughing End Mill to go faster still?
The cost to do so is a more expensive endmill and a tool change for profiling.
Harder materials can benefit particularly well because they’re already up against surface speed limits. More flutes is the only way to get faster feeds. Sometimes we have to go the other way too. If you’ve got some really sticky stainless steel that’s giving you fits in tight chip clearances, try a 3 flute instead of a 4.
Onward to Lesson 3: Chip Thinning and Rubbing.
Be the first to know about updates at CNC Cookbook
Join our newsletter to get updates on what's next at CNC Cookbook.