Using CADCAM Wizards to Optimize Our Pocket
Here's where we left off in the last example:
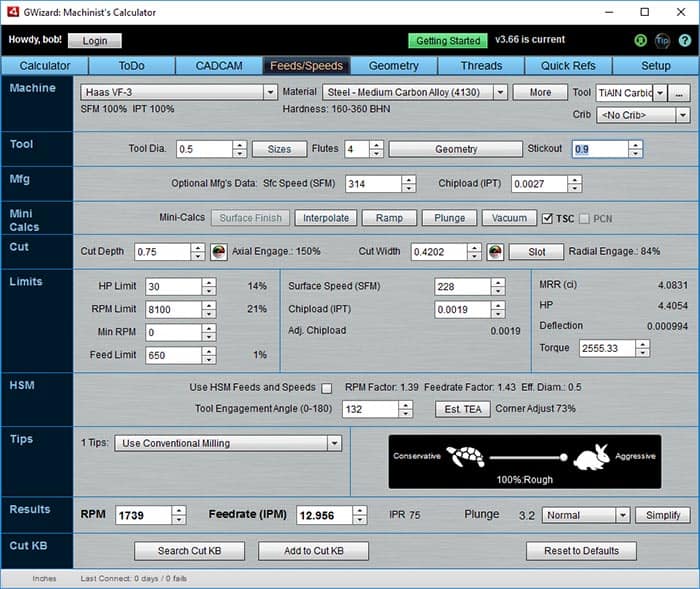
Here's how we left things in our last example...
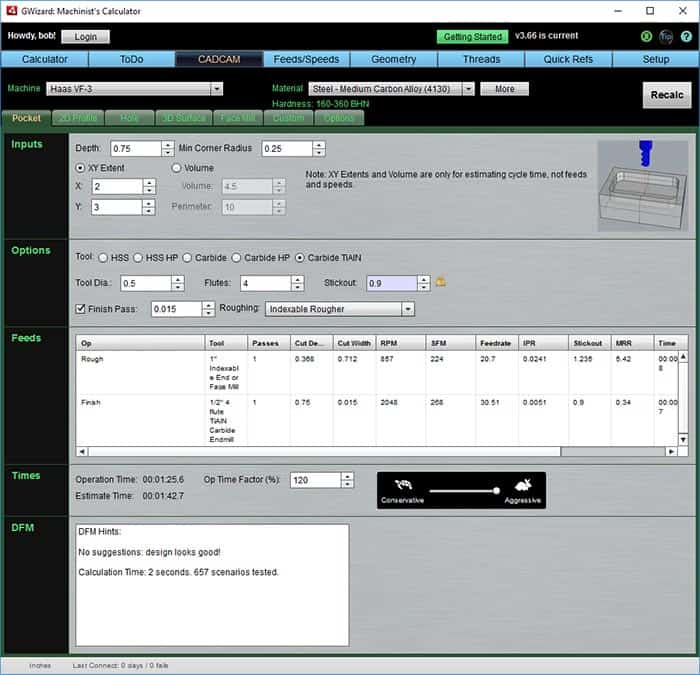
G-Wizard Calculator has a very powerful feature called CADCAM Wizards that make it easy to find optimal combinations of cut parameters. Here is an initial solution to our pocket problem in CADCAM Wizards:

CADCAM Wizards did a little better with 4.13 MRR...
First, what are these CADCAM Wizards, anyway?
They basically really fancy scenario testers. If you had the patience, you could do what they do by plugging numbers into the Feeds/Speeds Calculator. But you would have to be really patient!
If you look at the box labeled DFM Hints at lower left, it says 707 scenarios were tested. When was the last time you test over 700 combinations of variables to find the optimum on one of your jobs?
Nobody has time for that!
But CADCAM Wizards do it with ease. That's what makes them so handy. In fact, I am showing them to you after doing a bunch of other things, but I often prefer to start with them.
Here's how I set up our problem:
1. Tell it your machine profile and material. In this case, it just used the same thing that was already set in the Feeds/Speeds tab, so no need to retype.
2. Pick your feature using the tabs. CADCAM Wizards "think" more like your CAM software than a conventional Feeds/Speeds Calculator. We're doing a pocket, so that's the feature tab I picked.
3. The inputs change based on the feature. I gave it a pocket depth of 3/4" and minimum corner radius of 1/4" (since we knew our 1/2" endmill works).
The XY Extent, Volume, and Grayed out inputs are for estimating job times. More on that later, but it is handy for quoting jobs quickly.
I told it to use a Carbide TiAlN tool, and since we already knew we were rigidity challenged, I gave it our 0.9" stickout.
All that was left was to press the "Recalc" button. Just a few seconds later, it had crunched through 707 scenarios and found a slightly more optimal combination of Cut Width and Cut Depth.
Note that it offers a complete cut recipe with both a roughing and finishing pass and all their parameters. That's a lot of useful information for what little data it required us to enter. CADCAM Wizards make doing your CAM programming a snap!
But let's go to the next step. I talked about using two different sized cutters and rest machining. The "Roughing" dropdown makes trying ideas like that easy. Here is how things look if I choose to use an indexable tool as my rougher:
Using an Indexable Rougher and Rest Machining bumps MRR's to 5.42...
Using an Indexable Rougher and Rest Machining bumps MRR's to 5.42.
Don't have Rest Machining in your CAM Package, or don't want to do a tool change?
Well, you can always fake the package out by feeding it the right geometry. But, failing that, CADCAM Wizards have a lot of roughing strategies to choose from:
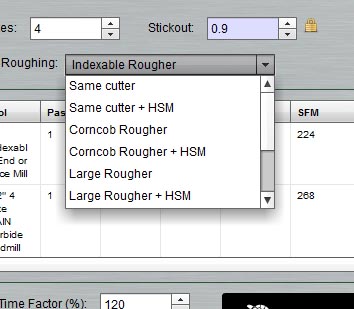
CADCAM Wizards have lots of roughing strategies...
By the way, we tell CADCAM Wizards what our indexable rougher looks like and what endmill sizes are available on the Options Tab for CADCAM Wizards:

Endmill sizes, finish pass, roughing tools, indexable roughers, and face mills are all under the Options Tab...
Click below to go see our next example, where we'll show how to set up Feeds and Speeds for a High Speed Machining Toolpath:
Example #4: High Speed Machining
Examples Home Page:
Beginner's Examples:
Example 1: Quick wood cutting with a Shapeoko
Example 2: Fine Tune Your Cuts with Tortoise and Hare Slider
Example 3: Avoid Tool Deflection with Cut Optimizer
Example 4: The Easiest Feeds and Speeds Ever: CADCAM Wizards
Experienced CNC'ers Examples:
Example 1: How much faster can I go with High Pressure Through Spindle Coolant?
Example 2: Playing "What-If" to optimize MRR's
Example 3: Optimizing Cut Width and Cut Depth for Higher MRR's and Better Tool Life
Example 4: Mastering High Speed Machining
CNC Router Examples:
Example 1: Figure out proper Feeds and Speeds to cut walnut plaques.
Example 2: Feeds and Speeds that won't pop small parts off our vacuum table.
Example 3: Downcut and other special router cutters.
Note: Many of the early Beginner's Examples use a small Shapeoko CNC Router too.
Be the first to know about updates at CNC Cookbook
Join our newsletter to get updates on what's next at CNC Cookbook.