Feeds and Speeds that won't pop small parts off our vacuum table.
In our first example we were concerned with cutting wood plaques out of walnut. Now we want to cut some smaller parts out of walnut and we're worried they'll pop off our vacuum table if the feeds and speeds are too aggressive.
How can we make sure our feeds and speeds stay within the limits of adhesion for the vacuum table?
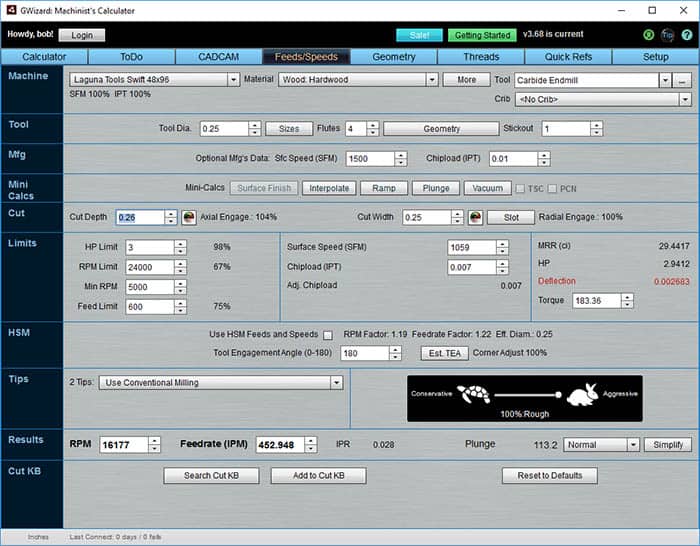
Let's assume we want to use a 1/4" diameter 4 flute carbide endmill, and that our parts are being cut from 1/4" thick walnut. Here's the initial setup for that scenario:

Note that Deflection has gone red...
We're already seeing a problem: note that Deflection has gone red. Whenever a value turns red on G-Wizard, you need to look into it. Red doesn't mean you can't proceed with the recommended feeds and speeds, but it means G-Wizard Calculator is not necessarily happy with the result and you should make sure you understand where the red comes from and can then either get rid of the red or move forward knowing it's okay.
The horsepower limit on the prior example was okay. Red on tool deflection is probably not okay. Excessive deflection is really hard on tool life (that link gives more detail about tool deflection and is well worth checking out). For now, know that deflection is a function of how rigid your tool is versus how much cutting force is being applied.
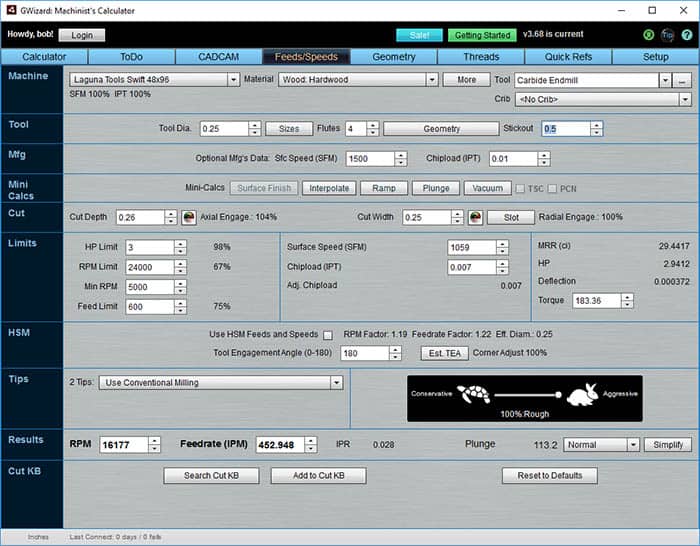
The larger diameter the tool and the shorter it is, the less deflection you'll have. Let's start here by choking up on the tool. We've got the Stickout set to 1", which is 4 diameters. That's pretty long and we only need to be able to clear a little over 1/4" on this job. So let's change that stickout to be 1/2".
Bingo! That's all it takes to clear up the problem. G-Wizard has a bunch of tools to help you with deflection. Check out Beginner's Example 3 to learn about G-Wizard's Cut Optimizer, which is a very quick and easy way to eliminate deflection.
Meanwhile, we now have a Feeds and Speeds solution:

We have Feeds and Speeds, but will they stay down on our vacuum table?
We have Feeds and Speeds, but will our parts stay down on our vacuum table?
Let's find out with the Vacuum Mini-Calc!
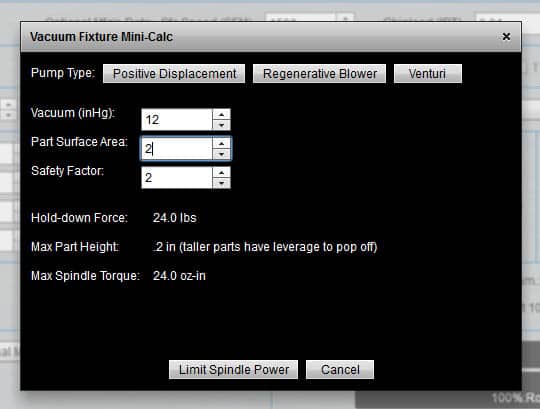
Mini-Calcs are the row of buttons labeled Mini-Calcs. They're special-purpose little calculators that solve specific problems. Here's the Vacuum Mini-Calc:

Vacuum Mini-Calc all set up for our problem...
Here's how I set up the Mini-Calc for our problem. First, it wants to know how much vacuum you're pulling. You can just click one of the pump types for an estimate (I clicked "Regenerative Blower"), or if you have a gauge, enter the value in inches of mercury it gives.
Next, enter your part's surface area. Most CAD software can tell you that surface area, by the way. I've just entered 2 square inches. Our mythical parts for this example are 1" x 2" and square, hence 2 square inches.
Lastly, you can enter a safety factor. I like a safety factor of at least 2x. G-Wizard's Mini-Calc says that with those parameters, each part is held down with 24 pounds of force. It suggest a maximum part height of 0.2. As the little note says, taller parts will have more leverage if you cut on top of the part to help pry it off your vacuum table.
In this case, I am going to ignore that as we have a 2x safety factor and I am not doing any cutting on top.
The last step is to click "Limit Spindle Power". Here's the result:

Feeds and speeds had to be sharply limited for these small parts!
Check it out-feeds and speeds had to be sharply limited for these small parts!
We went from about 16,000 rpm and 450 inches a minute to 13,800 rpm and 28 inches per minute. To figure that out, G-Wizard converted the cutting forces to effective spindle power and put a power limit of 0.19 HP on the spindle.
Now you can see how to cut such small parts without having to figure things out with trial and error.
Hang on though-we're getting some pullout on these cuts. We're set up for a standard endmill or what the CNC Router calls an "upcut" endmill. To limit that pullout, we should try a "downcut" endmill, and we'll do exactly that in our next Router Example.
Example #3: Downcut and Other Special Router Cutters
Examples Home Page:
Beginner's Examples:
Example 1: Quick wood cutting with a Shapeoko
Example 2: Fine Tune Your Cuts with Tortoise and Hare Slider
Example 3: Avoid Tool Deflection with Cut Optimizer
Example 4: The Easiest Feeds and Speeds Ever: CADCAM Wizards
Experienced CNC'ers Examples:
Example 1: How much faster can I go with High Pressure Through Spindle Coolant?
Example 2: Playing "What-If" to optimize MRR's
Example 3: Optimizing Cut Width and Cut Depth for Higher MRR's and Better Tool Life
Example 4: Mastering High Speed Machining
CNC Router Examples:
Example 1: Figure out proper Feeds and Speeds to cut walnut plaques.
Example 2: Feeds and Speeds that won't pop small parts off our vacuum table.
Example 3: Downcut and other special router cutters.
Note: Many of the early Beginner's Examples use a small Shapeoko CNC Router too.
Be the first to know about updates at CNC Cookbook
Join our newsletter to get updates on what's next at CNC Cookbook.