Note: This is Lesson 5 of our Free Email Feeds & Speeds Master Class. Click here to learn more about the Master Class.
Cutting Speed, Feed Rate, Stepover, and Depth of Cut.
Before you can generate the g-code for any given feature, CAM software needs to know those things. Most CNC'ers calculate Cutting Speed and Feed Rate using science. Unfortunately, most CNC'ers have no scientific way to choose Depth of Cut and Stepover. Your choice of Depth of Cut and Stepover will limit Cutting Speed and Feed Rate. That means we can unlock a lot of potential by adopting a more scientific approach to Depth of Cut and Stepover.
Defining Depth of Cut and Cut Width
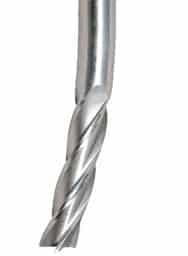
Let's start by defining the terms "Depth of Cut" and "Cut Width" (also called "Stepover"). Since a picture is worth a thousand words:

Depth of Cut is the length of the side of the flutes that are actually cutting. So, if you're doing a pocket in several steps or layers, it is the thickness of the current layer you're cutting and not the total depth of the pocket. Depth of Cut is also referred to as Axial Depth of Cut.
Cut Width, also called Stepover, is the total thickness of the cut when viewing the cutting tool from above. It can be no more than 100% of the cutter's diameter. Stepover is also referred to as Radial Depth of Cut.
For the sake of completeness, Cutting Speed is defined as your spindle speed (in rpm) in the cut. Feed Rate is defined as how fast the cutter is moving through the cut.
Material Removal Rate: What We Optimize
Let's be specific about what we're optimizing. When roughing we want to optimize Material Removal Rate. After all, the purpose of roughing is raw Material Removal. We want to do it as quickly as we can without compromising Tool Life so much that it isn't worth it.
Material Removal Rate (abbreviated MRR) is a function of:
- The shape of the tool. The most common is the cylinder that is the shape of most cutting tools.
- The Depth of Cut, which determines the length of that cylinder.
- The Stepover, which will determine what fraction of the cylinder's circumference is actually cutting.
- The Feed Rate, which is a multiplier of the cylinder as it travels along the workpiece.
A typical MRR calculation looks like this:
MRR = Axial Depth of Cut * Radial Depth of Cut * Feed Rate (all values in inches or inches per minute for Feed Rate)
This formula yields the number of cubic inches per minute your cutting tool is removing.
Now here's the last piece:
The machining time spent roughing your workpiece is mostly determined by Material Removal Rate. If you can get a higher Material Removal Rate, you can shorten the machining time. For a commercial machine shop, optimizing MRR can make a huge difference to your business.
You can see from the simple formula what a huge impact Depth of Cut and Stepover have on machining time.
Do you rely on guesswork or outdated rules of thumb for Depth of Cut or Stepover?
Depth of cut and stepover (width of cut) are crucial variables when milling pockets, profiling, facing, and any other machining operation where you'll be cutting with the flutes on the side of a cutting tool. Other important variables are the machine's capabilities, the material to be cut, and a description of the tool to be used. The rest can be determined from those variables.
Despite the importance of Depth of Cut and Stepover, most machinists do not have analytical tools that help them to optimize their values. Instead, they rely on guesswork, rules of thumb, and what has worked well in the past.
Rules of thumb can be useful memory aids when they're used to refer to simple phenomena that are easily explained. But, with Depth of Cut and Cut Width, there are so many complex phenomena that interact with each other that rules of thumb are useless. Worse, they can conflict.

Are your rules of thumb at odds with your productivity?
Effects of Depth of Cut (DOC)
Here are a few of the effects that changing Depth of Cut or Stepover can impact:
- Material Removal Rates. Of course, all other things being equal, we may be able to remove the most material by burying the cutter at maximum depth and width. But as you know, all things are never equal and this strategy usually doesn't work well at all.
- The ability of the cutter to clear chips. Exposing more of the cutter through shallower cut widths makes chip clearing easy. Forcing the cutter into narrow slows with wide cut widths and making the slots very deep relative to cutter diameter makes it hard to clear chips and so you're probably recutting chips and seriously reducing tool life. In the worst case, the cutter can break very quickly.
- Heat. With proper feed rate and cutting speed, most of the heat goes out in the chip. But even so, heat can build up on the cutter and if left unchecked, it will kill that cutter quickly. The time a flute spends in the cut is time when heat is building. The time out of the cut is cooling time. The cutter is exposed to air and coolant. It's not cutting, so there is no friction in that area. Trade offs of MRR's versus cooling "duty cycles" are a big part of calculating the best HSM toolpath feed rate and cutting speed. Maximizing that is one of the reasons HSM toolpaths are so productive.
- Power Requirements. The higher the Material Removal Rates, the more spindle power will be required.
- Tool Deflection. The more power we pump into the cut via more spindle power, the higher the cutting forces, and the greater the tendency of the tool to deflection.
- Wear: If you can spread the wear along more of the flute length for a given amount of material removed, your tool will obviously last a lot longer. But, this is traded off against the greater likelihood of Tool Deflection, which can also be bad for wear. Using more flute length means greater depth of cut, and everything else that goes with that such as more difficulty chip clearing, more heat, and so on.
There are actually many more such factors, and they're all inter-related. Strategies like High Speed Machining make those inter-relationships even more complex and unpredictable. Choosing the best Cut Width and Depth of Cut are a function of optimizing a lot of trade offs!
One can do systematic experiments given time, but there are so many variables involved that any combination of machine, material to be cut, and tool requires a completely new set of experiments to be done. A big matrix of Depths of Cut and Cut Widths must be assembled and Feed Rate and Cutting Speed together with MRR's computed. Very few have time to do all that, so they fall back on what's worked in the past, which may not be even close to optimal in the present.
That is, unless you have our G-Wizard Calculator Software. GW Calculator has not one but two tools for optimizing Depth of Cut and Cut Width. In fact, since it can calculate Scallop Heights for 3D profiling with ball nosed end mills, it actually has three tools, but we want to focus on the two.
How Do Depth of Cut and Cut Width Affect Cutting Speed and Feed Rate?
A cutting tool has to be able to clear chips that it cuts. If they're not cleared, they will be cut again and again. In that sense, they compete with the end mill's ability to cut new material.
But, depending on the material to be cut, recutting chips can make things worse in a variety of ways:
- The process of recutting the chips may scratch the walls and floor of the feature, ruining your surface finish. This is particularly true in materials that work harder.
- Work hardened chips can dull your cutting tool in a hurry. You'd never throw a handful of super hardened chips into the path of your cutter, but that's what happens if you can't clear the chips.
- The more chips there are piled up around the cut, the harder it is to eject any new chips well away from the cut. The harder your coolant has to work to get everywhere-it may be blocked by chips piling up.
That's all bad, but it gets worse. At some point, if you're producing chips fast enough, and your cutter is down in a hole or slot with walls blocking chips in, you will create so many chips that they jam in the teeth of the cutter and you shortly have a broken cutter.
You can create more clearance for chips to get out and coolant to get in by reducing Depth of Cut or Stepover. Increasing Depth of Cut or Stepover may require you to do a better job chip clearing. That can mean such things as:
- Aiming the coolant nozzle better to clear chips from the cut
- Increasing your coolant pressure or if you use mist increasing the air pressure
- Switching from mist to flood coolant
Optimizing Depth of Cut and Cut Width Using G-Wizard's Cut Optimizer
We introduced the Cut Optimizer some time ago and it has been an extremely popular part of G-Wizard. To this day, only G-Wizard has a Cut Optimizer.
The Cut Optimizer is easy to use, and it lets you optimize one of the two variables (Depth of Cut or Cut Width) while you hold the other one constant. For example, suppose you need to machine a slot that is 1" deep with a cutter that is the diameter of the slot. You will be holding Cut Width constant-it's the diameter of the cutter. But Depth of Cut is the variable to be optimized. What the Cut Optimizer does is to calculate the deepest cut that can be taken without creating excessive tool deflection.
Or take an opposite example. You're profiling a wall and you'd like to do it in a single pass instead of having to step down for multiple passes. You want to do this because the wall finish will look prettier without having the steps visible and because it spreads the wear over a longer flute length, which means your tool will last longer. In that case, Depth of Cut is the constant and the Cut Width is what you'd like to optimize.
Cut Optimizer is good with both kinds of problem and we show you exactly how it works in our G-Wizard University Video:
Cut Optimizer in action...
G-Wizard University provides short videos on specific topics that make it easier to learn our G-Wizard Software.
Optimizing the Depth of Cut or Stepover to keep Tool Deflection under control is super easy. Just click the title of the one you want to optimize and it's done:
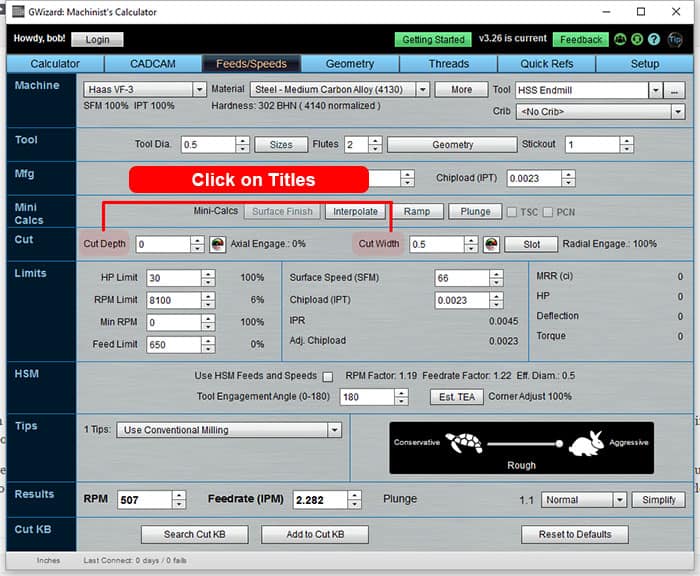
Just click the label of the variable to optimize (Depth or Width) and it's done!
How Much Deflection Should You Allow When Optimizing Depth of Cut and Width?
How much tool deflection should we allow?
This is a complex topic, and I'll refer you to a dedicated article for more information. Suffice it to say we allow more for roughing than finishing because too much deflection is bad when you want a good surface finish or need to hold tight tolerances. Therefore, finish passes can tolerate less.
For roughing, deflection is roughly equivalent to runout as far as tool life is concerned. Even a little (as a % of max chip load), can really shorten tool life. Thinking of your cutting tool as the paperclip that got bent too many times, and with deflection it is getting bent at whatever your spindle rpm is as times per minute. Worse, deflection excites chatter like crazy.
G-Wizard's default deflection limits are pretty conservative, and are aimed at minimizing chatter. But, you can set them to whatever you'd like.
Optimizing Depth of Cut and Cut Width Using CADCAM Wizards

The CADCAM Wizard for finding optimum parameters for pocketing...
Cut Optimizer was a great advancement-finally a tool that made determining the best Depth of Cut or Cut Width a science. But the CADCAM Wizards are even more powerful and strangely enough, simpler to use. CADCAM Wizards are a feature included with every copy of G-Wizard Calculator. They're accessed by clicking the CADCAM tab. Imagine having an assistant who was really good at figuring out "Cut Recipes." A Cut Recipe is everything you need to know in order to tell the CAM software how to generate a toolpath to cut a particular feature:
- Feed Rate and Cutting Speed-naturally!
- Which tool to use
- Depth of Cut and Cut Width
Moreover, you want the recipe to address both roughing and finishing without you having to tell your assistant anything additional. Lastly, you want this assistant to ask you as few questions as possible. After all, your time is valuable. Let the assistant worry about the details.
That's exactly what CADCAM Wizards do. It's easier to watch them in action than to try to explain further, so check out another new G-Wizard University video for the details:
CADCAM Wizards: Let your smart assistant figure it out...
CADCAM Wizards really put some amazing power at your fingertips. Like I said in the video, when was the last time you got a chance to run 1100 different scenarios to find the best combination of parameters for a job? I will never have enough time to do that even once. Yet as a customer said to me, G-Wizard makes it possible to optimize every cut. It even makes it easy to do so.
CADCAM Wizards use High Efficiency Milling
One of the things that CADCAM Wizards help with is High Efficiency Milling (HEM).
While it sounds like it could be something extremely advanced and hard to understand, the principle behind High Efficiency Milling is actually pretty simple. If you bury your cutter in the work, you're going to wind up making multiple passes to get down to the full depth of a pocket in many cases. With HEM, the idea is to use as much of the flute length as possible on your cutter. You may be able to cut that pocket in a single layer instead of several.
Using more flute length means spreading the wear over a longer length. That means your cutter lasts longer, or it can also mean you can drive it a bit harder.
In exchange, we back off the Stepover a bit. Using such deep depth of cut means we could have chip clearance and heat problems. Backing off the Stepover is how we avoid that. It turns out the resultant cutting parameters work great for High Speed Machining tool paths, which bring even more performance to HEM.
When CADCAM Wizards are considering the various combinations of Depth of Cut and Stepover, it prefers a greater Depth of Cut over a more shallow one, all other things being equal.
What About Stepovers for 3D Toolpaths?
The astute reader will see that a lot of what's been said above is great for 2 1/2D machine, but may not apply to 3D Toolpaths. It's true, and that's a whole new area. We've got a great article on selecting the best stepovers for 3D profiling that talks through the theory. But check it out:
G-Wizard Calculator has a CADCAM Wizard that can optimize stepover for 3D profiling toolpaths using all those same principles.
Conclusion
Both of these tools are unique to G-Wizard, so if you're looking to make Depth of Cut and Cut Width a little more scientific (and you know you really ought to), you've found the right place. Put them to work for you, they're quick and easy, and before you know it you'll find your cycle times are shorter and your tools last longer. It's almost as good as sliced bread. Well, not quite, but close. If you've never tried G-Wizard, be sure to check out our free 30-day trial.
Be the first to know about updates at CNC Cookbook
Join our newsletter to get updates on what's next at CNC Cookbook.