Beginner Example 1:
Quick Wood Cutting with a Shapeoko CNC Router
The Shapeoko is just about as simple and basic a CNC machine as you can get. Yet, these little machines are capable of some amazing cool work once you get them dialed in and learn how to use them. CNC is awesome at any scale!
Other machines like the Carvey, Carbide3D Nomad, and many more are similar lightweight CNC Routers.
Their best use is with wood and other soft materials. Even if you have a much beefier machine, let's start out here at the delicate end of the scale. We'll learn more than just bulling our way through. Plus, a smaller machine is the reality for most hobbyists and many beginners.
Let's try a quick and easy Feeds and Speeds Calculator Wood problem with one of these machines cutting in plywood. Let's say we are going to cut some 1/2" plywood. We want to cut a piece out that looks sort of like this:

The exact shape of the part doesn't matter-the main thing is we're going to cut all the way through the entire thickness of the plywood. I'm not going to worry about the holes, and I'm not going to worry about how you'll hold the part. I just want to talk about feeds and speeds for those full depth cuts.
Let's say we want to use a 1/8" endmill. First, how did we know what size? It's dictated by the tightest inside radius of a corner on either the inside or outside profile. You want to use the biggest diamter tool you can, because they're stronger and won't wear out as fast.
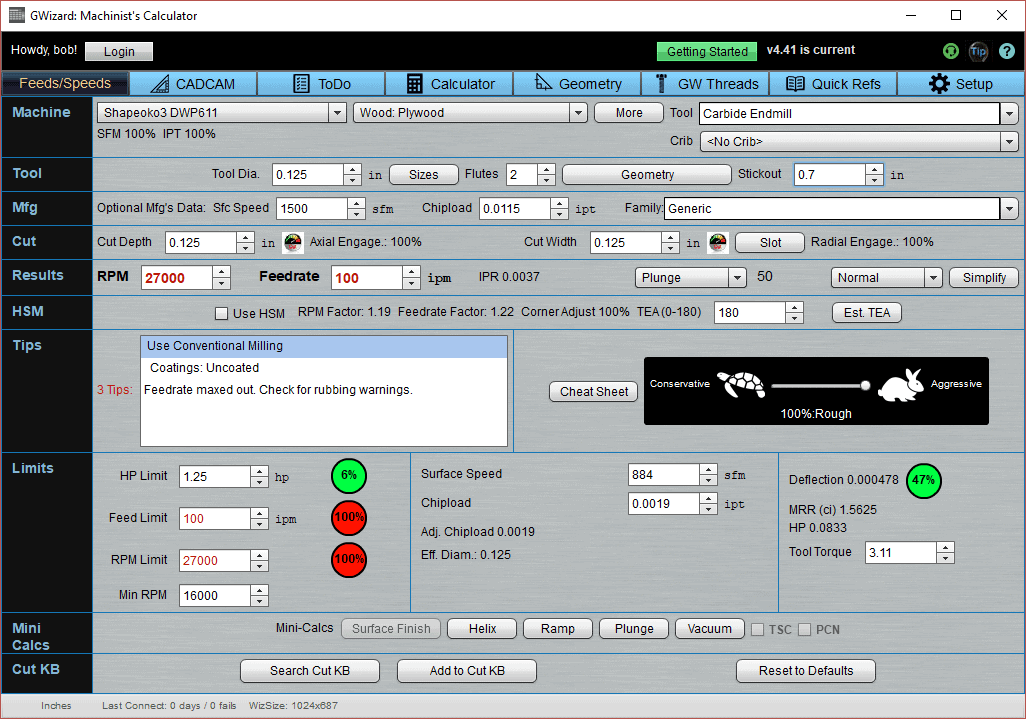
Okay, we bring up G-Wizard Calculator and want to use it to solve our problem. Here's my first stab at it:
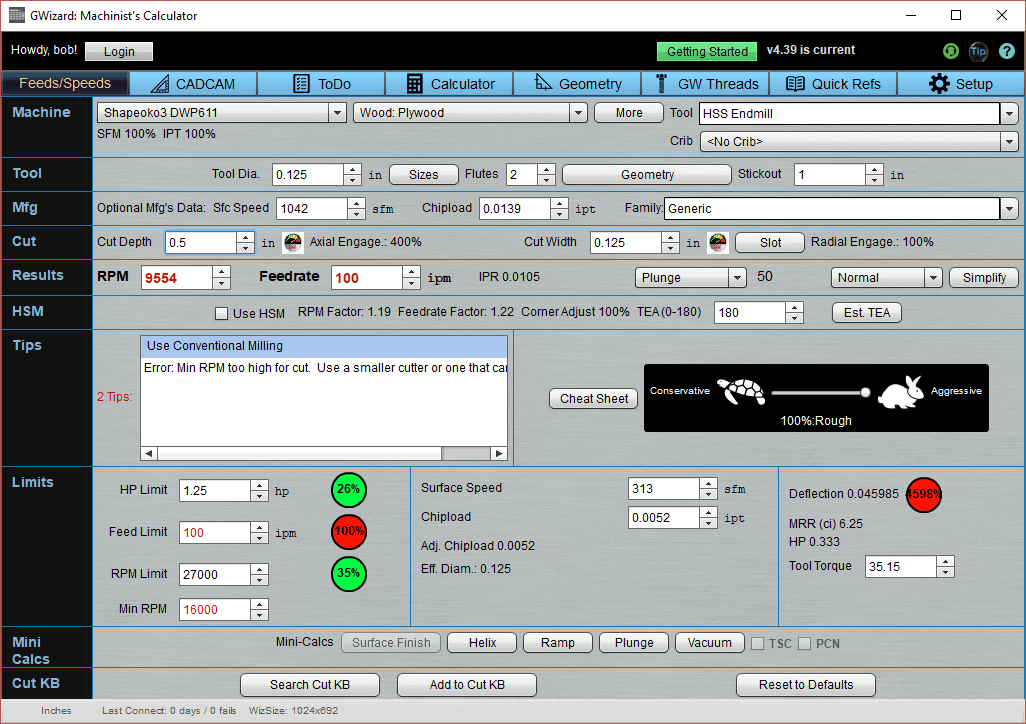
First try has some red showing...
To get this screen, I did the following:
1. Selected the Shapeoko Machine Profile. Note: By default, there's no power adjustment for rigidity turned on.
2. Selected the "Wood: Plywood" material choice.
3. HSS Endmill was already the selected tool, and I left it.
4. I set tool diameter to 1/8"
5. I set Cut Depth to 1/2" since I am cutting through 1/2" plywood.
6. I set Cut Width to 1/8", since I am making a "Full Slot." In other words, I am going to cut around the outline of what I want to cut out and not make partial cuts on edges that already exist. The "Slot" button just sets Cut Width to the Tool Diameter for convenience.
I intentionally skipped the "Mfg" row. G-Wizard's Defaults will work for any situation because they're conservative. The only time you need to worry about plugging in Mfg's numbers is when you want to extract maximum performance and you've purchased premium cutters.
Tip: Just go left to right, top to bottom, skipping what isn't needed. When you get the "Machine" and "Tool" rows filled out, stop and take stock. You'll see indicators turn red and messages go by, but don't sweat it until you have entered all your parameters.
First thing to note is that there is red showing. Any time G-Wizard shows red, it wants you to take a look and decide if the red is okay. In some cases it is, and in others it isn't. Here, we have red on the RPM, Feedrate, Min RPM, Feed Limit, Deflection, and Tips.
I always check the Tips first because it's simple English. What it says is, "Min RPM is too high for cut. Use a smaller cutter or one that can go faster." So that tells us how to deal with two of the issues-Min RPM is red because this cut should be run more slowerly in rpms than our router can go (16,000 rpm minimum). And RPM is red because Min RPM is red.
The thing is, we don't want a smaller cutter. The smaller they get the more delicate they are. So what else can we try to get past the minimum rpm issue?
Good news, G-Wizard has a cool "Cheat Sheet" feature. Just push the button right of the Tips box.
The Cheat Sheet is divided into two columns. The left column is where you look up what you want to do. The right will have suggestions for how to get there.
In this case, we need faster rpms to get up to the Minimum RPM's our machine will do. Here's what the Cheat Sheet tells us to do:
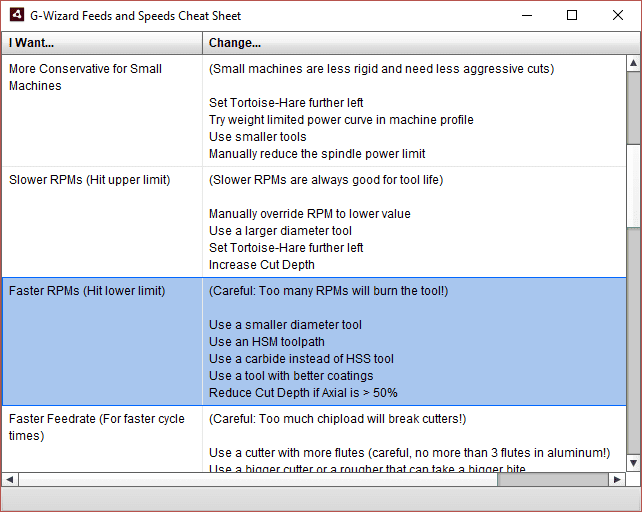
There are 5 possibilities:
- Use a smaller diameter tool. We don't want that.
- Use an HSM toolpath. Won't help as we're taking a full width cut.
- Use carbide instead of HSS
- Use a tool with better coatings.
- Reduce Cut Depth if Axial is > 50%
Pretty handy to get a list of ideas, right?
Let's try that carbide idea. Carbide end mills are more durable than HSS anyway, and especially in smaller sizes (or higher rpm spindles like on a router), I recommend them. To make that change, click the down arrow on the Tool Menu. On the Tool Menu, in the lefthand column, is a "Material" setting that lets you choose what Material your tools are made of:
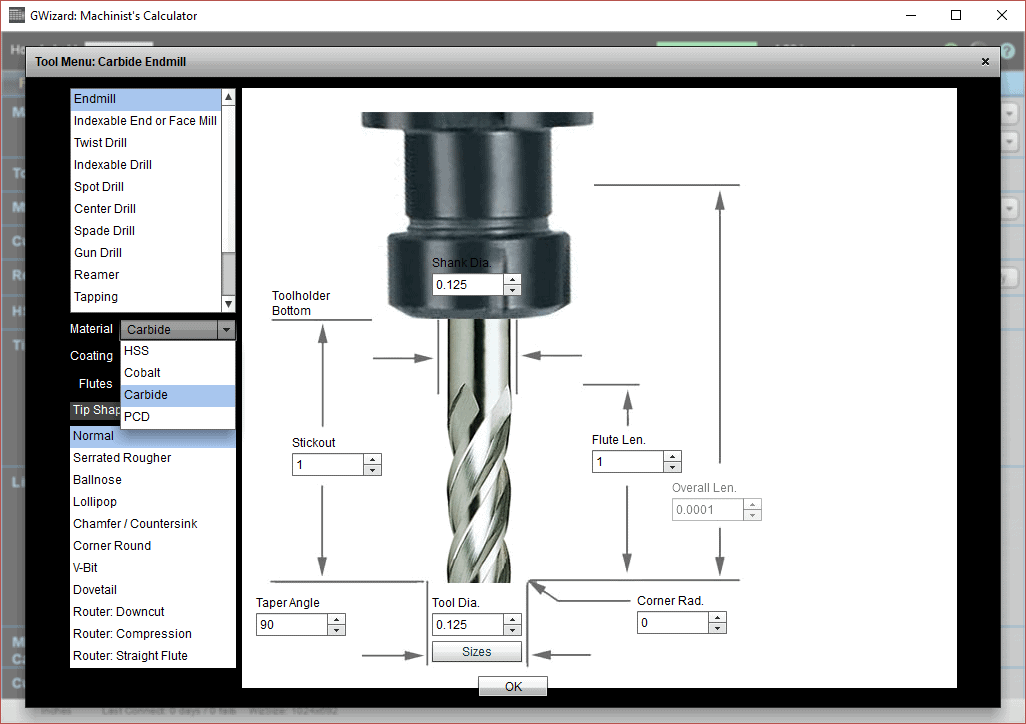
Choose "Carbide" and click the "OK" button at the bottom.
Unfortunately, not enough changed. The RPM is quite a bit higher, but still less than the Min RPM, so there is still a REd Warning.
What to do to get the RPM's up even more?
Something to note here that a beginner wouldn't know (unless you checked the Cheat Sheet!):
G-Wizard is really slowing down this cut because it is so deep. Any time you cut deep, G-Wizard has to dial things back. The way "deep" is defined is not in inches, it is in diameters. In this case, if we look at the "Axial Engage" to the right of Cut Depth, it says, "400%". That means we are 4 diameters deep. Anything over about 1 diameter can start to result in substantial slow down penalties.
Why slow down on deep cuts? Simply because it is harder to pull the chips up and out of a deep hole. They get lodged, clog the cutter, and eventually will cause it to break if we go too fast.
If you ever wonder how much G-Wizard is slowing things down because of a difficult cut (too deep, too wide, or too something), take a look at the row marked "Mfg". It has a "Sfc Speed" and a "Chipload" entry. Those are the manufacturer's estimates of the fastest the cutter can go under ideal conditions.
Now compare that to the values actually used which are in the "Limits" row under "Surface Speed" and "Chipload". In the screen shot above, our Surface Speed is 450 versus a max of 1500 and our Chipload is 0.0036 versus a max of 0.0115. You can see how slow G-Wizard has to go because this cut is very aggressive!
Fortunately, the fix is easy. We can cut this in 4 passes, each one stepping down another 1/8", and then each pass is only 1 diameter deep. Let's try that out, by setting Cut Depth to 0.125".
BTW, Cut Depth is always the actual length along the cutter that is actually cutting. So, even though we've made 4 passes, we are only cutting with the bottom 1/8" of the cutter on each pass.
Here's what I get:
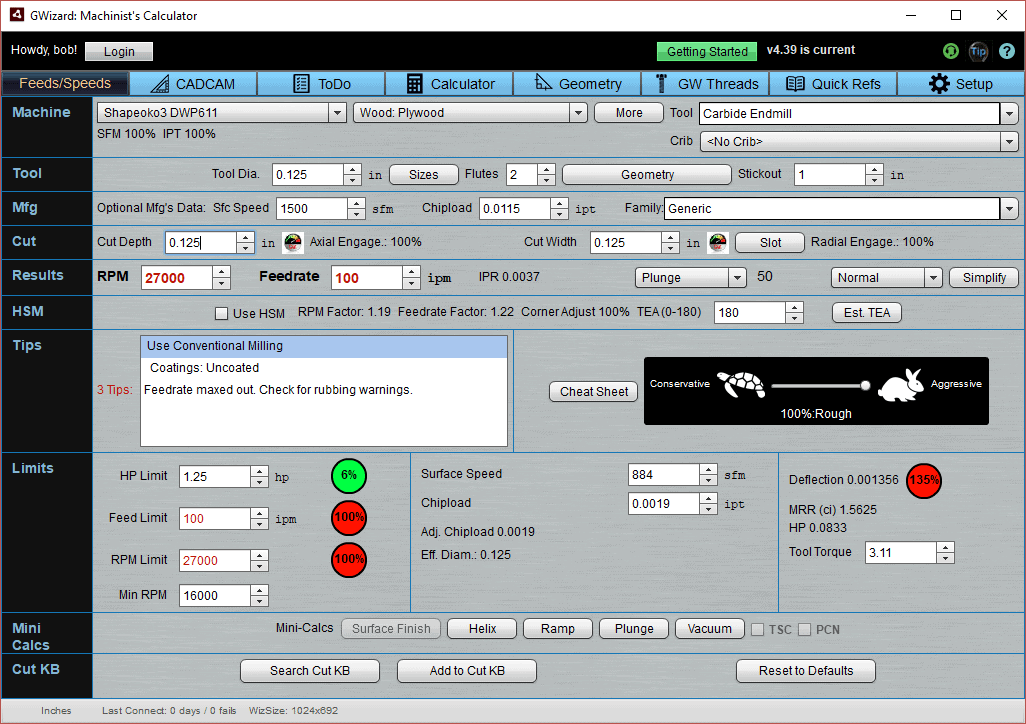
Wow, the Surface Speed is nearly double. It is still penalized versus the max, but that's due to the Cut Width. Chipload is also up. In fact, we got rid of the red on Min RPM but we've triggered new red lights on RPM Limit and Feed Limit.
We can always ignore red on the RPM Limit. It just means that if you had a faster spindle, you could cut faster. Running the RPM's a little slower is actually the best way to increase tool life because the tool runs cooler.
If we check Tips, it tells us to check for a Rubbing Warning because we can't feed fast enough. There is no Rubbing Warning under tips, so we are good to go and can ignore the Feed Limit.
That just leaves the red "Deflection" indicator. That's an important indicator, and one most Feeds and Speeds Calculators give you very little assistance with.
What it means is the tool has so much force on it that it is actually bending, not unlike this exaggerated picture:
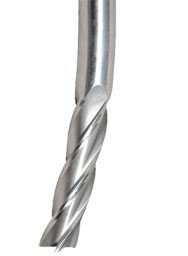
Tool deflection taken to the absurd!
Deflection is very bad for tool life in a lot of ways. First, it's like bending the paper clip too many times. The tool gets bent by the deflection amount each rotation, so at 27000 rpms, that 27000 times a minute. You can see how that'd be hard on it!
A small bit of deflection isn't too terrible, but the more you get, the shorter the tool's life will be. There's a lot more to know about tool deflection, but for now, it's best to avoid the red on tool deflection.
How do we minimize tool deflection?
Hey, by now you know-press that "Cheat Sheet" button again!
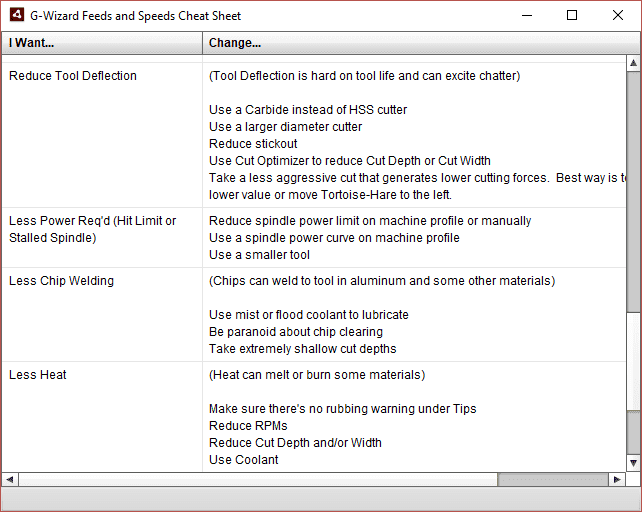
Sweet! There are 5 ideas to reduce Tool Deflection:
- Use Carbide instead of HSS. We are already doing this, so no go.
- Use a larger diameter cutter. Ugh-that's going to waste more material, let's see if we can get by with the 1/8".
- Reduce stickout. Hold that thought!
- Use Cut Optimizer to reduce Cut Depth or Cut Width.
- Take a less aggressive cut.
It's always important not to leave too much tool sticking out of your collet or other tool holder. The longer the tool sticks out, the more leverage the tip forces have to bend the tool.
Look at the G-Wizard screen shot above. We left the default 1" of tool Stickout (on the "Tool" row) as it was. That's 8 diameters for a 1/8" end mill-way too much!
In this case, we are trying to cut through 1/2" of plywood, so we need 1/2" of stickout plus a bit more. Let's add maybe 0.2" and see how we do, so that'd be 0.7" of stickout:
Hey, deflection is cured with shorter stickout!
Hey, deflection is cured with shorter stickout! In fact, we didn't have to reduce the stickout by much at all.
Here's a crazy little factoid:
- Reducing stickout increases rigidity by the 3rd power. So if stickout is 2x longer, the rigidity is 1/8. Just a little stickout reduction helps. In our case, we increased rigidity by 2.915x by going from 1" to 0.7". I calculated that using G-Wizard's Rigidity Calculator under the Quick Ref tab.
- Increasing diameter increases rigidity by the 4th power. So, let's say I could use a 1/4" endmill instead of this 1/8". With all other things equal, I get 16x more rigidity. That's why I said to use the biggest diameter cutter you can for your task at hand.
That's enough for this example. You've learned an awful lot. Let's summarize key points:
- Watch out for red in G-Wizard. It doesn't mean you can't go forward, but it means you want to be aware of why things are red, which ones you can ignore, and how to get rid of the red on things you shouldn't ignore.
- How going from HSS to Carbide enables higher rpms.
- How to tell when G-Wizard finds a cut aggressive (compare Manufacturer's data to actual data).
- How reducing Cut Depth (and Cut Width) makes the cut less aggressive so G-Wizard can try to go faster. You don't have to cut the whole depth in one pass, use multiple passes if one is too aggressive.
- How to tame Tool Deflection by reducing stickout.

The Tortoise Hare Slider will help you fine tune your cuts.
We'll delve into how to use the Tortoise Hare Slider to fine tune your cuts in our next example. Click below to check it out.
Beginner's Example #2: Using the Tortoise Hare Slider
Beginner’s Examples:
Example 1: Quick wood cutting with a Shapeoko
Example 2: Fine Tune Your Cuts with Tortoise and Hare Slider
Example 3: Avoid Tool Deflection with Cut Optimizer
Example 4: The Easiest Feeds and Speeds Ever: CADCAM Wizards
Experienced CNC’ers Examples:
Example 1: How much faster can I go with High Pressure Through Spindle Coolant?
Example 2: Playing “What-If” to optimize MRR’s
Example 3: Optimizing Cut Width and Cut Depth for Higher MRR’s and Better Tool Life
Example 4: Mastering High Speed Machining
CNC Router Examples:
Example 1: Figure out proper Feeds and Speeds to cut walnut plaques.
Example 2: Feeds and Speeds that won’t pop small parts off our vacuum table.
Example 3: Downcut and other special router cutters.
Note: Many of the early Beginner’s Examples use a small Shapeoko CNC Router too.
Be the first to know about updates at CNC Cookbook
Join our newsletter to get updates on what's next at CNC Cookbook.