Once upon a time in Bridgeport, Connecticut, there lived a man named Rudolph Bannow who conceived the now classic Bridgeport Mill. The design was done in 1936 and the knee mills went on sale in 1938. They became famous as the standard for manual milling machines, and that fame continues to this day.
What machinist has never heard of a Bridgeport Mill?
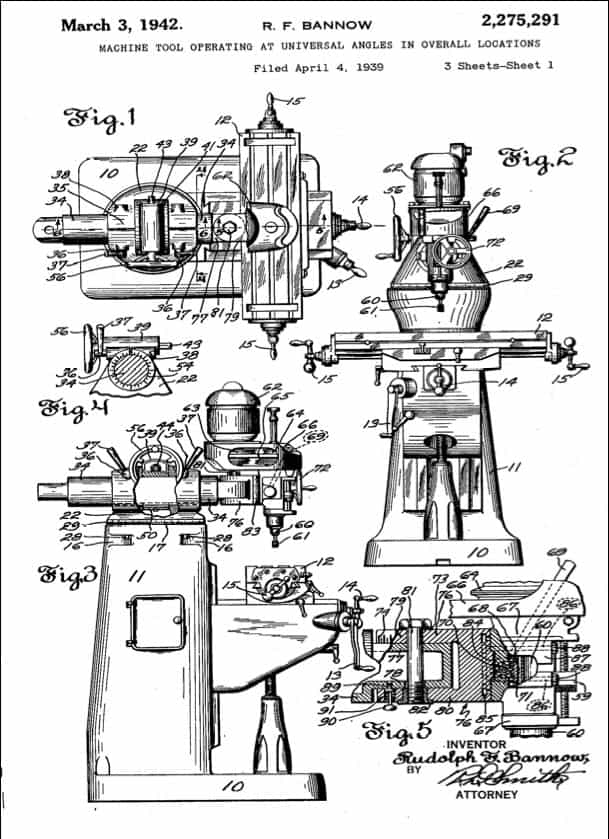
Here's a drawing from the original patent filed in 1939 and granted in 1942:
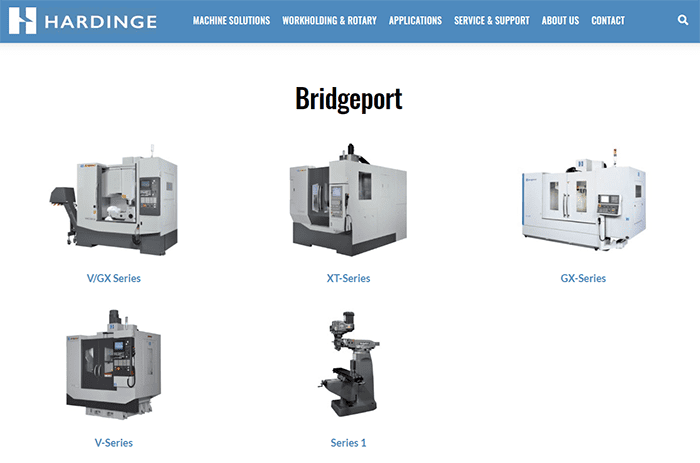
They're still listed for sale on Hardinge's web site alongside modern CNC VMC's as the "Series 1":
MSC will sell you a knee mill made by Hardinge-Bridgeport for the low price of just over $20,000. I don't know how many are still being sold at that price point given you can buy a decent clone for circa $5000.
Hardinge claims over 370,000 of these machines have been built over time, and I wonder if that even begins to include the many Asian clones and knock-offs that are available?
What is a Knee Mill? And Knee Mill vs Bed Mill?
Let's start by describing exactly what a knee mill is. This diagram should help:
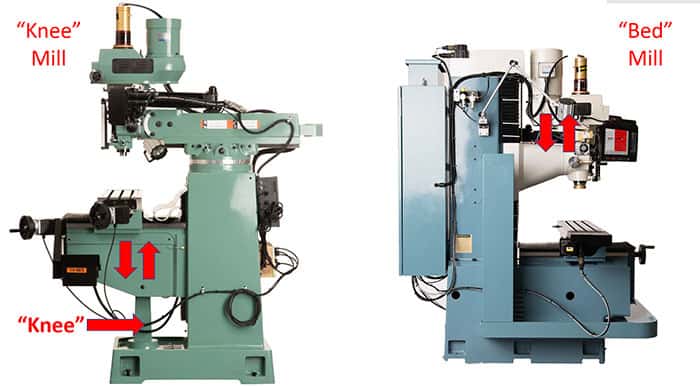
And for comparison, I've also shown a "Bed Mill". The main difference is that with a knee mill, the table moves up and down in Z, whereas with a Bed Mill it is the spindle that moves up and down.
Note that Knee Mills also have what's called a "Quill". If you're familiar with a drill press you'll know what a quill is. The quill moves just the spinning part of the spindle, not the motor, up and down in Z. This is usually done with the familiar X-shaped handle on the right side of the spindle head.
Modern CNC Vertical Machining Centers are universally Bed Mills, so why did Bannow go with the Knee Mill design for his Bridgeport Mill?
The answer is flexibility. Knee Mills are capable of a whole bunch of things that are more trouble on a Bed Mill:
- Tilt the head to machine at an angle. On a Bed Mill, you'll have to set the workpiece at an angle to accomplish the same. That's going to be more trouble and potentially require more expensive fixtures.
- Machining parts larger than travel is always a pain, but on a Knee Mill you may be able to swivel the head and extend the ram. Indicate from a known spot reachable by prior travels and keep going.
- Machining long parts on a knee mill is done by standing the part vertically and attacking it to the side of the table.
But, like all things, there are downsides to this flexibility, especially where CNC is concerned. The biggest downside is the lower rigidity of a knee mill versus a big bed mill such as is found on a modern CNC VMC.
When you consider that the need for the kinds of flexibility offered by the Bridgeport Mill doesn't come along all that often, while Rigidity can affect almost every machining operation, you can see the writing on the wall.
BTW, the ability to swivel and extend on a ram the milling head is the definition of a Turret Mill. Bridgeport Mills are not just Knee Mills, they are Turret Mills as well.
There's one other issue for CNC applications. Knee Mills have two methods of travel in Z: their quill and cranking the table up and down. This is problematic because both are needed. Cranking the table up and down has the most range, but it is the slowest-that table is big and heavy. The quill has limited range, and while automating its motion in CNC is the simplest and most common, the lack of travel can be annoying.
All-in-all, if you plan to use a manual mill as a basis for a CNC Retrofit, a Bed Mill is likely to be a better candidate than a Knee Mill. Even so, back in the days before VMC's took over and made them dinosaurs, there were many CNC Knee Mills available from Bridgeport as well as companies like Tree.
Why Are Knee Mills and Bridgeport Mills Still Popular?
I did a bunch of poking around and I often ask shops I visit about the old Bridgeports I see sitting in the toolroom. Do you still use your Bridgeport Mill? What for?
They're still quite popular, and many machinists have a hard time imaging not having a Bridgeport Mill sitting ready to go in some corner of the shop.
Here's why:
Universal Brand and Familiarity
![]()
Almost any machinist can run a Bridgeport Mill. They're in all the schools. The brand has a loyal following. In general, when a machinist hears "Bridgeport Mill" they think good things. They realize these mills have their limits, but that's not the point. They also have their uses and they have served well over the years.
If you drop into a vocational program at a school, you're almost always going to see at least one Bridgeport (yup, my son ran one in school, LOL) so the new generation that's coming up through the ranks are automatically read to go on Bridgeports for the foreseeable future.
Fast and Simple
"I just need a couple holes in that part."
Or, "I just need to quickly mill a little off the side."
For most machinists, walking up to a Bridgeport Mill to drill a hole or trim a little off a part is quick and easy. They can't imagine spending time to program a CNC machine to do that sort of work. Plus, the CNC machines sitting on the main part of the Shop Floor are expensive beasts. They need to be kept busy generating barrels and barrels of chips on high paying jobs. No time to help out a machinist needing a quick hole for a simple bracket.
Second Ops
In the same vein as the "Fast and Simple" argument, it's often easy to perform some simple second ops on a part run with a properly set up Bridgeport. Tapping holes by power tapping on the Bridgeport is a great example.
You've never power tapped? It's easy:
- Put the tap in the machine.
- Position it properly over the hole. A fixture with the right stops will make this easy to do for multiple parts.
- Apply a little tap fluid (Moly-D!).
- Lower the tap spinning into the hole until it grabs then let go the handle. It will pull itself in as it threads.
- Reverse it out.
BOOM! (Oh wait, that's the other CNC guy, LOL)
It's quick and easy.
Generations of machinists have been doing that for years. ‘
Toolroom Use
Toolrooms are the place where the Bridgeport Mill's flexibility and small footprint really shine. In the Toolroom, we're making fixtures and perhaps a few quick prototypes or bits of tooling. You can throw together a simple plate fixture with a bunch of Mitee Bite clamps or similar very quickly on a Bridgie.
Manual vs CNC Cutting Speeds
Why is determining the speed of cutting crucial in CNC, and what makes it difficult to compute?
First thing's first-if you're just looking for quick access to CNC cutting speeds, the best place to look is at our G-Wizard Feeds and Speeds Calculator. Our free 30-day trial will get you calculating your feeds and speeds right away. If what you're looking for is to learn more about CNC cutting speeds, check out our free Feeds and Speeds Cookbook. There's a wealth of great information there. If you have a little extra time, and you're curious about the differences between manual cutting speeds and CNC cutting speeds, keep reading. What I want to talk about here, are two things:
First, why are cutting speeds so important for CNC, and second, how come they're so much harder to calculate for CNC than they were for manual machines?
A Look Back at the Simpler Life of the Manual Machinist Using a Bridgeport Mill
Once upon a time, we had little or no automation. At best, there were hydraulic tracer machines and screw machines. That's not to say they couldn't do quite a lot, but they certainly were not as ubiquitous as CNC has become in today's machine shops. Instead, we had machines like the iconic Bridgeport Milling Machine. Let's start by taking a look at the good old Bridgeport, copies of which are still being manufactured today.
The heart of any machine tool is its spindle, and for the Bridgeport, the pinnacle of spindle evolution was the 2JS head. That head used a back gear and a variable sheave belt system to achieve reasonably flat distribution of its 2 HP all the way from 50 to 3750 rpm. Its taper was the common-as-cats R8. Not too shabby:
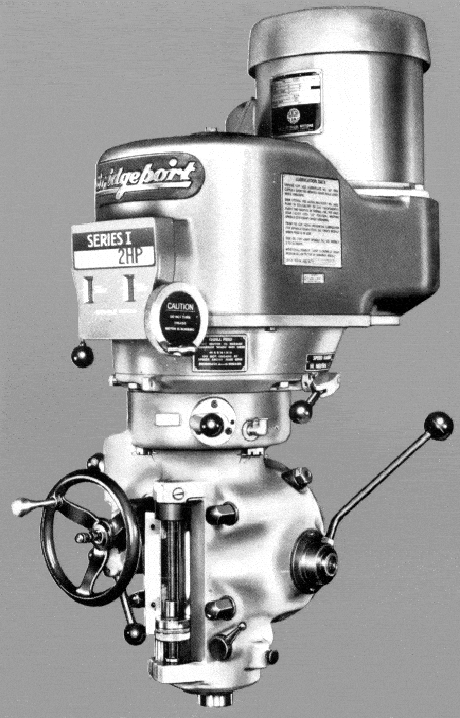
2 HP from 50 to 3750 rpm and an R8 taper!
For automation, we had the Mk I revision 1932 through 2011 or later human machinist. Feedrates were a function of how fast that machinist could turn the handwheel, or in some cases, how fast a power feed could move, which wasn't an awful lot faster. Given that the handwheel moves through 100 0.001" divisions each turn and you could maybe turn 2 or 3 turns a second during roughing, and maybe half that for finishing or less, we're talking feedrates of 6 to maybe 18 inches per minute.
In terms of axes, the machinist could move them one at a time-no coordinated motion was really possible without a rotary table, and even then, coordinated motion was limited to circles. The slick interpolated moves of a modern CNC were hardly even a gleam in the imagination. This was just how these machines worked and nobody worried about it too much.
Differences for CNC Machinists Using a Haas Mini-Mill
And then along came CNC. For reference, let's consider the smallest Haas CNC mill. I'm not sure this is the most common CNC the way the Bridgeport was the most common manual mill, but it is a fairly common CNC that perhaps most importantly is similar in size and capacity. Here is one that was featured in our Home Shop Hall of Fame:

The Haas Mini Mill...
Starting with the spindle again, we have a 7.5 HP, 6000 rpm spindle with a CAT40 taper. The quoted cutting feedrate is 500 inches per minute, and of course this machine is perfectly happy moving not just all 3 axes simultaneously, but also slapping on a 4th axis that will move too!
Getting the Most Out of Each Machine Requires a Different Strategy?
Given that you've only got 2 HP, 3750 rpm, and maybe 18 inches per minute of feedrate, plus the fact that many would say the limits of the R8 taper are an endmill of about 3/4" maximum diameter, what's the best strategy for removing material with your Bridgeport?
Modern CNC's often use fancy toolpath strategies such as constant tool engagement angle paths and they take advantage of geometric effects like radial chip thinning to move extremely quickly while exerting as little force as possible on the machine and working to maintain the life of the tool. There's no point in any of that with the Bridgeport. You can't turn the handwheel fast enough to feed a radial chip thinned path, and you can't turn two handwheels at once to go around a corner without dwelling, let alone manage the complicated curlicues that a constant tool engagement path makes.


Comparison of the same pocket done with HSM and conventional toolpaths in GibbsCAM as shown by the GWE CNC Simulator. Neither one could really be done on a manual machine...
So, instead of having all this fancy digital sophistication, the answer for manual machinists was to load the biggest cutter they could and bury it. Here's how the cutting speeds and conditions differ:
- With much slower spindles and on materials that like fast spindle speeds like aluminum, we rely more on chipload than spindle speed to do the work. It turns out that because it is less brittle, HSS tooling can take higher chiploads than carbide. Carbide can tolerate much higher spindle speeds that more than offset that difference, but on a slow spindle, HSS can win.
- Since we have such slow feedrates, it isn't like we can't take great heaping gobs if we're taking skinny little cuts. The answer is to use a larger cutter and bury it. Got a 3/4" endmill? Use as close to 3/4" width of cut as you can.
- Since we've buried the width of cut, and we don't have a lot of cut calculation sophistication anyway, we probably aren't cutting too deep. Depths of cut are 1 x Diameter or maybe a little more, but nothing too crazy.
I'll add one last consideration-with manual machining, not only are things not happening nearly as quickly as they do with CNC, but the machinist is getting instant feedback from the handwheel about how "happy" the cut is.
Those factors, in a nutshell, radically simplify cutting speeds for manual machining. With no fancy toolpaths, an inability to feed very quickly, and a need to make shallow but wide cuts, we eliminate a whole host of complications. For this kind of machining, the basic equations we're all so familiar with work just fine. In fact, you can basically tune it up by ear pretty easily once you know what a good cut sounds like.
Now We Can See Why Cutting Speeds are Much Harder for CNC!
Getting back to the case for CNC, there are a whole host of new factors to consider such as:
- Radial chip thinning. Any time you cut less than half the diameter of the cutter wide, the chipload isn't what you calculate with the simple equations. The thinner the slice you're taking, the further off you will be.
- If the chipload goes too low, your tool will begin to "rub", and tool life falls off quickly. The likelihood of rubbing while manually machining is much less. At 3000 rpm and a 3 IPM feedrate, you've still got room to go 3-5x slower before you're into true rubbing territory. HSS tooling is sharper than carbide, making it even harder to get the tool to rub.
- You're keeping the cut relatively shallow due to the broad widths of cut, and you're not going around corners as fast as a CNC would. This greatly improves chip clearing and keeps the big jumps in load on the tool that corners cause from happening so suddenly.
The list goes on, but you get the idea. For CNC, the G-Wizard Cutting Speed Calculations consider nearly 50 variables versus the handful that the simple equations are focused on. In addition to facing more complexity from a physics standpoint, the CNC machinist is cut off from the feel of the machine. When something goes wrong, your first warning is often dire (tool breakage is the least of your worries) and then it's a mad dash for that bright red emergency stop button.
Want to Learn More About Feeds and Speeds?
If you'd like to learn more about the art of calculating CNC cutting speeds, check out our free Feeds and Speeds Cookbook or get signed up to try the G-Wizard Calculator:
Try the Free Trial Version of G-Wizard Speeds and Feeds Calculator...

No credit card required-just your name and email.
What's the Future? Should You Buy a Knee Mill?
My expectation is that the Bridgeport Mill has a bright future for years to come. At least the clones do, not sure what the market for $20K plus Bridgie's looks like.
They'll go into toolrooms where they'll be used as described above.
But, let's dream just for a minute. Suppose you're setting up a brand new job shop. You want a machine to perform the tasks on the side that are too expensive to run on your CNC VMC machines.
Should you buy a Knee Mill?
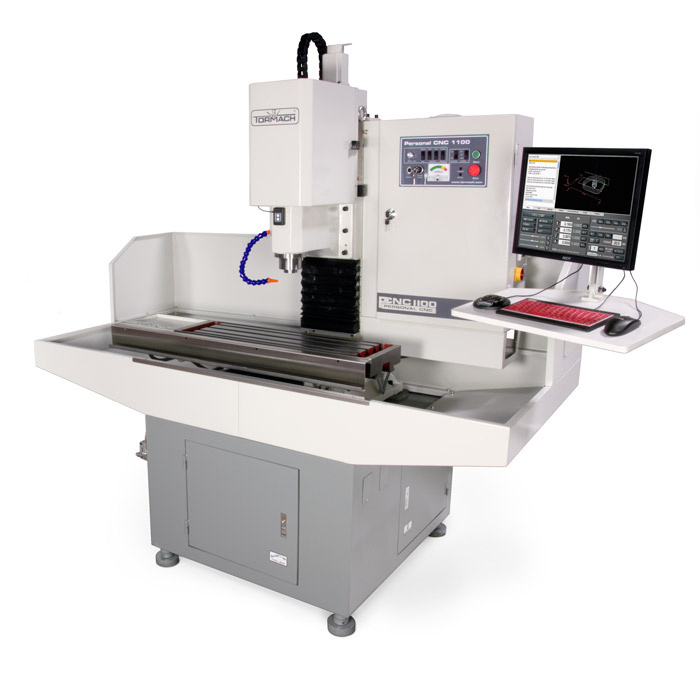
I wouldn't. Yup, that's right, I wouldn't. I don't mean to get all controversial, but there's a better answer available. I'd buy a small CNC machine. Something like this Tormach would be perfect:
Whoa! Past generations of machinists are spinning in their graves at the very thought of it. Present mature machinists want to know what the heck I'm thinking. Well, it's pretty simple, really.
First, let's revisit the advantages of a Bridgeport Knee Mill for this application:
- Small Footprint + Relatively Cheap: Fits in my toolroom corner in a space too small for a full-grown CNC that can make me more money.
- Fast and Simple: I gotta be able to walk up and do simple things without having to resort to CADCAM.
- Easy to Learn: They already know how to use the Bridgie, so anything new has a double priority of being easy to learn and use.
- Great for Second Ops: Holemaking, Tapping, and simple machining ops.
Okay, so let's go down that list and see how a Tormach 1100 would compare!
Universal Brand and Familiarity
Okay, the Bridgeport Mill wins here, and it is uncontested. But this is the only category where the Bridgeport wins hands down.
By the way, Tormach is making a big push into STEM education, and this will pay great dividends for their brand recognition down the road.
Small Footprint + Relatively Cheap
Hardinge says you need 7 x 4 feet of floor space to install a Series 1 Bridgeport Mill. A Tormach 1100M fits in 6 x 5 feet. Pretty close.
Cheap? Well, the knee mill is probably $5K to $20K depending on which one you buy. Tooling for these two will be similar, though with a CNC some kinds of tooling are not needed (like a rotary table). To get the advantages and make a reasonable comparison, I'd say the Tormach 1100M "Starter" Package at circa $14K is the right comparison.
For more on How Much CNC Machines Cost, check out this linked article.
So the Tormach carries a premium to many knee mills (especially that crusty old one you've been dragging around for years), it isn't that big. BTW, think of your Tormach CNC Mill as a Manual Mill that has Power Feeds and DRO's on all axes.
Now, a decent DRO for a Bridgeport can cost you $500 or more. Add another $500 for a power feed. It's a little closer to the Tormach's price.
Fast and Simple
Remember, we're assuming the Bridgeport Mill wins on fast and simple because most machinists already know how to use it. But, there are a couple secret weapons that will put a CNC Mill like the Tormach way ahead of the Bridgeport Mill.
First, consider Conversational Programming. It's built right into the Tormach's Path Pilot controller and makes all sorts of operations super easy. In the end, you answer a few questions from a Wizard and the machine jumps in and just does it. And boy, it'll do things that require a lot more effort on a Bridgeport Mill. It'll do them faster, and it'll do them right and accurately the first time every time.
Here's the Tormach's Thread Milling Conversational Wizard:
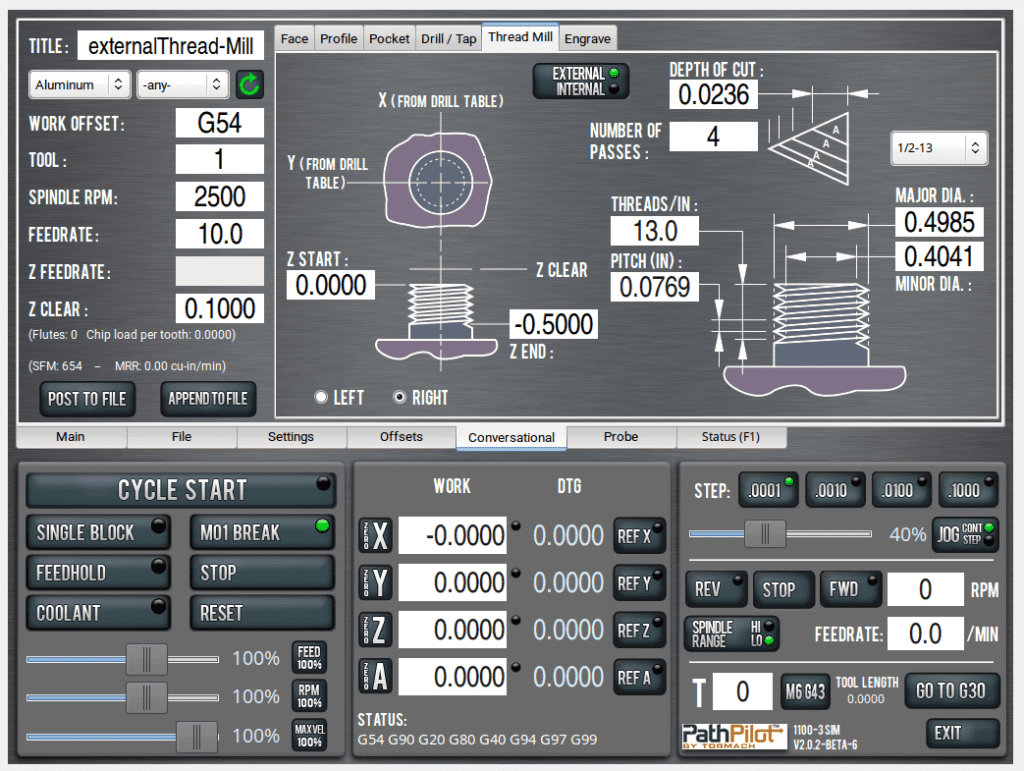
Fill in the blanks and you're thread milling. This is something that's just not possible on a manual machine like a Bridgeport Mill.
Second, with a small amount of learning, you can run any CNC mill just like a manual mill that has power feeds and DRO's on all axes. All that's needed are a few g-codes and knowing how to type them in for manual execution. Don't worry, it's super easy and we have a great article and cheat sheet to make it even easier.
Get anyone who will use the machine to be able to run the Conversational Programming and MDI and they'll be leaving Bridgeport Mill operators in the dust. All it takes is an afternoon to get the hang of it.
By now, the Tormach should be ahead if you have any idea how handy an easy a CNC Mill with Conversational and MDI programming can be. If you've never used one, you may just have to take my word for it.
I will tell you I sold first my manual mill then my drill press too because my Tormach was so easy to just walk up to and drill a hole or whatever that they were gathering dust. True story!
Great for Second Ops
Even if you are not imagining the value of these machines for quick one-offs, their advantage for running second ops should be obvious. Geez, they're completely programmable just like your VMC with the same g-code.
Second ops are trivial with these things, and Tormach tells me they sell a bunch for that purpose. Our local Tormach dealer, Santa Cruz Electronics has also regaled me with many stories that are essentially Tormach purchases for second ops. In some cases, they were throwaway-bought for one job, made a bunch of money, then resold when no longer needed. I'd say they're pretty cost effective!
People use them for all kinds of crazy second ops. Normal machining is obvious and easy. More specialized uses are also common. For example, applying glue, paint, or special coatings is easy to do. Try using your Bridgeport Mill to assist with that.
One application involved machining an opening in some packaging that was supposed to have been permanently sealed in order to rework the product with some updated internals. Crazy cool stuff!
Why not make sure your Toolroom Mill is there for second ops any time you need a spare "hand"? These things are money makers for a lot of folks.
Toolroom Use
What about that whole toolroom business?
Well naturally a Tormach is great for making fixtures and tooling of various kinds. It's quite easy to do on one, and it should be obvious how helpful a CNC mill would be for such an application.
I have to award one win to the Bridgeport though. For sheer flexibility given its tilting head and ability to hang parts off the side of the table, it beats a machine like a Tormach. But geez, when was the last time you really needed to do that? And how many people do you know with Bridgeports that would let you borrow some time if push came to shove?
Conclusion
The ubiquitous Bridgeport Mill will be with us for a long long time yet. They're very handy to have around. But they are not the undisputed challengers for their niche. Canny buyers should be looking at whether the latest crop of inexpensive small CNC Mills wouldn't be a better bet for their needs. Or, for the best equipped shops with the space and money, maybe you want both?
Be the first to know about updates at CNC Cookbook
Join our newsletter to get updates on what's next at CNC Cookbook.