CNCCookbook's G-Code Tutorial
Haas makes some of the most popular CNC machines in the world, so knowing how to use their unique g-codes can be an important skill. The good news is that Haas has taken one of the smartest approaches I can think of in creating their unique g-code dialect.
Haas: Smart strategy when it comes to their CNC G-Code dialect...
They started with the world's most popular dialect, Fanuc (what the bulk of this course is concerned with) and built on top of it while maintaining compatibility. They didn't make any arbitrary changes and they largely added good value and convenience.
This is a smart strategy because it means most Fanuc g-code will just run on a Haas, yet they still have some great advantages to talk about due to the special codes they've added. It also means that the vast cadre of folks who know Fanuc g-code programming are ready to be productive day one on Haas machines, and they can pick up the things Haas added as they need to.
This article is all about picking up those things today, so let's get started.
What are the Haas G-Codes for Mills?
Here's a quick overview:
- G12/13: Circular Pockets
- G51: Scaling
- G53: Non-Modal Machine Coordinate System
- G68: Rotation
- G101: Mirror Image
- G150: General Purpose Pocket Milling
Now let's go through and break down each one to see how it works.
G12 & G13 G-Codes: Circular Pockets
Circular Interpolation or Helical Interpolation is something we see often in CNC programming. It's a case where an endmill is programmed to follow a circular or helical path to make a much bigger hole than the diameter of the endmill.
These special Haas g-codes make it easy to perform the operation. G12 cuts in a clockwise direction while G13 cuts counter-clockwise. Here are the words you'll use to create the pocket:
D*: Tool radius or diameter. If you use D00, it tells the Haas not to use cutter compensation. The D-Word is modal, so if none is specified, the last value of D will be used.
F: Feedrate
I: Radis of the first circle (or finish if no K). I must be greater than Tool Radius but less than K.
K*: Radius of the finished circle.
L*: Loop count for repeating deeper cuts.
Q*: Radius increment or stepover. To be used with K.
Z: Depth of cut or increment
* = The word is optional and can be left out.
To use these g-codes, start by positioning the tool above the center of the circle. You have a choice-you can either remove all the material inside the circle, or you can cut the circle's radius only. If you want to just cut the radius, use an I value set to the radius and do not specify a K or Q value. If you want to remove all the material, use I and Q values less than the tool's diameter and a K value equal to the circle's radius.
Here's a sample program that just cut's the radius:
%
(SAMPLE G12)
T1 M06 (Select tool 1) ;
G00 G90 G40 G49 G54 (Safe startup) ;
G00 X0 Y0 (Rapid to 1st position) ;
S1000 M03 (Spindle on CW) ;
G43 H01 Z0.1 (Tool offset 1 on) ;
M08 (Coolant on) ;
( Cut the circle ) ;
G12 I0.75 F10. Z-1.2 D01 (Finish pocket CW) ;
G00 Z0.1 (Retract) ;
G00 Z0.1 M09 (Rapid retract, Coolant off) ;
G53 G49 Z0 M05 (Z home, Spindle off) ;
G53 Y0 (Y home) ;
M30 (End program) ;
%
And here's a backplot in G-Wizard Editor of that program's toolpath:
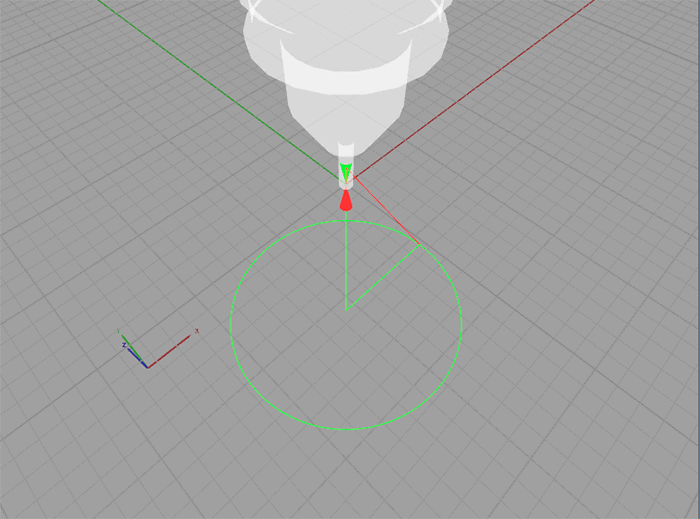
G12 set for radius style cut...
G51 G-Code: Scaling
G51 scaling is available on Fanuc controls, but Haas does it slightly differently. Here is the Haas syntax:
G51 X_ Y_ Z_ P_
X, Y, and Z allow you to specify an optional center for the scaling. If they're absent, the center is the origin (part zero). P is the scaling factor. If there is no P specified, setting 71 is the default scaling factor.
Note that scaling is an optional extra-cost feature on Haas controls.
Scaling is handy for a lot of purposes, and our chapter on scaling has more details on that.
G53 G-Code: Non-Modal Machine Coordinate System
G53 lets you cancel the work coordinate system for one block. In other words, it is non-modal. You must use it with a G49 cnc code if you have a Z value as G49 cancels the tool offset.
For example:
G53 Y0
That g-code will move the table to machine zero in Y. G53 is mostly a shortcut versus say G28.
For example:
G28 G91 Z0
Now you have to remember to add a G90. With G53, G90 stays in effect.
G68 G-Code: Rotation
Like scaling, rotation is also available in Fanuc, but it's slightly different on Haas. It's also an extra-cost option to enable rotation.
G68 rotates subsequent X, Y, Z, I, J, and K values by a specified angle with a center of rotation. G69 cancels the G68 rotation.
Before using rotation, be sure the plan of rotation is specified by G17, G18, or G19.
Here's the syntax for G68
G68 a_ b_ R
a is the coordinate for the center of rotation of the first axis of the plane you specified. So, for G17, it is X. b is the coordinate of the center of rotation for the second axis. For G17, it is Y.
R specifies the angle of rotation in degrees. You may use values from 360 to -360.
G101 G-Code: Mirror Image
G101 may be used to produce a mirror image of a sequence of codes around an X, Y, Z, A, or B axis.
Here's the syntax:
G101 X_ Y_ Z_ A_ B_
You must specify at least one axis. Any value given with the axis word is ignored, but you need the value to avoid an alarm.
Use G100 to cancel mirror images.
G150 G-Code: General Purpose Pocket Milling
G150 is a very fancy and handy g-code. Think of it as the equivalent of a CNC Lathe's G71 cycle for milling. In essence, it's a mini-CAM program in a g-code.
What it does is let you specify the outline of a pocket as a little g-code program. G150 will clear out that pocket.
Here's the syntax:
G150 G41* P_ F_ D_ I_ J_ K_ Q_ R_ X_ Y_ Z_ L_ S_
And here's what the parameters do:
- P: The number of the subprogram that specifies the pocket outline. Required!
- F: Feedrate
- D: Tool diameter offset selection.
- I: X-axis cut increment. Each pass removes this much material. You must specify I or J but you cannot specify both.
- J: Y-axis cut increment.
- K: Finish cut allowance for the final pass.
- Q: Incremental Z-axis cut depth per pass. Must may be equal to 0 and is required. Q is a positive incremental stepdown amount.
- R: R plane position (Required). This is the retract plane for rapid motion.
- X and Y: Position of starting hole.
- Z: Final pocket depth
- L: Optional repetition count for additional pockets.
- S: Optional spindle speed
G41 cutter comp is normally specified, but you can also use G42 if you prefer.
The first thing to note is that G150 expects there to be a hole for the full pocket depth it can use to get the endmil down to cutting depth on each pass. You can drill or interpolate that hole, but it must be done before you call G150.
Second, your pocket definition, referred to by the P-word, must be a sub-program, not a subroutine.
Last, the subprogram must have fewer than 40 moves. You can get around this by cutting more than one pocket.
Other things to note:
- Codes other than G, I, R, X, and Y in the subprogram are ignored.
- The first move in the subprogram should be from the hole to a point on the pocket edge.
- The last move should be to that same starting point on the pocket edge.
- it's okay to use G91 (incremental) or G90 (absolute) moves in the sub-program.
- There's no Z-depth finish pass, it's only on the walls of the pocket.
- If you use L for repeating pockets, you must have a G91 and incremental positioning in the G150 line. Make sure you've drilled all the pocket entry holes first!
The G150 g-code is pretty slick, but in the end of the day, CAM Software makes pocket program easier and less error-prone. Keep G150 for simply pockets that are easily programmed and visualized.
Next Article: Thread Milling
Be the first to know about updates at CNC Cookbook
Join our newsletter to get updates on what's next at CNC Cookbook.