CNCCookbook's G-Code Tutorial
Linear Motion is Straight Line Motion
G-Code is about motion, and the most common kind of motion found in part programs is straight line or linear motion. Motion is another one of those things in g-code that is modal. You tell the controller what kind of motion you'd like with a g-code and it remembers to always make that kind of motion until you tell it to change using another g-code.
We've covered a lot of the basics in the chapter on MDI, but let's just buzz through a review and slightly deeper coverage of that material. It won't take long and it will give me a chance to talk about the commands from the perspective of part programs rather than manual machining.
G00 for Fast Positioning, G01 for Slower Cutting Motion
There are two codes intended to set up linear motion modes:

G01 and G00 for straight line motion...
Rapids motion tells your machine to move at its fastest possible speed. G00 is used to position the cutter near where you want to start cutting, but we never enter a cut with G00. Doing so by mistake ensures a broken cutter or worse as rapids motion is way too fast for any kind of cutting. Most controllers start up with G00 active when you first turn on the machine. That's because the part program has to manuever the cutter into position near the cut before you can begin removing material. Once the cutter is ready and you want to make cutting motions, you would typically use G01 to specify feed motion.
Older Machines May "Dog Leg" G00

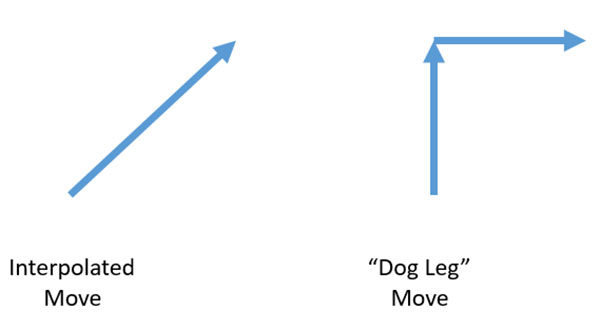
Interpolated vs "Dog Leg" Moves...
Something to keep in mind if you're using an older controller is that it may "dog leg" G00. That means that rather than moving all the axes to create straight line motion to the target, it will move one axis at a time. Depending on what might be in the way (clamps, fixtures, vises, or raised portions of your workpiece), this can be very important to consider when programming G00 moves.
Note: This article is part of our CNCCookbook G-Code Tutorial. Learn g code the easy way with our tutorial!
Specify Cutting Feed Rate With the "F" Word and Spindle RPM Speed with the "S" Word
No, silly, not that F-word! "F" as in "Feed rate". The speed at which your cutter moves while the G01 mode is active is called its feedrate. This rate is highly dependent on the type of material you are cutting, the type of cutter you're using, the spindle speed and a whole host of other factors. The feedrate word specifies feedrate in inches per minute for Imperial controllers and in millimeters per minute if your controller is set up for metric. It's easiest to determine the feedrate using a feeds and speeds calculator like our own G-Wizard. We have a free course on determining the best feeds and speeds for your machine, so be sure to check it out. The G-Wizard Calculator is also available for a free trial so you can play with it.
The other important parameter when setting up a cut is the spindle speed, which is determined by the "S" word. For now, consider that the default "S" address is rpm. There are specialized modes that let you specify spindle speed in other ways.
I like to set up the F and S words before issuing the G01. The words are modal just like G00 and G01, so you set them and then don't need to change them until you want a different speed or feed. Switching back and forth between G00 and G01 or the other kinds of motion doesn't affect the F and S settings either.
G-Wizard Editor is Integrated With the G-Wizard Feeds and Speeds Calculator
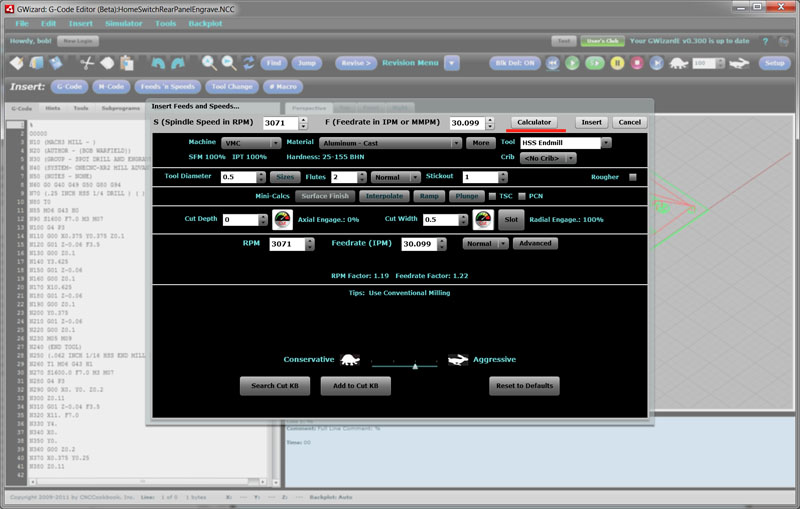
G-Wizard Editor includes Wizards to help insert all the different g-codes in the right formats. To add feeds and speeds type "Ctrl+P" (P for sPeeds and feeds). All our keyboard shortcuts have some kind of memory aid behind the choice of which keys to press, and they're listed on the keyboard page. Once typed, you get a popup that lets you enter a value for feedrate and spindle rpm at the top. If you press the "Calculator" button (underlined in red below), you get to access the G-Wizard Feeds and Speeds Calculator:

Integrating our feeds and speeds calculator with GWE...
Note that you have to be a registered G-Wizard Calculator user with a valid trial or subscription. Use the calculator as desired to calculate your feeds and speeds and then press the "Insert" button in the top row to add the "F" and "S" words with their addresses to your program.
Specifying Linear Motion With X, Y, and Z
Note that simply specifying G00 or G01 does not cause any motion to happen-they merely tell the controller what type of motion is expected when you finally tell it where to move to. For actual motion you need to specify a destination using the X, Y, and Z words. We've talked about how the coordinate system works previously, so you should be quite familiar with XYZ moves. As a reminder, to move to the part zero, we might issue a command like this:
G00 X0Y0Z0
We can also do it this way:
G00 (Or use G01 if you want to go slower)
X0Y0Z0
When we specify multiple coordinates on a line, we get what's called interpolated motion or an interpolated move. That fancy word just means more than one axis of the machine is moving at the same time. In fact, the controller will move them all at exactly the right speed relative to one another so that the cutter follows a straight line to the destination and moves at the feedrate. Imagine trying to do a coordinated 3 axis move at an exact feedrate on a manual machine. I know guys that can shift a stick shift on a car with their knee while both hands are busy (not recommended!), but I have yet to see a machinist do a coordinated 3 axis move with manual handwheels!
If we specify the same destination, but spread the coordinates over multiple lines, each line is a separate move:
G00
X0Y0 (Move to X0Y0 in one move, keeping Z constant)
Z0 (Move to Z0 in one move, keeping X and Y constant)
Remember, G00 and G01 are modal, so we only have to specify them when we want to change modes.
Careful With Z!
The concept of interpolated moves raises an interesting issue for the Z axis (or whichever axis controls your depth of cut). It's often a good idea to move the depth-of-cut-axis on its own, rather than as coordinated motion with other axes. Doing so just makes it easier to "eyeball" whether you're going to have a problem (collision is the technical term) as the cutter gets close to the workpiece and fixturing. It's really hard for the human eye to judge motion in multiple axes, particularly if you have to move a long ways in X and Y and a relatively shorter distance in Z. By first moving in X and Y and then moving in Z as shown in the example above, it's much easier to judge whether an accidental collision is about to take place. You're also much less likely to hit some random object sticking up, like a clamp, if you keep the cutter high until you're directly over where you want to start cutting.
The downside to this approach is it might be slightly slower than the coordinated move. If you're trying to wring every last second out of a job, start out making 2 moves and then when you're sure you've got the job running smoothly, update the program on a future run.
Entering a Cut
While you will often see programs and machinists that take the cutter straight into the material to begin a cut, this is not the best approach for cutter life and surface finish. The Feeds and Speeds course talks more about this in the section on toolpaths, but ideally you'd like to enter with some sort of an arc move that gradually builds the cutting forces instead of hammering straight in with a plunge cut of some kind. This makes it less likely you'll chip the cutter, especially in harder materials.
To do that, we'll need to understand arc moves, the subject of our next chapter.
Exercises
1. If you haven't already, sign up for the G-Wizard Calculator's free trial and start going through the free Feeds and Speeds Course to learn more about feedrates.
2. Try some "etch-a-sketch" programming. Draw out a figure by hand on graph paper so you can see the coordinates easily. Now using the G-Wizard Editor, start trying to enter the correct G00 and G01 moves to create a cut that resembles that figure. Use G00 to position close to the starting point, set the Feed and Speed up, and then start making G01 cuts
Next Article: Circular Arcs With G02 and G03
Be the first to know about updates at CNC Cookbook
Join our newsletter to get updates on what's next at CNC Cookbook.