
Note: This is Lesson 13 of our Free Email Feeds & Speeds Master Class. Click here to learn more about the Master Class.
For the most part, G-Wizard's Feeds & Speeds defaults work extremely well. But, there's even more performance to be had if we learn how to make some fine adjustments.
These adjustments fall into 3 categories:
- Adjustments for the specific make and model of tool or insert being used.
- Adjustments for task, specifically, roughing vs finishing.
- Adjustments for lightweight hobby-class vs industrial grade CNC machines and routers.
Let's dig in and see how to take advantage of these adjustments in G-Wizard.
Adjusting Tooling Based on Manufacturer's Specifications
Who would know better than the tooling manufacturer what their tool is capable of?
In truth, nobody. But, with that said, G-Wizard's defaults are extremely good. And it takes some time to go look up the Manufacturer's Data in their tooling catalog and feed that information into G-Wizard.
So, let's start by understanding, When should we use the Manufacturer's Specifications?
I tell G-Wizard users to start with the defaults. Then, if they're involved in a paying job where every penny counts, or if they're using expensive premium cutters, it makes sense to consider using Manufacturer's Specs. At least for cutters that are being used often.
Using Manufacturer's Specs also makes sense for indexable tooling. With so many different kinds of inserts available, performance spans a very wide range. It's hard for G-Wizard to know where within that range your particular inserts lie. So, you can pick up some big improvements by telling G-Wizard the manufacturer's recommendations.
And, if you're going to go to the trouble, then it also makes sense to preserve it for reuse later. We'll talk about two ways to do this, which can be combined.
So, let's step through how to go about it.
First, Look Up the Data
You should aim to retrieve the most favorable data issued by the provider for the material being cut, and the tool or insert that will be utilized. Please refer to the Tooling Catalog of the Manufacturer for this data. More often than not, a variety of figures will be presented to you. As an example, refer to these standard sets of charts provided by Lakeshore Carbide:
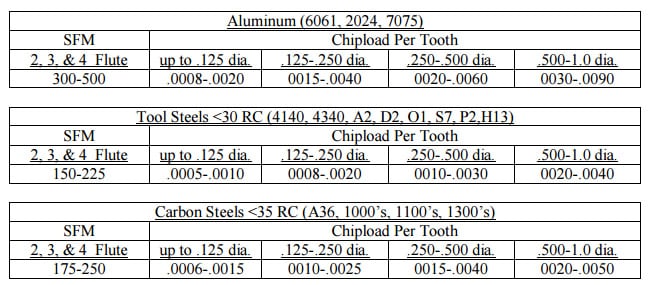
Typical feeds and speeds data from the Manufacturer's catalog...
Note how most all of the numbers are in a range-300 to 500 SFM for aluminum. And the chipload is 0.002 to 0.006 for 1/2" diameter in aluminum. We want the most aggressive numbers, so we would use 500 SFM and 0.006" of chipload per tooth. Some catalogs may tell you to reduce these values for full slotting or some other condition-ignore all that, G-Wizard will make such adjustments automatically, and it does a much better job.
Second, Enter it Into G-Wizard
Once you have the two numbers, just enter them into G-Wizard like so:
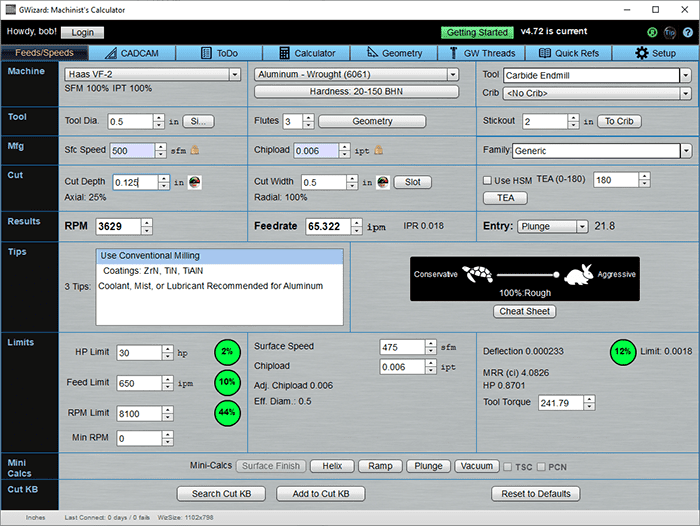
We entered 500 SFM for Mfg's Sfc Speed and 0.006 for Chipload...
Add the Tool to a Tool Table
Once you have it in G-Wizard's Feeds / Speeds tab, you can easily create a tool in the Tool Table. Just press the "To Crib" button. A popup asks you which crib to put it in, then takes you to the Tool Crib's Tool Editing Popup so you can modify it before saving to the Crib. Here's what that looks like:
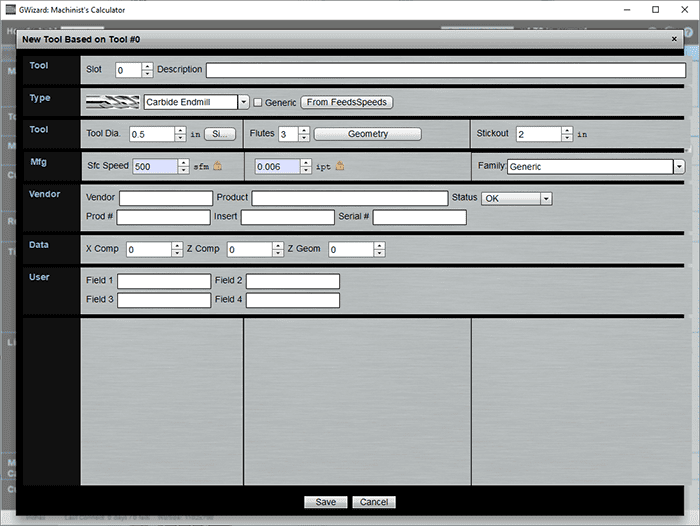
Looks pretty familiar, as it is based on the layout of Feeds / Speeds.
"To Crib" let's you build up your Tool Tables on an as-needed basis, working as you go. Pretty soon you'll have all your most commonly used tools in a table. But there's an even more powerful way to capture Manufacturer's Data that we call "Tool Famillies".
Save Your Manufacturer's Data with Tool Families
Just to the right of where you entered the Manufacturer's Data you'll notice there's a dropdown menu that says "Generic". That's the Tool Family menu, and you can use it to save frequently used Manufacturer's Data. If you click the dropdown button, you get the following popup:
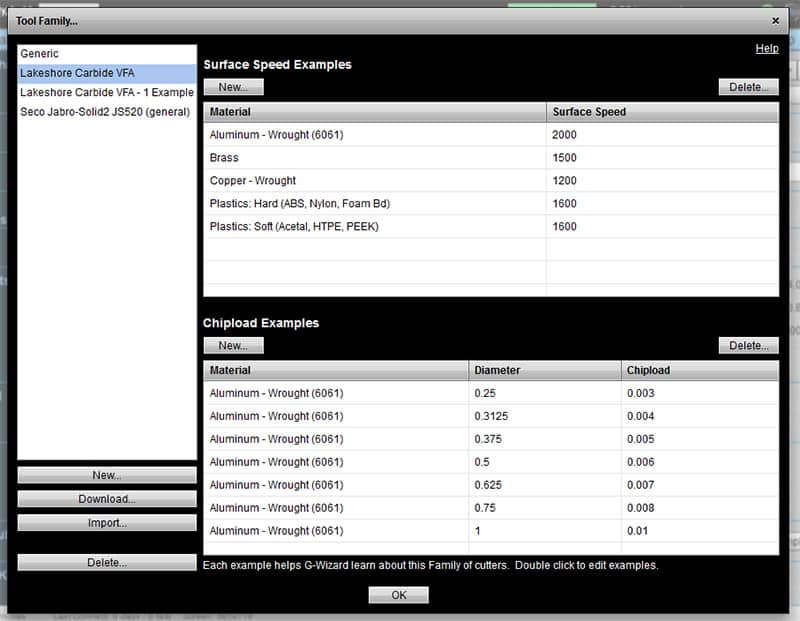
The Tool Families Pop Up...
Tool Families consist of Examples. You give examples for Surface Speed and Examples for Chipload. These examples are the same data you would enter in directly for the "Generic" choice, so use the guidelines at the top of this page to look them up.
The idea is that G-Wizard learns from the Examples, and it can use them to estimate specs for tools you haven't entered any Manufacturer's Specs on. This can save you having to type in the whole set of numbers. It's a real timesaver that doesn't exist in any other Feeds & Speeds software.
To use Family information, G-Wizard needs to have a material entry of the same material to calculate surface speed. To calculate chipload, it needs at least one example with a diameter within 25% of your target tool's diameter. Or, it needs 2 examples, one larger than or equal to and one less than or equal to in diameter. The examples must also use the same material as the cut you have setup.
Every time you add examples and close the window, they'll be saved so they're available next time you need to use them. This makes it easy to enter just the examples you need for a job as you go, instead of entering those giant tables from the tooling catalogs before you can do anything.
Now You Have Feeds and Speeds Calibrated with Manufacturer's Data!
G-Wizard will crank out Feeds and Speeds that are tailored to this particular endmill and to the cutting conditions you define in G-Wizard's other parameters. And of course, you can assign families to tools in Tool Tables too, which combines the power of the two features.
Adjusting for Task: Roughing vs Finishing

While it can be used just to "turn down the volume" on any cut that needs to be done more conservatively, the primary role of the Tortoise-Hare Slider is to select between a smoother finish for Finish Cuts (Tortoise) and a little rougher finish in order to hog out material faster (Hare).
From 0 to 29%, you're in the Finishing Range. From 30% to 100% you're in the Roughing Range. Recall our "Sweet Spot" diagram from the very first lesson:
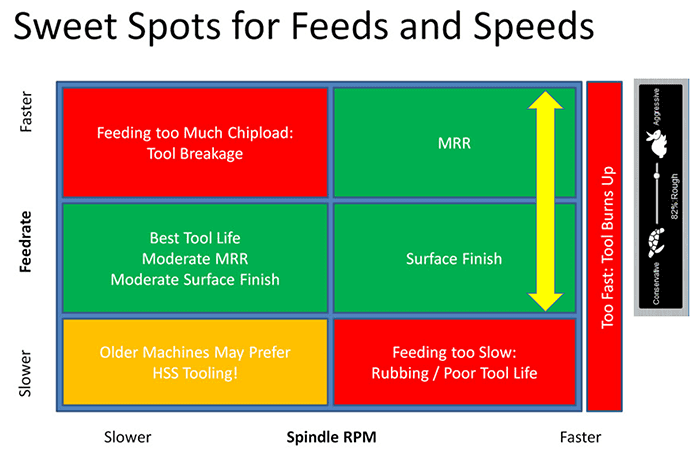
I've overlaid the yellow arrow and Tortoise-Hare Slider on the Sweet Spot diagram to show you what the slider does. In fact, the arrow is a touch diagonal, since it also will slow the spindle a bit as you move to the Tortoise end. That's so it is even more useful at making cuts more conservative if you have a lightweight machine or a setup that may not be as rigid as you'd like.
Here's another tip:
Full Tortoise is set up to be the exact slowest you can go before rubbing sets in. That's really useful to know, because as we know, rubbing is terrible for tool life.
G-Wizard is the only product with an "aggressiveness" slider that has all these smart functions built in.
What about adjustments for slotting, depth of cut, and so on?
Tooling catalogs will often give you a bunch of other adjustments to make that are task related. They'll tell you to slow down this much for slotting (i.e. Cut Width = Diameter of tool), this much if you're more than 1 diameter deep, and so on. If you don't have a tool like G-Wizard, you'll have to rely on these adjustments. But they're very crude compared to the sophisticated algorithms G-Wizard uses. That's why, as mentioned in the section on Manufacturer's Specs, we ignore them and just plug in the most aggressive specs in the tooling catalog for that cutter.
Adjusting for Lightweight vs Industrial CNC Machines
The last bit of fine tuning has to do with adjusting for the differences in rigidity between Hobby-Class and Industrial CNC Machines, as well as between rigid CNC Mills and slightly less rigid CNC Routers. It's another feature totally unique to G-Wizard, and boy is it a doozy!
Being a beginning machinist with a small machine is a tough job. Your machine is capable of some awesome things, even though it isn’t very large. If you have any doubt, just read through Hoss’s projects on his site Hossmachine where he converts a little Sieg X2 to a machine center complete with flood coolant, enclosure, tool changer, 4th axis, custom control panel, and much more. Or, check out some of the amazing projects from the Internet Craftsmanship Museum.
Coaxing these kinds of results from a lightweight machine is much more difficult than with a heavier machine. These machines are not nearly as rigid as the venerable Bridgeport knee mills, let alone even a low end Vertical Machining Center. After talking to a lot of folks with these machines, we’ve seen how to add some capabilities to G-Wizard that will facilitate their use.
Most of the science and literature on feeds and speeds is written from the perspective that the tool is the weak link. It’s focused on wringing maximum performance from that tool, and there is an implicit assumption that this will also wring maximum performance from the machine. That’s all fine and well if your machine is very rigid relative to the tool, but what if it isn’t?
Well if it isn't, your machine is the weak link. You will hit the machine's limits before you hit the tool's limits. And without some way of knowing where they are, you'll be surprised in a very bad way.
Enter G-Wizard's ability to adjust for lightweight CNC machines.
Compensating for Machine Rigidity
Industrial VMC’s weigh thousands of pounds yet the actual size parts they can machine may not be a lot larger than a mid-sized desktop CNC Router. Clearly those thousands of pounds do something for the VMC that the little machine isn’t getting, and that something is machine rigidity.
Spindle Power (HP in Imperial and KW in metric) is a measure of how much power the machine has available to try to deflect the machine’s frame. It doesn’t just go to deflection, it also goes to cutting, but let’s take the worst case here. In the industrial world, the relationship between machine weight and spindle power is pretty predictable. Here it is visually:
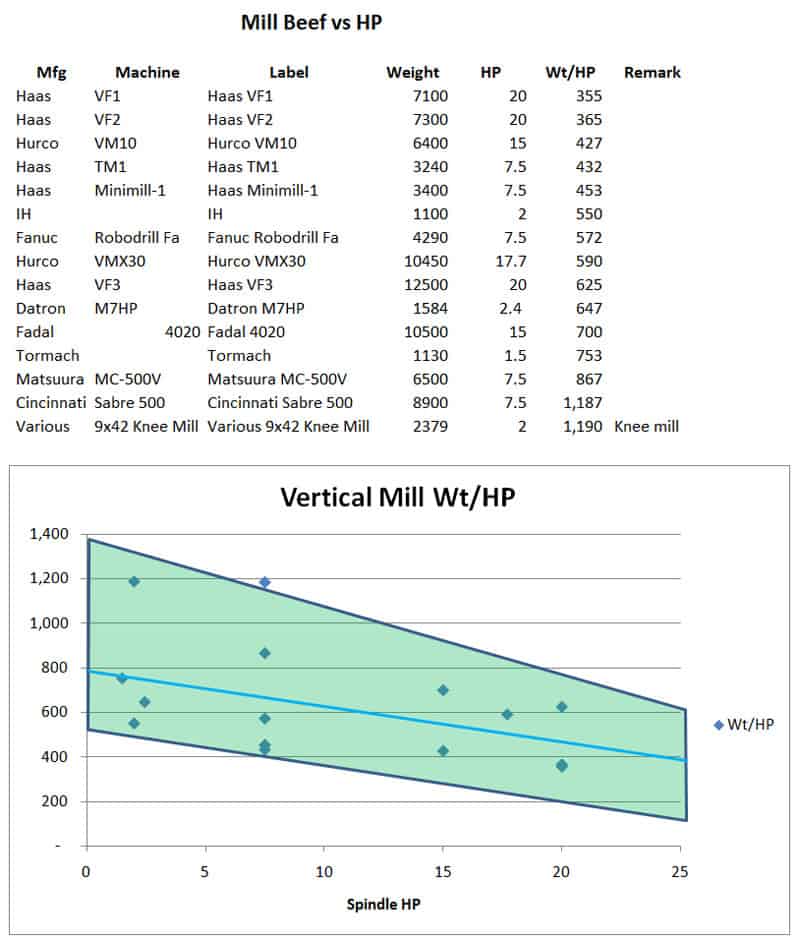
Machines fall within a pretty narrow zone…
G-Wizard uses this relationship, together with your machine’s work envelope (volume of its travels in X, Y, and Z) and weight to find an “ideal spindle power” that is right for the estimated rigidity of your machine. If that adjusted spindle power is less than your spindle’s rated power, then it derates to the adjusted power.
This video describes how to use G-Wizard's various spindle adjustments for the power curve (you can't get full power at every possible rpm) and for machine rigidity:
Conclusion
As you can imagine, fine tuning for all of these factors-tool, machine, and task-can really make a difference. But, it can also be time consuming. Remember, there's no requirement to do it. The defaults work pretty darned well. But, when you're ready to reach the next level of performance, G-Wizard is ready to help you get there!
Be the first to know about updates at CNC Cookbook
Join our newsletter to get updates on what's next at CNC Cookbook.