Understanding spotface vs counterbore is essential to comprehend how these machining features provide secure connections between components and ensure a high-quality finish. In this blog post, we will explore the differences between spotfaces and counterbores, their symbols, dimensioning, machining techniques, and common applications in various industries.
Short Summary
- Spotfaces and counterbores differ in depth, function, screw hole accommodation, and surface finish.
- They are widely used to create secure connections between components in the automotive, aerospace, and general manufacturing industries.
- Manual milling is cost-effective but requires greater operator skill while CNC milling offers higher precision with automated processes.
Understanding Spotfaces and Counterbores

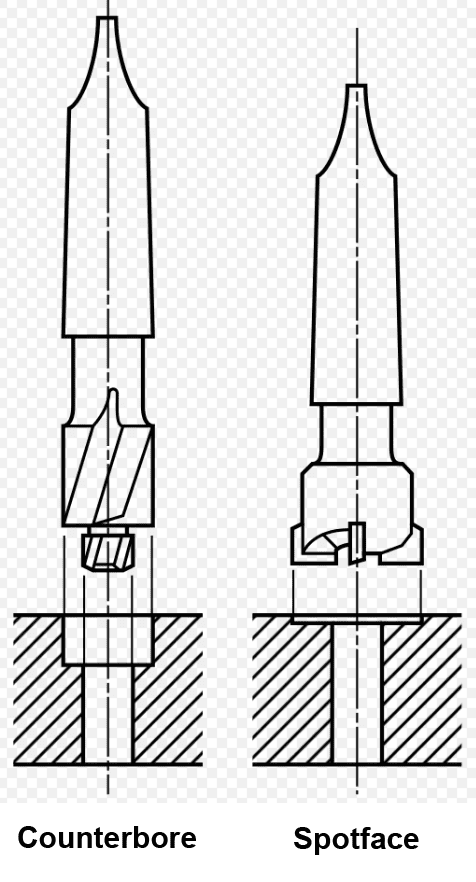
Machining features such as spotfaces and counterbores play a crucial role in creating accurately located surfaces for fasteners and recesses for screw heads. Understanding the differences between these two features will help you choose the appropriate machining process for your specific application. Spotfaces provide a flat, accurately located surface, which is essential for fasteners to sit flush with the workpiece’s surface. On the other hand, counterbores create a cylindrical recess for a fastener, allowing the screw head to be accommodated within the workpiece.
Although both spotfaces and counterbores are designed to accommodate fasteners, they differ in their depth, function, screw hole accommodation, and surface finish. In the following sections, we will delve deeper into these distinctions and explore the various machining techniques used to create spotfaces and counterbores.
Spotface: Definition and Purpose
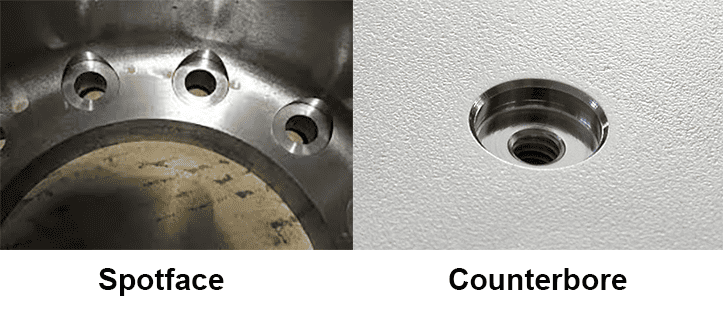
A spotface is a shallow counterbore that provides a flat, accurately located surface with a smooth finish. The primary purpose of a spotface is to offer a level surface for the screw or fastener to be seated on, ensuring accurately located surface stands. Spotfacing is executed to generate a smooth, level, and consistent surface for fasteners, while counterboring creates a cylindrical recess for fastener heads.
Creating a spotface involves machining a shallow, circular indentation on the workpiece’s surface. The spotface is typically achieved by cutting a shallow counterbore that is just deep enough to make the surface flat. This process ensures a smooth and accurately located mounting surface for fasteners such as bolts, nuts, and washers.
Counterbore: Definition and Purpose
A counterbore is a cylindrical recess machined into a part to accommodate a screw head or other fastening component. The primary purpose of a counterbore is to protect the head of the fastener and enable it to sit flush with or below the level of a workpiece’s surface. This is achieved by enlarging a drilled hole for a section of its length, allowing for the placement of a screw head in the counterbore screw hole. The section of the hole that has been enlarged is also referred to as a counterbore. Counterbore holes are essential in various applications where a clean and flush finish is required.
In essence, counterboring creates a cylindrical, flat-bottomed hole that is deeper than a spotface and specifically designed to accommodate screws with flat-bottomed heads. This machining process ensures a secure fit for fasteners, providing a flush and recessed mounting surface for screws and other fastening components.
Key Differences Between Spotfaces and Counterbores
As mentioned earlier, spotfaces and counterbores differ in their depth, function, screw hole accommodation, and surface finish. While both machining processes aim to create a flat surface for fasteners, the primary distinction lies in the depth of the feature and the type of fasteners they are designed to accommodate.
Let’s explore these differences in more detail, as understanding these distinctions will help you determine the appropriate machining process for your specific application.
Depth and Function
The primary distinction between spotfaces and counterbores in terms of depth is that counterbores are typically deeper than spotfaces. The purpose of a counterbore is to position the head of a fastener beneath the surface of a part, while spotfaces are shallower and intended to create a flat area on the surface. The depth of a counterbore allows for a recessed mounting surface, ensuring that the head of the fastener is flush with the surrounding material.
In terms of function, spotfaces create a flat mounting surface for various types of fasteners, while counterbores are specifically designed to recess the head of a fastener, such as a screw or bolt, beneath the surface of the workpiece. This difference in function is essential for determining the appropriate machining process for your specific application.
Screw Hole Accommodation
Another key difference between spotfaces and counterbores is the type of fasteners they are designed to accommodate. Spotfaces are designed to create a flat surface for the secure attachment of various fastener types, such as bolts, nuts, and washers. In contrast, counterbores provide a flat and recessed mounting surface that is suitable for screws with flat-bottomed heads.
The distinction in screw hole accommodation between a spotface and a counterbore is that a counterbore offers a flat and recessed mounting surface, whereas a spotface only provides a flat mounting surface. This difference in screw hole accommodation is essential for determining the appropriate machining process for accommodating various types of fasteners.
Surface Finish
The surface finish of a machined feature is another crucial factor to consider when comparing spotfaces and counterbores. A spotface generally features a smoother surface finish than a counterbore due to its shallower depth. The smooth, flat surface created by a spotface ensures a secure and flush connection between the fastener and the workpiece, providing a high-quality finish and improved performance on the surrounding surface.
In contrast, counterbores may have a rougher finish due to their increased depth, which can affect the overall quality and performance of the connection between the fastener and the workpiece. Understanding the differences in surface finish between spotfaces and counterbores will help you determine the appropriate machining process for your specific application.
Identifying Spotface and Counterbore Symbols
Spotface and counterbore symbols are essential for accurately communicating these features on technical drawings. These symbols allow engineers and machinists to understand the requirements of a specific part and ensure the correct machining processes are applied.
In the following sections, we will explore the specific symbols used for spotfaces and counterbores according to the ASME Y14.5 standard.
Spotface Symbol

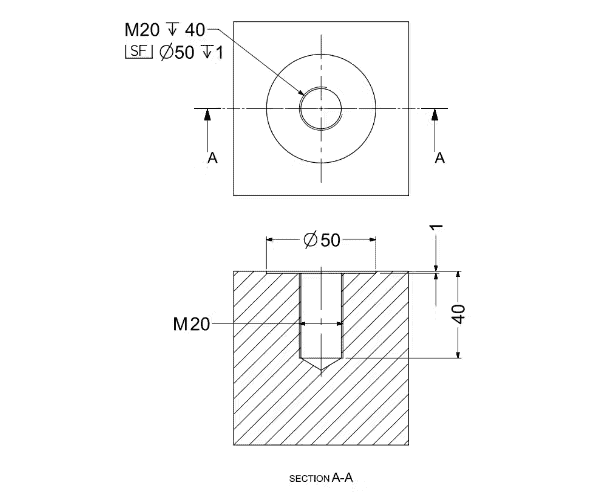
Complete callout for a Spotface...
The spotface symbol is the counterbore symbol with “SF” in the middle, as per the ASME Y14.5 standard. This symbol denotes a spotface feature on a technical drawing, indicating the need for a flat, accurately located surface to accommodate a fastener, such as a bolt or nut.
By including the spotface symbol on a drawing, engineers and machinists can ensure that the required spotface feature is created during the machining process.
Counterbore Symbol

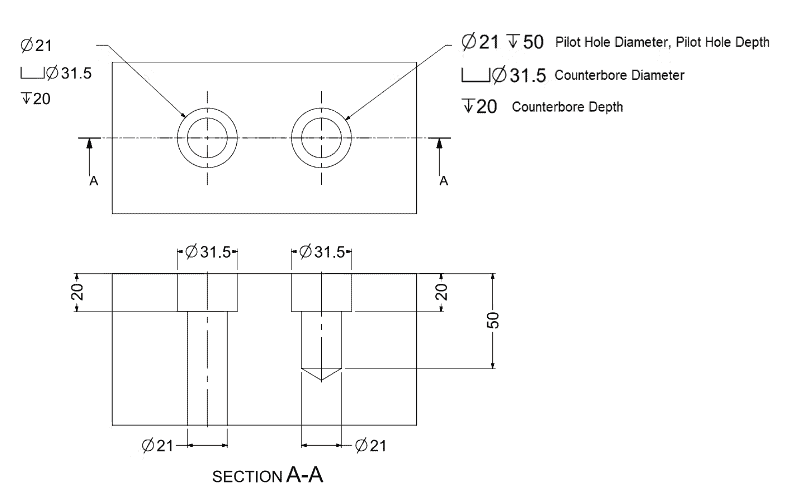
Complete callout for a Counterbore...
The counterbore symbol is a circle with a smaller, concentric circle inside, according to the ASME Y14.5 standard. This symbol is used to indicate the need for a counterbore hole feature on a technical drawing, providing a recessed area for a fastener head, such as a socket head cap screw, in a cylindrical hole for a bolt hole, to sit flush with the surrounding material.
By incorporating the counterbore symbol on a drawing, engineers and machinists can ensure that the required counterbore feature is created during the machining process.
Dimensioning Spotfaces and Counterbores
Dimensioning spotfaces and counterbores is an essential step in the machining process, as it ensures that these features are created with the correct diameter, depth, and remaining material thickness. Proper dimensioning allows for a secure and precise connection between the fastener and the workpiece, providing a high-quality finish and improved performance.
In the following sections, we will discuss the process of dimensioning spotfaces and counterbores.
Dimensioning a Spotface
Dimensioning a spotface involves specifying its diameter and depth. The diameter corresponds to the flat, smooth surface that contacts the washer, nut, or bolt-head, while the depth is typically about 0.0625 inches deep. By dimensioning a spotface accurately, engineers and machinists can ensure that the spotface provides the required support for the fastener and that the connection between the fastener and the workpiece is secure and precise.
It is essential to ensure that the minimum perfect diameter, as specified in the dimension, is reached when machining a spotface. This guarantees that the spotface will provide an accurately located surface for the fastener, ensuring a secure and flush connection between the fastener and the workpiece.
Dimensioning a Counterbore
Dimensioning a counterbore involves specifying the diameter of the counterbore, the depth of the counterbore, and sometimes the diameter of the pilot hole. The diameter of the counterbore corresponds to the recessed area for the fastener head, while the depth determines how far the fastener will sit below the surface of the material. The pilot hole diameter is critical, as it defines the size of the counterbore and ensures a secure fit for the fastener.
By accurately dimensioning a counterbore, engineers and machinists can ensure that the counterbore provides the required recess for the fastener head and that the connection between the fastener and the workpiece is both secure and precise.
Machining Techniques for Spotfaces and Counterbores
Spotfaces and counterbores can be typically machined using various techniques, such as manual or CNC milling. Each method has its advantages and disadvantages, depending on the specific application and requirements.
In the following sections, we will discuss the differences between manual milling and CNC milling techniques and how they are applied to create spotfaces and counterbores.
Manual Milling
Manual milling involves using a milling machine and cutting tools to create the desired feature, such as a spotface or counterbore. This traditional machining process is slower than CNC milling. Manual milling is typically employed for small batch production and is more cost-effective and simpler to use than CNC milling machines.
The primary benefits of manual milling are its cost-effectiveness and ease of use compared to CNC milling machines, as well as its flexibility and applicability to small-scale production. However, manual milling requires greater operator skill and experience and may result in a slower production rate and lower accuracy compared to CNC milling.
CNC Milling
CNC milling is a computer-controlled machining process that utilizes cutting tools to accurately remove material from a workpiece. This automated process enables the creation of complex shapes and parts with tolerances as precise as 0.0004 inches and is well-suited for milling profiles, cavities, surface contours, and die cutting operations.
The benefits of CNC milling include increased accuracy, enhanced surface finish, and faster production compared to manual milling techniques. However, CNC milling machines are more expensive and may require specialized training to operate effectively.
Despite these drawbacks, CNC milling has become a popular choice for creating spotfaces and counterbores due to its precision and efficiency.
Common Applications of Spotfaces and Counterbores

Spotfaces and counterbores are commonly used in various industries, such as automotive, aerospace, and general manufacturing. Their ability to create accurately located surfaces and recesses for fasteners allows for precise connections between components and ensures high-quality finishes.
In the following sections, we will explore the specific applications of spotfaces and counterbores within these industries.
Automotive Industry
In the automotive industry, spotfaces and counterbores play an essential role in creating secure connections between engine components, suspension systems, and other parts of a vehicle. By providing a flat surface for fasteners to sit flush against, spotfaces and counterbores ensure that these components are accurately located and securely attached to one another.
The use of spotfaces and counterbores in the automotive industry leads to increased precision and accuracy, enhanced strength and durability, and decreased manufacturing time, ultimately resulting in improved performance and reliability of vehicles.
Aerospace Industry
Similar to the automotive industry, spotfaces and counterbores are widely used in the aerospace industry for creating precise connections between aircraft components, such as landing gear and engine parts. By providing a flat surface for fasteners to sit flush against, spotfaces and counterbores ensure that these components are accurately located and securely attached to one another.
The use of spotfaces and counterbores in the aerospace industry results in increased precision and accuracy, enhanced strength and durability, and decreased manufacturing time, ultimately contributing to the overall performance and reliability of aircraft.
General Manufacturing
In general manufacturing, spotfaces and counterbores are used to create precise, flush connections between various components. These machining features enable the creation of accurately located surfaces and recesses for fasteners, ensuring a secure and precise connection between parts.
The use of spotfaces and counterbores in general manufacturing spans a wide range of industries and applications, from machining and woodworking to the production of consumer goods. By providing a flat surface for fasteners to sit flush against, spotfaces and counterbores contribute to increased precision, accuracy, and overall product quality.
Summary
In conclusion, understanding spotfaces and counterbores is essential for anyone involved in the manufacturing, automotive, or aerospace industries. These crucial machining features provide accurately located surfaces and recesses for fasteners, ensuring secure and precise connections between components. By learning the differences between spotfaces and counterbores, their symbols, dimensioning, and machining techniques, you will be better equipped to make informed decisions about the appropriate machining processes for your specific applications. As technology continues to evolve, the importance of these features in various industries will only continue to grow.
Frequently Asked Questions
What is the difference between spotface and counterbore?
Spotface provides a flat mounting surface, whereas counterbore provides both a flat and a recessed mounting surface. The symbol for spotface is similar to that of counterbore but with the addition of "SF".
What is the spotface area?
The spotface area is a shallow counterbore hole, allowing the fastener to rest just with the workpiece's surface with a level surface for the screw or fastener.
What is a spotface?
A spotface is a shallow counterbore that provides a flat surface with an accurate location and smooth finish.
What is a counterbore?
A counterbore is a cylindrical recess machined into a part to provide a seat for the head of a fastening component such as a screw.
How are spotfaces and counterbores dimensioned?
Spotfaces and counterbores are dimensioned by specifying their diameter, depth, and remaining material thickness.
Be the first to know about updates at CNC Cookbook
Join our newsletter to get updates on what's next at CNC Cookbook.