6 months by cncdivi
I get a lot of use out of my granite surface plate, height gage, and various accessories. For a long time, I have wanted to upgrade my existing Mitutoyo Height Gage to one of the fancier motorized height gages, such as this one from Tesa:
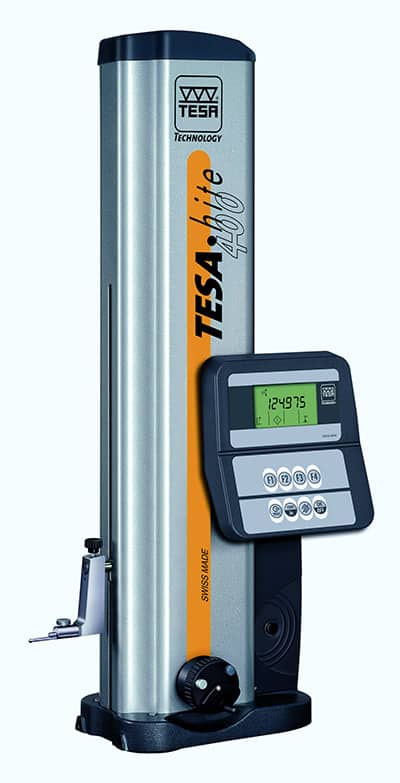
Tesa Digital Height Gage…
A variety of companies make these, and they come up from time to time at quasi-reasonable prices on eBay–several thousand dollars. It would be an expensive luxury, but it would take my measuring capabilities to the next step.
The most potent measuring devices in the CNC arsenal are coordinate measuring machines or CMM’s.
I’ve also been exposed to portable CMM arms, which are also extremely powerful measuring devices. Romer makes nice ones:
They’re quite a bit more expensive than the height gages, but a friend managed to snag one for about $6000 for a project he was doing.
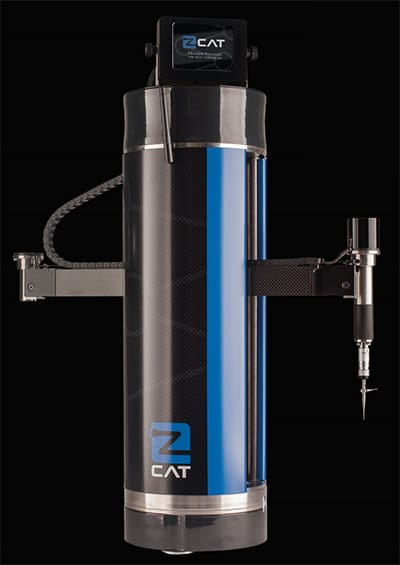
Today, all that is history. Thanks to CNCCookbook reader Lloyd, I have seen the future and it is a nifty small CMM that will be similar to the Fowler ZCat. The ZCat is my new object of CMM Lust.
Introducing Fowler’s ZCat CMM
The Fowler ZCat is the world’s first portable DCC CMM. “DCC” means it is “Direct Computer Controlled.” In other words you can program it from a PC and the inspection measurements it collects can go back to the PC and be stuffed into an Excel spreadsheet. This communication happens seamlessly over a WiFi connection. This sleek little cylinder weighs only 30 lbs, so it is completely portable. It can even run on internal batteries for up to 4 hours. If Apple were making an iCMM, I suspect it would come out pretty similar to the ZCat. As a matter off fact, according to Fowler, it uses the same touchscreen as an Apple iPhone.
Let’s watch the demo video:
I like the very tactile “Grab and Go” programming model the ZCat uses.
Challenge: We Need a Prosumer CMM
Now for the bad news. I have to sell an awful lot of G-Wizard Feed and Speed calculators to buy a ZCat–the price as I write this is $39,995. It’s probably not going to happen for me, even though ZCat is less than a lot of CMM’s out there.
We need a Prosumer CMM for smaller shops and hobbyists. I got the “Prosumer” term from the Digital Camera market, but it applies to many markets where there is an intersection of hobbyists and professionals. It refers to that unique segment where the device is just powerful enough to be useful to many pros but still falls into the price range a hobbyist could manage. What if you could purchase a machine similar to the ZCat, albeit somewhat lower performance, but it only cost $10,000? That would be a Prosumer CMM.
Is it doable? I don’t know why not. The active ingredients in this little CMM are:
- 2 optical encoders
- 2 glass scales
- Motion for 4 axes
- Associated electronics
- Precision machined base
- Probe
We’ve seen companies like Tormach boil down the cost of the motion control for nice Prosumer CNC milling machines. Their latest machine, the Tormach 440, gets you a very decent machine for about $7500. The math for a $10,000 CMM seems to work out from there. There’s a lot in the Tormach 440 we don’t need:
- Stand
- Spindle
- VFD
Suppose for the cost of all that we can get 4 axis motion using servos instead of steppers–a CMM will need the higher resolution especially on the rotary axes. It seems doable. To that we will need to add a couple of glass scales and a probe. Even at Tormach’s retail pricing for their probe, we should be able to get there.
BTW, here’s a video by Homer Eaton, the man who invented both the zCat and the Romer Arm that tells how they make the zCat super accurate:
I don’t know if Tormach or any other company would have any interest in a Prosumer CMM. Even if not, it’d make a heck of a project for a dedicated CNC hacker to tackle. I can’t wait to see what the future of Portable CMM’s will bring!
Like what you read on CNCCookbook?
Join 100,000+ CNC'ers! Get our latest blog posts delivered straight to your email inbox once a week for free. Plus, we’ll give you access to some great CNC reference materials including:
- Our Big List of over 200 CNC Tips and Techniques
- Our Free GCode Programming Basics Course
- And more!
Just enter your name and email address below:
100% Privacy: We will never Spam you!
Bob is responsible for the development and implementation of the popular G-Wizard CNC Software. Bob is also the founder of CNCCookbook, the largest CNC-related blog on the Internet.
Amazing……the Z Cat.
Price….ouch.
Great idea for a lower cost version Bob.
I bet it could be done for less than $5K.
End up being made in Hong Kong.
Probably true, dk, although I am allowing for the idea a CMM has to be precise to be useful.
So, who’s interested in backing a group to make one?
We bought a 3D arm 5 yrs ago, a small one with 4′ diameter reach, which we use to gather point cloud from performance cylinder head ports we develop..
A couple of comments:
1. Just like using micrometers, only more so, it takes practice and a “smooth” touch to get reliable and repetitive results from a CMM 3D Arm. It’s not as easy as it looks. i takes some skill and one needs to practice regularly to stay good. And like playing a piano, some folks never get good enough…which is something folks should keep in mind before spending $$$’s. They should “test drive” the arm they’re planning to buy, to see how sensitive it is, and if they can get repetitive measurements after practicing with it.
2. Most arms I’ve used are, realistically, good to about +/-0.0002″ IF the operator is good, practiced, smooth, and consistent.
3. One should plan how the inspection will be done – it’s similar to how one plans to hold and machine a part. For example, the angle(s) at which the arm’s probe approaches and touches the part can effect accuracy. Most arms have best resolution when their “joints” are not near the extreme inner or outer range of motion. Think about having to probe a bore on the backside of a part – things can quickly get “twisted up” without some prior planning 🙂
4. The cost of an arm often is only about 70% of the tab – the other 30% is the cost of software to capture, offset, and allow one to more effectively manage and use the data points efficiently. We use MasterCam’s VeriSurf which cost about $8k. plus $18k for the 3D Arm. (2009 prices)
Oddly enough, we mostly inspect parts with our Centroid probes in the spindles, despite having the portable 3D arm. It’s contrary to what most folks think: that’s its better to probe/inspect outside the machine, to boost machine efficiency – but we find it depends on the complexity of the part, work holding method, and especially the time it takes to cycle a program. Often it takes longer to remove & refixture the part, use the arm, reenter any G-code adjustments, etc, than it does to cycle a part, including probe time on the machine. And, there are times when we use the arm to probe a part while still fixed in the machine…which with complex parts & work holding issues, is very
convenient. Another big use of the arm is reverse engineering an item.
Our biggest use for an arm is “scribbling” around/along the inside of organic shaped cylinder head ports. Typically when we develop new hi-performance heads, we make “port box” replicas from one cylinder of a raw head casting from machinist wax. Then, with 50+ yrs of porting experience, we hand carve/die grind the wax port to the shape we want. We flow test if on both wet & dry flow benches. Make & test alterations until we are satisfied with the shape/ The we use the arm’s probe to “scribble” along/around the wax port’s surface, to gather a point cloud. Verisurf hels us weed out “noise”, offsets for the probe tip diameter, and cleans up the results. we Use MasterCam X9 w/ PortXpert to create a surface, analyze, and further tune the port shape virtually, post G-code, and CNC machine another wax port box. The CNC’d wax port is then flow bench tested and compared to our hand cut original. Typically the CNC “tuned” port flows 1 to 2 % better across all valve lifts. After this work, it’s relatively easy as falling down to CNC port the expensive head castings 🙂
Having the CMM 3D arm saves us a lot of probing time & frees up our machines. (45 minutes per port, on the bench top vs. 2 hours with a spindle mounted probe, or 4 hours measuring a grid pattern manually, old school :-). It also lets us probe areas where a spindle mounted probe, even on our 5-axis VMCs cannot reach, due to work holding / fixture issues. Fixturing a part for use with a 3D arm is often a easy as a piece of double sided tape. You very gently touch the probe to the part, so their are no huge workholding forces req’d.
Lastly, the 3D arm is fantastic for measuring large items too bulky to fixture. For example, we manufacture engine adapters that allow a diesel engine to replace a gas V8 in many medium and small trucks. When designing the original adapter, we needed to measure all the features & their 3D relationship, on the end of the engine’s block, crank, & flywheel. With the sample engine sitting in a stand, we simply placed the arm on top of the engine, fixed firmly with zip-ties & duct tape, confirmed we could repeat within +/-0.001″, which was plenty accurate enough for this job, and went at it. Quick, fast, easy 🙂
I think it would be interesting to integrate Tormach’s CNC Scanner approach with probing. Process would be that you scan the part, open the scan app, then “dimension” it to designate which features you want probed. This would work great for reverse engineering where you often have only a few critical dimensions like bolt hole locations on a cast part.
Good article, with a major gag-reflex on the prices!
If such a beastie existed at the $10K level, what precision/repeatability specs would be reasonable? What about at the $1k level? Just curious what the performance expectations might be. 1 mil? 1/2mil? 0.1 mil? 50 microinches?
Great article. At the last place I worked I bought a Romer arm and software to allow it to sketch directly into SolidWorks, that was a $40k package. Depending on you accuracy needs you could look at one of these.
http://www.3d-microscribe.com/G2LX%20Page.htm
.012″ is defintely not the best for sure, but quite good for a 5 DOF $8k package.
I’ve been playing around with a digitizing probe in the spindle of my mill quite a bit, lately.
It’s not a fancy setup – cnc4pc has a rather low-cost probe, it only costs $135, and of course it’s limited to the accuracy of my ability to adjust it concentric as well as the accuracy of my mill – but I’ve been able to pull a lot of dimensions off parts that I would otherwise never have been able to measure even to those limits. Probing and data recording is handled by a plugin for Mach3, called ProbeIt. (I think it cost $30, at CraftyCNC.com.) It can spit out a DXF or .CSV file for me.
Both of those are well worth the cost of entry, in my book. Total cost of only $165 or so, and it’s really changed the way I work. Beyond just the CMM / reverse engineering side of things, it’s absolutely revolutionized the way I do my setups, and that’s where about 90% of the value is, for me.
Probes are hugely valuable. It’s an area I intend to write a lot more about in 2016.