We had a couple hundred participate in our 2016 Probe and Toolsetter survey, which is great-it shows there is quite a lot of interest in the topic . Let's go over the results!
Do you use a CNC Probe?
Please provide the text that needs to be rephrased.
77% of survey respondents use probes while about 23% do not. I am suspicious the results are skewed and that people who don't use probes just didn't participate as much. Otherwise, probe usage seems very high.
What kind of machine do you use your probe on?
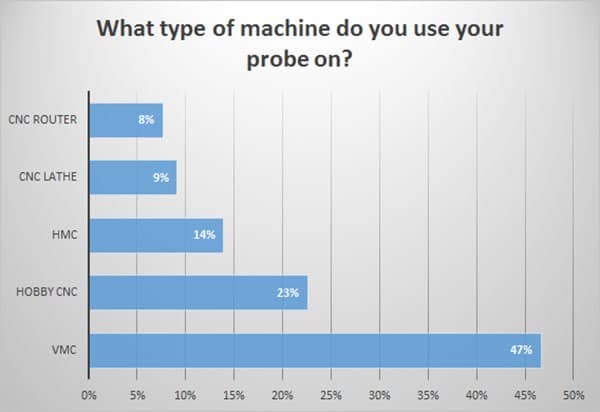
Probe use probably mirrors the prevalence of the different machine types, with VMC's being the most common. Routers and Lathes don't see nearly as much probe use, however.
What stage of machining do you use your probe for?
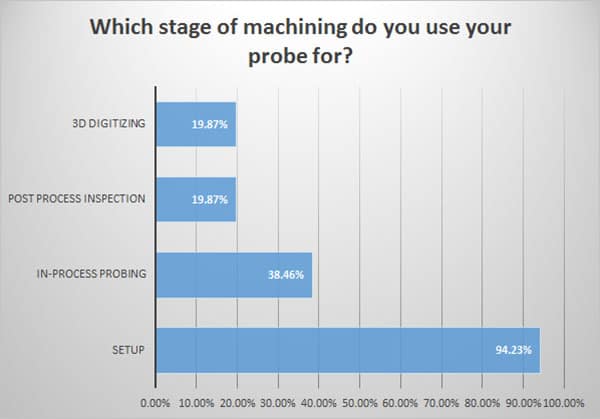
The vast majority use probing as an aid to setup, and it can make a big difference in time savings and accuracy there.
The next largest group (and far smaller) is using probing in-process. That means that there are routines in the g-code part program that use the probe to do specific things to verify the part program is doing the right thing or to alter its behavior.
After that we have post process inspection and 3D digitizing as the smallest use cases.
How do you use your probe during setup?
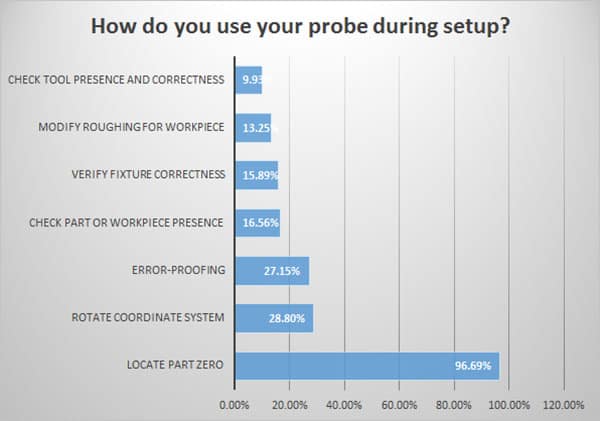
Given the vast majority of probe usage is during setup, what do folks use them for to aid with setup?
The number one answer by far is to locate part zero or establish a work offset. Probes make this task fast, dead simple, and very accurate, so it's a natural.
It's really not much harder to use a probe as a substitute for tramming a vise, fixture, or part. The probe can sweep the jaws of a vise and determine what angle they lie at relative to the motion of the axis. One can then apply a coordinate rotation to the setup and make the part without having to actually tram. Here again, the task is fast, simple, and accurate, but far fewer CNC'ers are doing it.
Error proofing refers to checking various aspects of the setup to make sure they're what the Part Program is expecting. Sub-categories would be to determine whether there is actually a workpiece in place, whether the correct fixture is installed, and whether the correct tools are in place.
Lastly, we might modify the roughing routine to take into account differences in workpiece size. Perhaps there is provision to run two different roughing passes depending on how much excess stock is available, or to skip the roughing pass and go straight to finishing if there isn't much extra stock.
What In-Process Probing Do You Do?
It's possible to accomplish what almost amounts to magic with the right in-process probing, and I've been quite enamored of the potential since reading about the RAMTIC manufacturing methodology. Let's see what sorts of magic our survey respondents are getting from in-process probing:
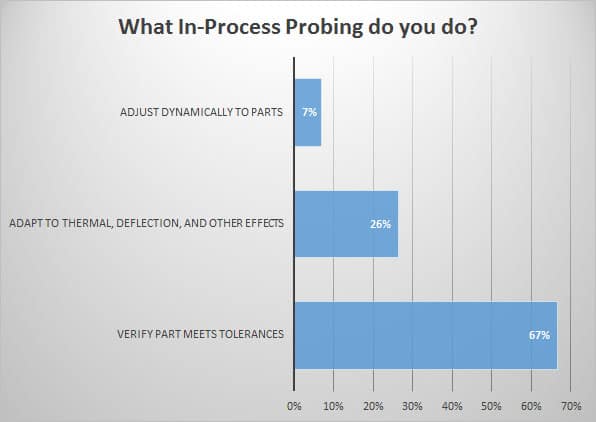
The number one application of in-process probing is verifying that the part meets tolerances. To the extent this can be automated with probes, a lot of post-machine inspection and quality control can be automated.
The next category, adapting to thermal, deflection, and other effects is what the RAMTIC methodology is all about. For example, suppose you have to make a bore to a very tight tolerance. You could machine a bore into your fixture whose diameter is known with great precision. Assuming the fixture is made of the same material as your part, probing that example bore will tell you what thermal and other sources of error have done to distort the size of the bore. You can then adjust the g-code, perhaps with scaling, to offset those effects.
For example, suppose you know the sample bore is 1.0002" in diameter. But, it's a hot day in the shop and after probing, you measure the bore as being 1.0013". It has expanded due to the heat, and so has your workpiece. But, if you apply appropriate scaling, you'll get a bore within tolerance at the reference temperature it will be inspected at.
Pretty cool!
The last category is dynamically adjusting to parts. This is based on feedback from the "Other" category. Folks had some great examples of things they were doing to adapt their g-code programs to differences in parts:
- Probing a rough casting to adjust to the location of cast features.
- Probing a not quite flat surface to adjust an engraving program accordingly.
- Checking for additional features or parts installed in the fixture and changing the work offsets and number of parts machined accordingly.
- Adjusting to different bolt patterns present in the parts.
These are just a few examples of what can be done with the right programming and in-process probing.
How do you program your probe?
Speaking of programming, how do folks program their probes?
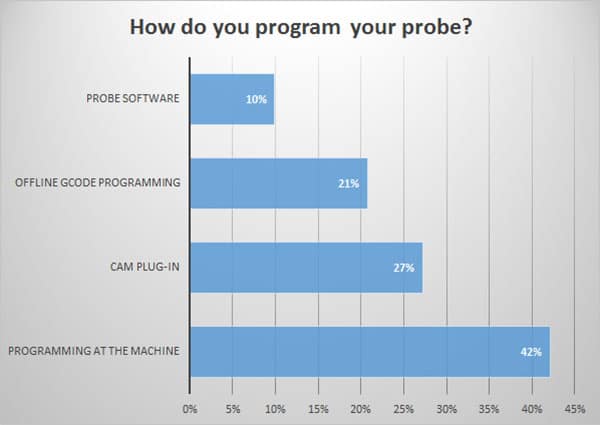
This chart tells an important story-almost half of probe usage involves running the probe at the machine. This is typically done either by calling standard macros (subprograms) that the probe vendor provided, or because the CNC Control has some facility to assist with it.
In-process probing is not really even possible with that style of operation, which accounts for why so much of probe use happens during setup.
The next most likely approach is to use a CAM Plug-In of some kind, followed by actually doing some g-code programming, followed by using Probe Software to generate the right g-code.
What brand of probe do you use?
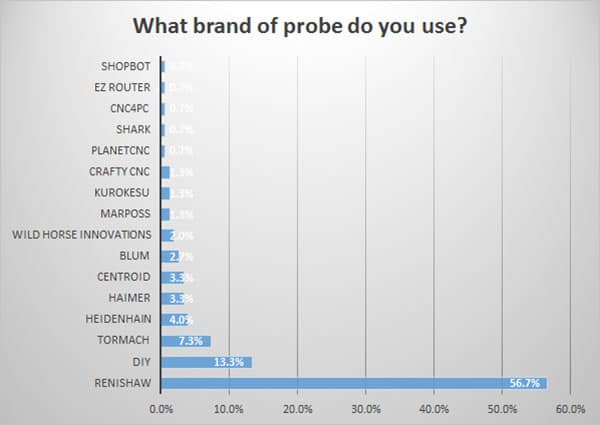
Looks like Renishaw is the market share leader by a huge margin followed by a variety of shopmade and inexpensive probes the hobby CNC'ers are using.
How satisfied are you with your probe?
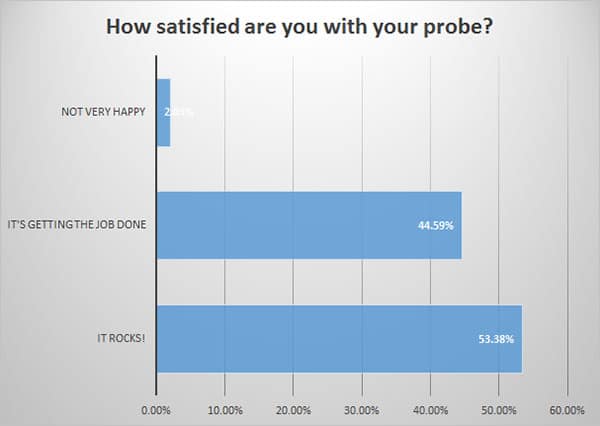
Customer Satisfaction is very high for probes, with the majority giving their probe the highest mark (It Rocks!). Very few (about 2%) indicated a problem. Buying a probe looks like one of those investments that are really worth it.
Top Benefits for Probes
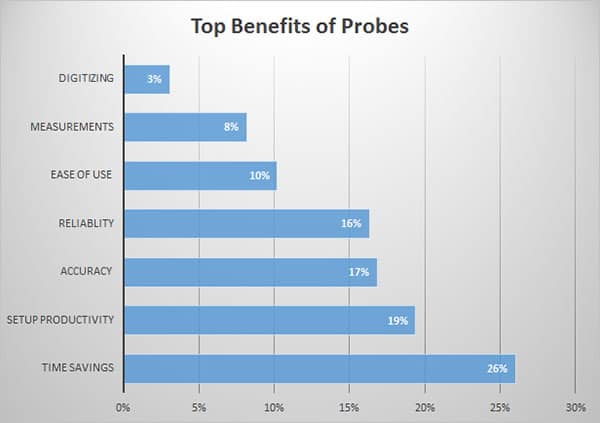
The top benefits for probes were:
- Time Savings: This was mentioned over and over-probes save time.
- Setup Productivity: This is the most likely area to benefit: machine setup.
- Accuracy: Also frequently mentioned. Accuracy is generalize improved when using a probe.
- Reliablity: This included making the machining process more robust as well as eliminating common errors.
- Ease of Use
- Measurements: Many called out the convenience of probes for measuring things, particularly bore-related diameters and centers. "Poor Man's CMM" was frequently mentioned.
- Digitizing
Biggest Complaints About Probes
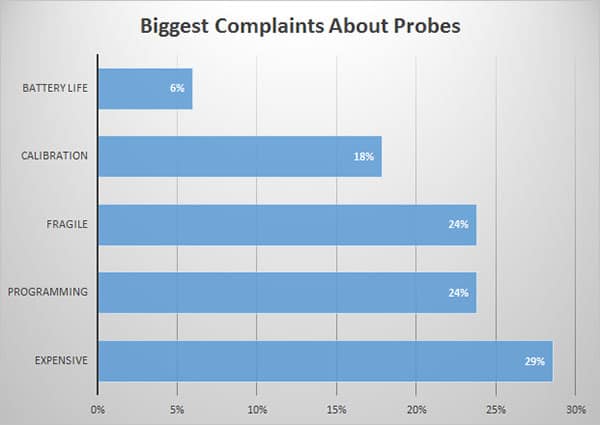
Expense topped the list of complaints about probes, followed by:
- Difficulty of programming
- Fragility (easy to break tips or worse if crashed)
- Calibration
- Battery Life
Conclusion
This survey gives a good idea of what CNC'ers are using their probes for, and it also clearly paints a picture that CNC'ers really like their probes. Next week, I will finish up the survey results by going over the responses for Toolsetters.
Be the first to know about updates at CNC Cookbook
Join our newsletter to get updates on what's next at CNC Cookbook.