Parameterized Programming: Macro Variables for Fanuc
CNCCookbook's G-Code Tutorial
Introduction to Fanuc Macro System Variables, Parameterized Programming and Fanuc Macro B
Fanuc Macro System Variables, Parameterized Programming, and Fanuc Macro B. It all sounds pretty arcane, doesn't it?
It's really not. They're just buzzwords and jargon that stand for some pretty simple concepts. Mastering them is pretty easy and they'll give you tremendous power and control in your g-code programming.
The next several lessons in the tutorial stand together as a Mini-Tutorial on Macro Programming and Fanuc Macro B. In many ways, Macro Programming is the highest level of G-code Programming. It offers the most flexibility and the greatest potential power of any of the G-Code Programming Techniques. Without Macro Programming, G-Code is not really a full fledged computer language, it's more a recording of a series of manual steps. That's useful, but computers and CNC controllers are capable of a lot more.
A word about Fanuc Macro B
Fanuc Macro B is by far the most common Macro Programming Dialect. Not all controllers support full Macro B, and there are variations supported by some non-Fanuc controllers. We can't document every G-Code Dialect here, but the concepts offered in Macro B will be similar to what you see elsewhere, and therefore applicable to those cases with slightly different syntaxes and capabilities. If you don't have a controller with Macro B, it's still worth checking it out. Just use a our G-Wizard CNC Simulator and Editor to play with the Macro B capabilities.
Parameterized Programming
Until now, all of our g-coding has been done without any recourse to variables or formulas. If we wanted to go to a particular coordinate, we had to enter that coordinate, either absolute or relative, to get there. A tremendous amount can be accomplished in that way, but just as algebra is more powerful than arithmetic, so parameterized programming is more powerful than basic g-code, and for the same reasons.
Once you have variables, you can start to parameterize your programming. You'll be able to create general purpose routines that use parameters to tie them to specific uses you want to make. Imagine being able to create your own custom canned cycles that can do almost anything. A custom drilling cycle, or perhaps a routine to automatically serial number your parts. Almost anything is possible.
Covering the whole of parameterized programming will involve three chapters in our tutorial. In this chapter, we'll be dealing with variables and formulas. The next chapter will delve into how to divide your code up into subprograms and access the subprograms. Lastly, we'll deal with macro control structures.
Not all controls support parameterized programming. We'll be dealing with the Fanuc Macro B dialect for it, and we'll throw in mention of Mach3 and LinuxCNC's parameterized programming features as well.
Parameters to Customize the Machine to the Controller (aka Why We're Going to Quit Saying "Parameters")
You may have noticed that different companies often make the CNC Controller versus the actual machine tool. In fact, this is nearly always the case. There are a collection of settings inside the controller that are called parameters that are used to perform that configuration of the controller to the machine tool. For example, the travels, spindle speed range, rapid traverse rate, and many other types of information that are critical to making the control work right with the machine.
For that reason, you don't want to go poking around with parameters too much, or you can scramble some of those settings. Reading a system variable is okay, but don't assign any values to them unless you know for sure what they do. You should make sure you have a good backup of all your parameters in case the battery fails on the controller or they get inadvertently changed. Typically there is a procedure available for your controller to use DNC to perform a backup.
Now here is the tricky part: Parameters and Macro Variables are Two Different Things!
I don't know why we like to call it "Parameterized Programming" and then immediately quit talking about Parameters, which have little to do with Parameterized Programming. It's tempting to think Parameters are just System Variables (more on what a System Variable is in a moment), but they're completely different.
There are ways to set some Parameters from a part program, but this is not the most common way to deal with them-usually it's done via the control panel. Therefore, we'll be sticking to the term "variables" and will leave "parameters" for a future chapter.
What Are Variables?
First thing is first, what are variables? Simply put, they are just like algebra variables that you can use in your g-code. They can be assigned values, and when you refer to them, they give back the last value they were assigned.
The syntax for a variable is the pound sign followed by a number up to however many digits your controller supports that identifies the variable. For example, we can write "#1 = 100" to assign the value "100" to the variable "#1". There's even a special "null" value that says the variable never had a value assigned. The variable #0 always has a null value, and you can give any other variable a null value just by assigning #0 to it. For example:
#100 = #0 ( Make #100's value "null" )
These variables fall into ranges that affect their meaning and how they can be used. Here is how Fanuc thinks of these ranges, for example:
Variable Number
Type of Variable
Function
#0
Null
You can never assign a value to #0, it's value is always "null", which means "no value."
#1 - #33
Local Variables
Local variables are used to pass arguments to macros and as temporary scratch storage. Your controller won't remember the value of any local variables when the power is turned off. Local variables nest when used with suprograms, so be sure you understand how that works.
#100 - # 199
#500 - #999
Common Variables
Common Variables are shared by all your macro programs. When the power is turned off on the controller, #100 - #199 are cleared to null. #500 - #999 remember their values for the next time power is turned on.
#1000 and up
System
Variables
System variables can be used to tell things about what the controller is doing, such as the current position. Don't assign anything to these unless you know what they do!
Fanuc Macro Variables: Note that these ranges may vary across controllers and especially for non-Fanuc controllers!
Mach3 has 10,320 variables available, from #0 to #10320. There's not quite the variety found in Fanuc, but still, plenty of system variables are accessible so you can get at things like work offsets. Mach3's variables are saved from one control boot up to the next, so be sure to reset them if you aren't expecting them to have a value.
What Are Variables Good For?
Use variables whenever you think you might want to change a value in different situations. For example, suppose you have a macro or subprogram that cuts a square pocket. You probably want to have variables that let you define the size of the square and the feeds and speeds so they may vary as the material changes. Depending on the subprogram, you might want a variable for the top left corner of the square, or you might simply let that corner be the current position when the routine is called. You may want a variable defining the depth of the square pocket. And lastly, you may want a variable that defines the diameter of the tool.
Which Variables Should I Use in My Programs?
System Variables and Local Variables have some special behaviors, so steer clear of those unless you specifically want those behaviors. System variables refer to specific things going on in the controller, so are not usable as general purpose variables. Local Variables exhibit "nesting" behavior with macros, so wait until you have read about macro subprograms and understand them before deciding to use a Local Variable.
Common Variables are there for the taking, so try to stick to using those variables for general purpose programming.
When Variables Can't Be Used
Most addresses (remember word address format?) can be variables, but not all. For example, I can't have a sequence number that is a variable. N#10 is not allowed. Here is a short list of the "not alloweds":
- Program Numbers: O#10 is not allowed. Neither is :#10 for controls that allow ":" for program numbers.
- Sequence Numbers: N#10 is not allowed.
- Block Skip Address: /1 is okay but /#1 is not allowed.
- WHILE..DO..END Addresses: DO1 is allowed, DO#1 is not.
System Variables
As mentioned in the table above, Fanuc Macro System Variables run from #1000 and up. That's a lot of variables, what do they all do?
System Variables let you read and write the values of various critical things going on inside the CNC Control. You can access and modify work offsets, for example. You can see what modes are in effect. You can generate user-defined alarms. You can query positional information.
Are you beginning to see how powerful Fanuc Macro System Variables can be?
Looked at another way, using System Variables, you can do a lot of things in g-code that would normally require the operator looking at the machine's control panel.
Cool beans!
Note: There are a LOT of system variables, so just scan over these the first time so you have an idea of what's possible. No need to memorize them, this handy reference will be here if you need to look them up.
For full details, consult your controller manual's, as there are differences across models and definitely across control manufacturers. But in general, Fanuc Macro System Variables work like this (described in numerical order):
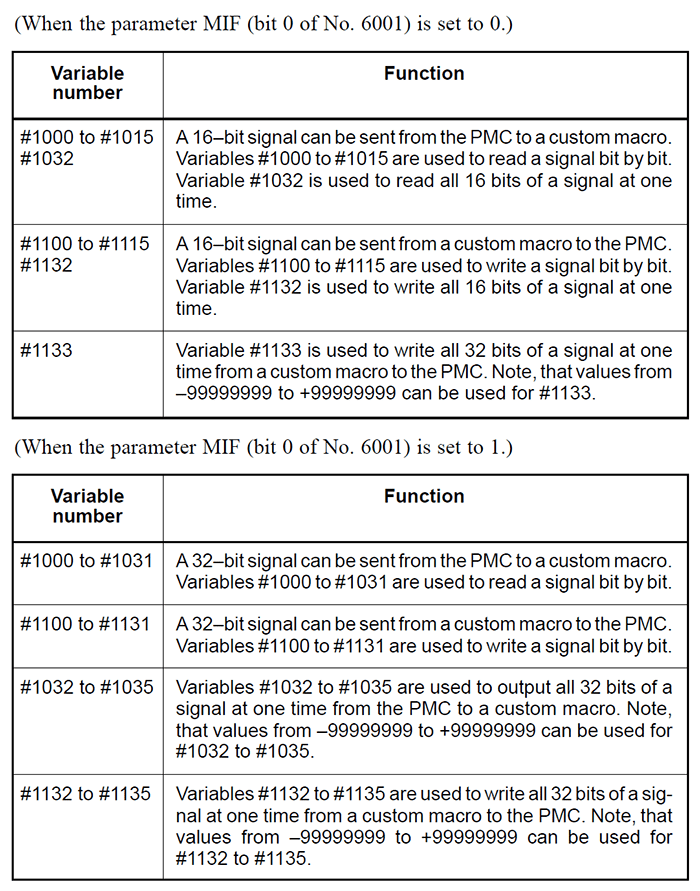
Interface Signals (#1000 - #1135)
Tool Compensation Values (#10000 - #13400)
Read and write tool compensation values using these system variables. Note how each variable corresponds to a range. For example, for Tool Compensation value 200, here are the variables:
- Tool Length Geometric Compensation: #11201 or #2400
- Tool Length Wear Compensation: #10201 or #2200
- Cutter Geometric Compensation: #13201
- Cutter Wear Compensation: #12201

Macro Alarms (#3000 and #3006)
This is a very cool feature. It lets you assign up to 201 custom alarms to notify the operator of various conditions. Just because it's called an "Alarm" doesn't mean it has to signal a problem. Think of them as messages your g-code program can send to the operator.
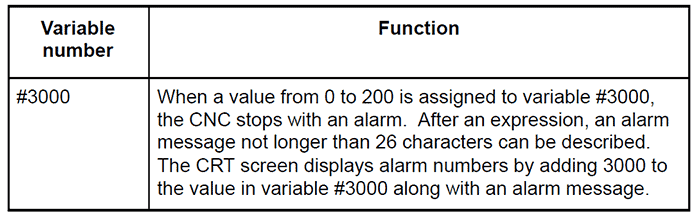
For example you could have this line in your g-code program:
#3000 = 1 (Tool Not Found) ;
When that line is executed, the control will display an alarm saying "Tool Not Found". So, the actual message, which can be up to 26 characters, is contained in the comment following the assignment to #3000.
#3006 works the same way but it also stops the program.
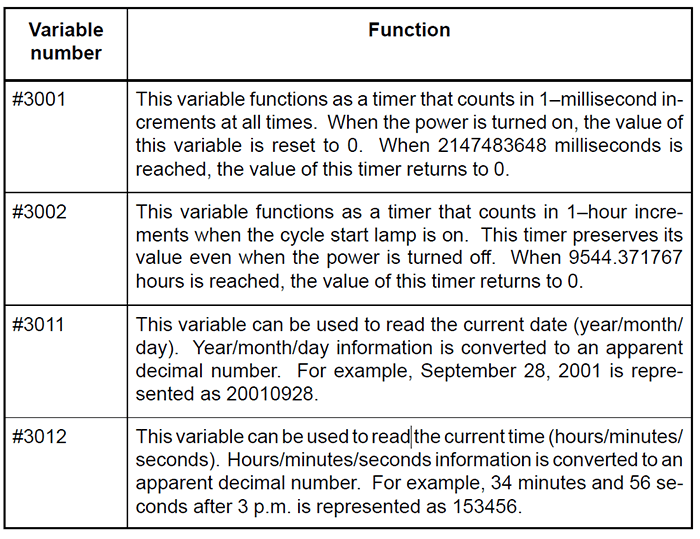
Time Functions (#3001, #3002, #3011, and #3012)
Being able to access timers or read the current date and time are very useful when g-code programming. For example, maybe you want to compare how long a program takes to run versus historical averages. You can time the program's run time by accessing a timer and store that in a global variable for comparison.
If it gets off the historical averages by too much, perhaps you want to use the Alarm options to tell the operator to summon their supervisor to come see what the problem is.
Number of Machined Parts (#3901 & #3902)
#3901 is the number of machined parts completed so far, while #3902 is the target number of parts to make.
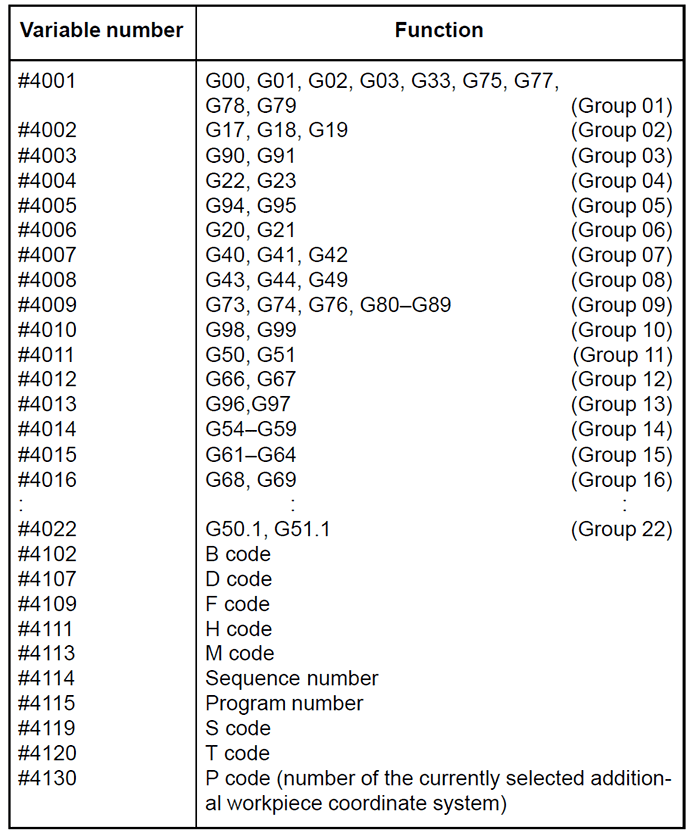
Modal Information (#4001 - #4130)
G-code is very modal, so being able to access what modes are currently in effect can be very important when g-coding. As a matter of fact, we have a whole chapter on just that topic. We'll present the reference info here too:
Current Position (#5001 - 5104)
Always handy to be able to access the current position. These variables can be read, but no written:
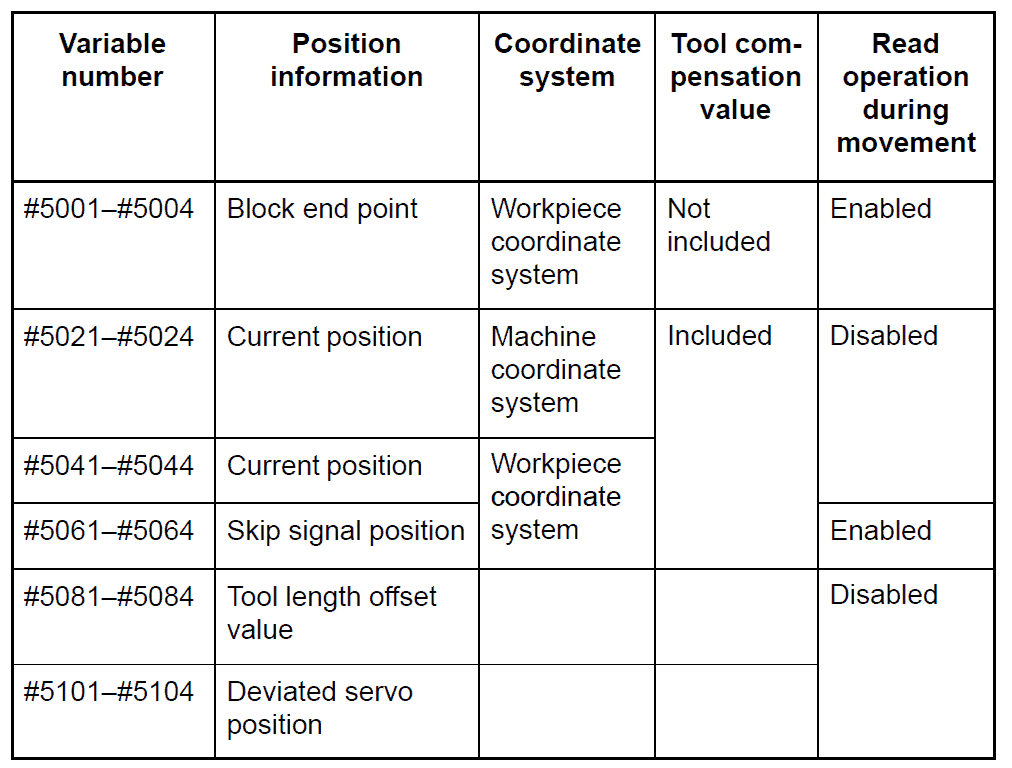
Some things to note:
- The first digit (1 to 4) tells you the axis. X=1, Y=2, Z=3, A=4.
- The tool length offset value currently in use is held in #5081 to #5084.
- The tool position where the skip signal is turned on via G31 is held in #5061 to #5068. When skip is not turned on, those variables hold the end point of the specified block.
- When variables are marked "disabled" during movement, it's because they can't be read due to lookahead.
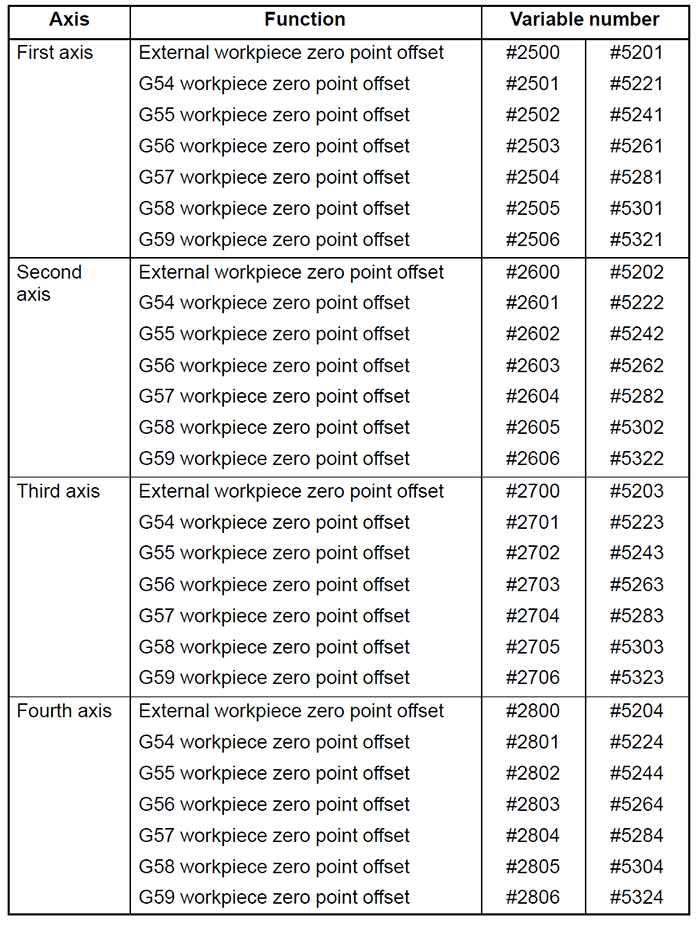
Workpiece Coordinate System (#5201 - #7944)
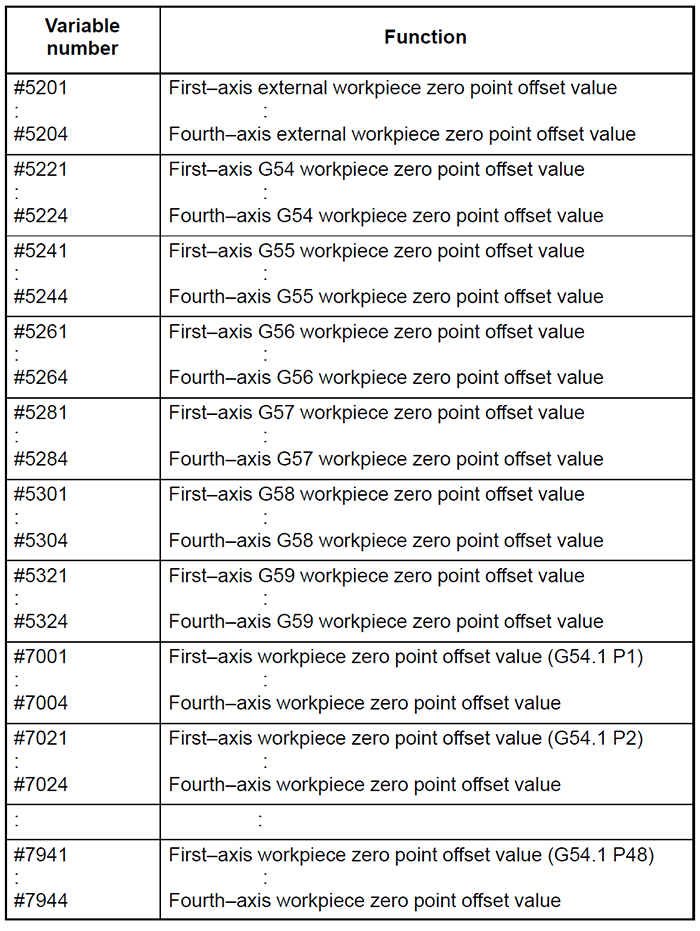
The following variables can also be used:
Okay, I just want to state the obvious-that's a LOT of information!
Gives me a headache just thinking about it. But the thing is, I never have to think about it. There's an easier way.
Keep reading, because our G-Wizard Editor software has all that information built in so you don't have to remember it. It's all described below. But first, let's keep learning a bit more.
Let's learn do do arithmetic on the variables.
Expressions: Formulas
Formulas used in parameterized programming are called Expressions. They work pretty much as you'd expect algebraic formulas to work with a few things to keep in mind:
- G-Code uses square brackets ("[" and "]") instead of parenthesis, since parenthesis are used for comments. It looks kind of strange, but you get used to it pretty fast. So, instead of:
#1 = (#2 * #3) + #4
you need to use:
#1 = [#2 * #3] + #4
- The standard operators are add ("+"), subtract ("-"), multiply ("*" asterisk and not "x"!), and divide ("/").
- The minus sign is also used for negation. Think of it as multiplying whatever follows by -1.
- There is a list of other operators and functions that may be somewhat control-dependant. Make sure you check your manual to see if your control supports them and if so just how they work. Here is a list of operators and functions for Fanuc and Mach3:
Operation
Fanuc Uses
Mach3 Uses
Function
Arithmetic Functions
Power
#1 ** #2
#1 ** #2 raises #1 to the power #2. Power takes precedence over the other operators.
Modulus
MOD
Modulus divides and returns the remainder. So 5 MOD 2 is the remainder of 5 divided by 2, which is 1. The modules of 4 divided by 2 is 0. Mod is a convenient way to keep a value with a range of 0 to the MOD divisor.
Absolute Value
ABS
ABS
Absolute value. ABS(1) = 1. ABS(-1) = 1.
Rounding Down
FIX
FIX
Rounds down to the next smaller integer. FIX(2.8) = 2, FIX(-2.8) = -3.
Rounding Up
FUP
FUP
Rounds up to the next larger integer. FUP(2.8) = 3. FUP(-2.8) = -2.
Rounding Off
ROUND
When used in a macro function like IF, ROUND rounds down by slicing off the fractional decimal places. ROUND(1.1) = 1.0. ROUND(-1.1) = -1.0.
When used as a coordinate address, ROUND rounds off to the least input increment of the address = 0.001 for mm and 0.0001for inches.
Square Root
SQRT
SQRT
Natural Logarithm
LN
Exponential
EXP
Trig Functions
(Units are Degrees, 90 degrees 30 seconds = 90.5)
Cosine
COS
COS
Sine
SIN
SIN
Tangent
TAN
TAN
Arc Cosine
ACOS
ACOS
Arc Sine
ASIN
ASIN
Arc Tangent
ATAN
ATAN
Logical Functions
Logical OR
OR
OR
Logical AND
AND
AND
Logical XOR
XOR
XOR
Other Functions
Convert from BCD to BIN
BIN
See your Fanuc manuals for more details on these specialized functions.
Convert from BIN to BCD
BCD
See your Fanuc manuals for more details on these specialized functions.
Fanuc and Mach3 Expression Operators and Functions...
Tip: When in doubt about the order a formula will be calculated in, use extra brackets
Most of us learned tricks in grammar school for how to remember what order to perform arithmetic operations in. The one I learned was "My Dear Aunt Sally", which translates to "Multiplication then Division then Addition then Subtraction." Because of that order (called an order of precedence), these two formulas have an identical result:
#1 = [#2 * #3] + #4
#1 = #2 * #3 + #4
But this can get confusing. Always use extra brackets to make the order clearer at a glance.
Calculating Which Variable to Access
This is kind of a trick, but you can calculate which variable to access. Instead of retrieving #107, you could write #[100 + 7], or any other expression inside the square brackets. This is often useful when you want to loop through variables that are grouped together in a certain way. You can even write #[#2], which is the variable whose identity is the value stored in variable #2. So, if the value of #2 was "10" and we write "#[#2]", it is the same as writing "#10". Some controls will tolerate "##2", but most won't, so get in the habit of using the square brackets.
Macro Variables and Expressions in G-Wizard Editor
Our G-Wizard CNC Simulator and Editor understands macro variables and expressions, so you can use it to experiment with them a bit. Just bring it up and type in the expressions you want to see. Use the Simulator / Debugger to step through and see the results.
For example:
Debugging Macro Variables and Expressions with G-Wizard Editor...
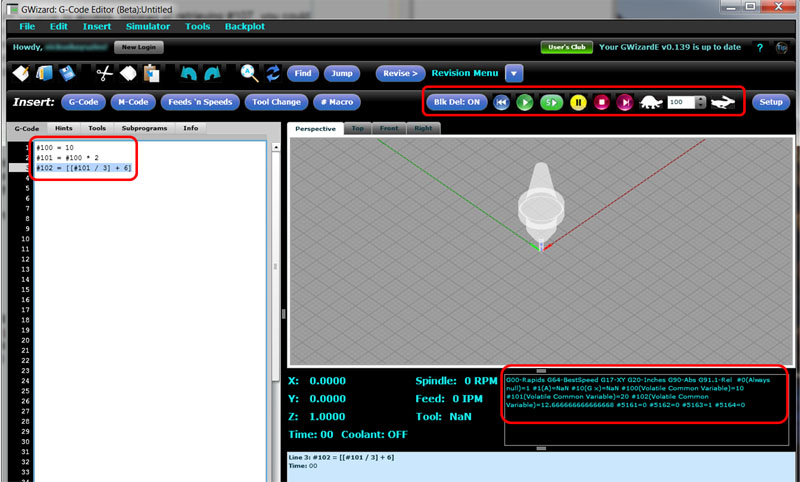
Just type your expressions on the left. In this case, we have a pretty simple set:
#100 = 10
#101 = #100 * 2
#102 = [[#101 / 3] + 6]
Now, put the debugger in Single Block by selecting the button just left of the Tortoise.
As you step through a block at a time, the variables values are show in the box right below the backplot:
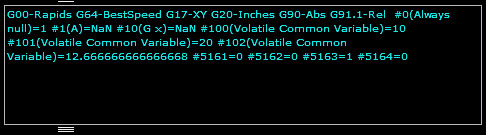
Macro variable values are shown below the backplot...
This little window shows all the modal activity, for example, we're in G00 - Rapids mode. The values of Macro Variables are also modes of sorts, so they're shown too. You get to see values for the last n variables whose value changed, and they're sorted by variable #. Note how it also gives you a little hint about what the variable does. For example, it says #100, #101, and #102 are "Volatile Common Variables". "Volatile" means their values are not remembered when the controller is switched off, and as we saw from the table up near the top of this page, variables in this range are Common Variables. G-Wizard doesn't have all the variable values, but is has an awful lot of them and it will try to use this information to help you understand what's going on.
You can see the full list of what it understands by looking under Setup, Post, Variables:
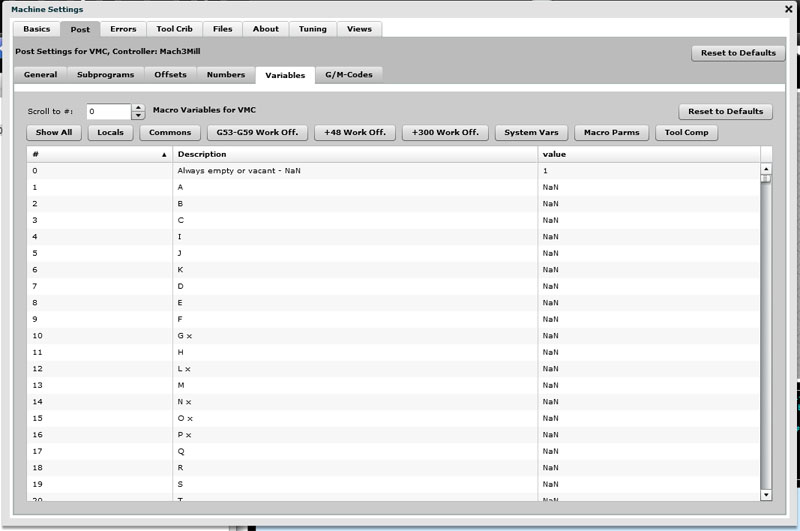
This screen is useful for a number of purposes. You can immediately see the current value of any variable, for example (anyone see the bug in the screen above? GWE has made a mistake on one of the variables). You can change the value of any variable just by double clicking it too. And you can see the different groupings for the variables with the row of buttons right above the table. The groupings will help you narrow things down to a particular thing you're looking for, such as a Work Offset variable.
Conclusion
That was a lot of information, but you're now equipped to start parameterizing your g-code programs in ways that should make it possible to reuse the g-code in multiple situations instead of always having to rewrite the code for each individual situation. Good CNC programmers start to accumulate a library of useful g-code subprograms that are tested and ready to go the next time a similar task is at hand.
Exercises
1. Pull out your CNC controller manual and see what differences exist between your controller and what's described here.
2. Use GWE to experiment with Macro Variables and Expressions until you've got a good grasp of them.
3. Modify one of your existing G-code programs to use some variables and expressions. Verify that it still produces the correct results when you've finished.
Next Article: Subprogram and Macros
Be the first to know about updates at CNC Cookbook
Join our newsletter to get updates on what's next at CNC Cookbook.