Why enter the information for a tool you use frequently over and over again?
Our G-Wizard software allows you to manage collections of Tools gathered together under what's called the "Tool Crib". The Tool Crib has its own tab next to the Setup Tab
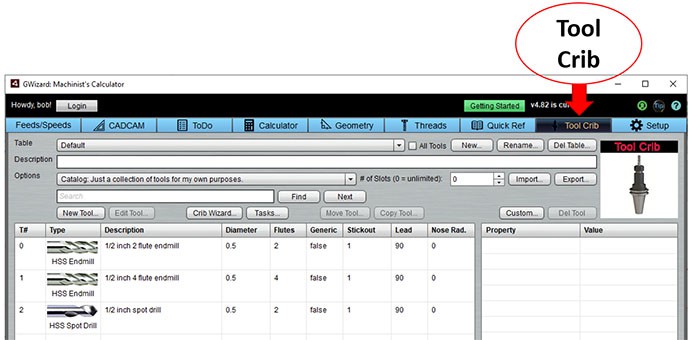
A Tool Crib holds multiple Tool Tables, which are selected using the dropdown menu at the top. You can create new tool tables, rename tables, and delete tables with the buttons to the right of the dropdown.
Tool Tables have a description, a type, and optionally they have a limited number of slots for tools.
You can also Import and Export Tool Tables in various formats such as CSV or Mach3.
Why Use a Tool Table?
Tool Tables save you time entering tool information in the rest of the software. If you will be using a tool more than once, it is probably worth it to define the tool in a tool table. If you're going to use Manufacturer's Data, why not capture it in a Tool Table so you never have to re-enter it again?
They can also be used for various other purposes. For example, you might create Tool Tables by tool type:
- All the End Mills your shop uses
- All the Twist Drills
- Indexable Cutters
- etc.
This makes it easier to organize and select particular tooling. You might also create a Tool Table for each Job you work on, so the table represents the tools in your CNC Machine's tool changer for that job. Or a tool table for each of your CNC Machine's tool changers to track what tools are currently on the machine.
Adding Tools to a Tool Table
The easiest way to add a new tool to the tool table is to define it in the Feeds / Speeds Calculator, then press the "To Crib" button. It'll ask which crib to add it to, then take you to the Tool Crib Tool Editor to see if you want to make any changes. When you're ready, just click the "Save" button and it'll add your newly defined tool to the Tool Crib in the Table you specify.
In practice, it just takes a couple keystrokes then you'll never have to recreate that tool's settings again.
If you're on the Tool Crib tab, you can also create new tools. To add a new tool to the Tool Table, just select the table from the dropdown and press the "New Tool" button. You'll get a popup that lets you define the tool:
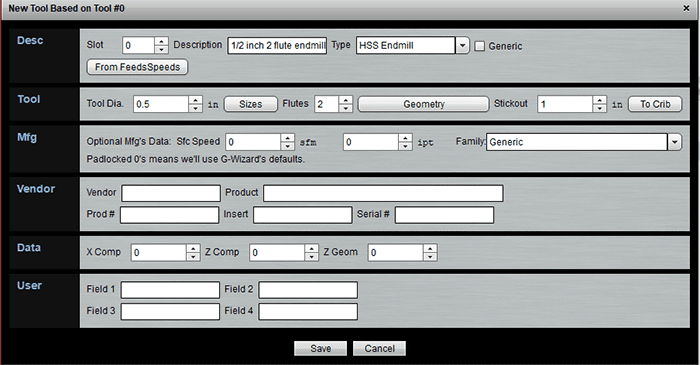
You'll notice there's some information here that you don't see in Feeds/Speeds. It's used so you can keep track of the exact details of a particular tool:
- Vendor: Who makes the tool?
- Product: What does the vendor call this tool?
- Prod #: What is the vendor's part number for this tool?
- Insert: What inserts go with the tool? Tip: For different inserts, just copy your tool, changes the Mfg information, Description, and the Insert field.
- Serial #: If your tool has a serial #, record it here. You could also record the number used to identify the Tool Holder the tool is installed in.
There's also tool compensation information. G-Wizard Editor has the ability to help you manage all that.
Lastly, you have the ability to create up to 4 fields that are for your own purposes. More on that in our reference documentation on the Tool Crib.
You can also refer to that documentation to learn about the Crib Wizard. The Crib Wizard makes it easy to rapidly create tools in standard sizes in a Tool Table. For example, when you are first getting your master tables set up.
Selecting Tool Crib Tools in Feeds and Speeds Calculator
Having defined a bunch of tools, how do we go about using them for Feeds and Speeds?
It's super easy. Just select which Tool Table to use right below where you select Tool Type:
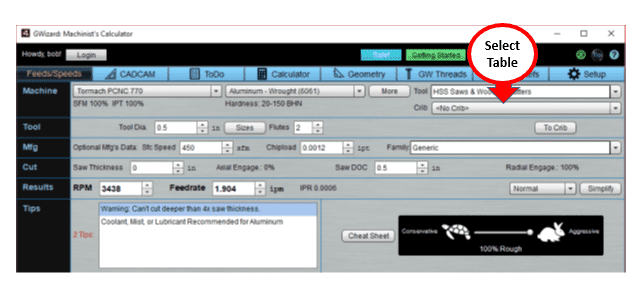
Once you choose a Tool Table, the dropdown above switches to listing the tools in the table rather than showing tool types. Pick a tool and all the properly values will be pulled from the Tool Crib to setup your tool in one step.
Great time saver!
Be the first to know about updates at CNC Cookbook
Join our newsletter to get updates on what's next at CNC Cookbook.