7 months by cncdivi
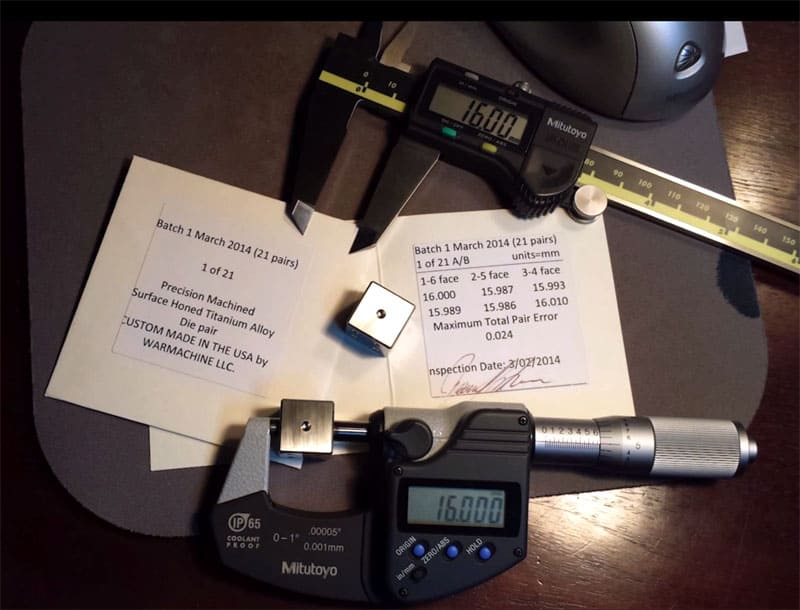
I greatly appreciate hearing about the unique ways our customers are utilizing G-Wizard. It’s especially fascinating when they take the time to chronicle an extraordinary project. Presenting, by James Dressman, are these meticulously machined Titanium Dice. Despite the significant amount of effort put into creating these, the final product is a set of dice showcasing exquisite craftsmanship.
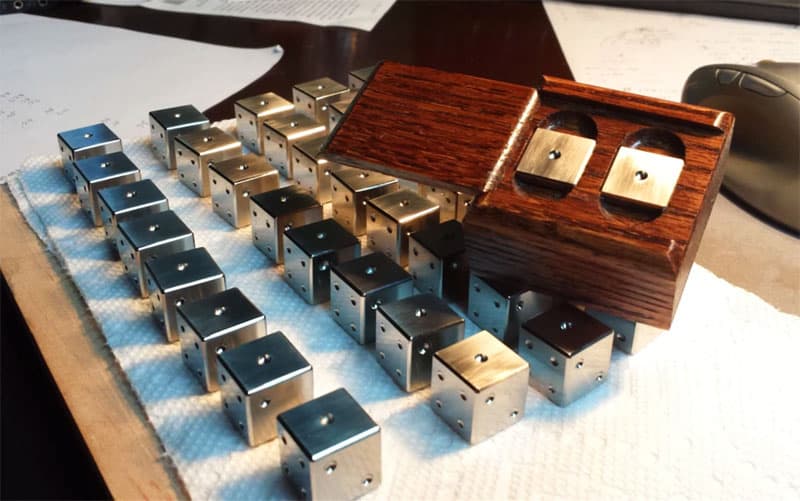
The Titanium Dice and their presentation box…
You gotta love the idea of including an inspection sheet: that’s a true machinist’s touch!
James has included a series of videos so you can see how he did it. I will embed them below, but you should subscribe to his channel to see what he’s up to over time. The Ti Dice won’t be his last project I’m sure. As I was watching the videos, I jotted down some of the good practices and tips I saw:
– Use of Stops on Bandsaw and Milling Vise, Endmill as vise stop: Work stops are great time savers. I make sure I have one in place for virtually every job. If nothing else, it saves me if I pull a part and discover it needs to go right back where it came from.
– 1 insert in a Face Mill makes a Fly Cutter for better Surface Finish: This is a trick available to anyone with a facemill. Just pull all but one insert and you’ve converted your face mill into a fly cutter. It won’t remove material as quickly, but it’ll leave a nicer surface finish.
– Use a face mill just a little bigger than the work for best results. Small parts need smaller face mills. This is more in the commentary as James has a fairly large face mill. He notes that a smaller one could get the job done a little faster and keep the rpms up for perhaps a better surface finish.
– Rough cutting on the bandsaw saves machining time and money. A lot of beginning machinists want to cut everything out with an endmill. That does automate more of the process, but the bandsaw can do the work faster and more efficiently. Waterjets and laser cutters are the next step after a bandsaw. With a decent waterjet, you might only need a finish pass for the part outline and no roughing at all. In this application, what’s also important is that Titanium stock is expensive, so use it sparingly. Turning a bunch of it into chips by relying too much on the endmill to cut out the parts is going to be more expensive.
– Polishing wheel work and Surface plate honing: Some nice shots of finishing these dice. Everybody loves “bling” on machined parts, but few take the time to really document how to achieve it.
Here are the videos:
Getting started with the process required some experimentation…
Starting to be a little more mass produced…
Finish work with a buffer and some surface plate honing…
Making the wooden presentation cases on the mill…
This was a nice little run of dice. I always learn more from producing a batch than from one-offs. With a batch you’ve got a chance to refine the operations as you learn. With a one-off it’s mostly about adapting later steps to what goes on in the earlier steps. James says in the videos that these dice were an awful lot of work and he wasn’t sure he’d be doing too many more. I’m sure there’s a number of ways he could make his process more efficient. Off the top of my head I’d be looking to get his local waterjet house to cut the blanks, looking at fixtures, and using strictly the facemill rather than the combination of rougher and facemill to finish the faces. A fourth axis would allow 3 sides of the dice to be finished at a time too. Lastly, a big vibratory polisher might save a fair amount of that finish polishing. I’m thinking that since these dice are small and fairly time consuming, a vise pallet fixture might work well. In other words, build a fixture plate that holds a grid of dice and fits into the vise jaws.
What ideas do you have for James to speed up his production?
Be sure to check out the YouTube Channel for more information.
Like what you read on CNCCookbook?
Join 100,000+ CNC'ers! Get our latest blog posts delivered straight to your email inbox once a week for free. Plus, we’ll give you access to some great CNC reference materials including:
- Our Big List of over 200 CNC Tips and Techniques
- Our Free GCode Programming Basics Course
- And more!
Just enter your name and email address below:
100% Privacy: We will never Spam you!
Bob is responsible for the development and implementation of the popular G-Wizard CNC Software. Bob is also the founder of CNCCookbook, the largest CNC-related blog on the Internet.
Sorry, Newbie Question-
I see there is a slot milled in the top of one of the soft jaw… Why?
very cool work.
Very nice! I did my first titanium dice as a Christmas gift about a year and a half ago,
along with several in aluminum, brass and stainless steel.
No custom made display cases, and since I’m still teaching myself machining,
I’m no where near one hundredth millimeter precision!
… What ideas do you have for James to speed up his production?
Spending two days on finishing is not good.
While the dice are clamped together in a row, hit the surface by hand with 800 grit wrapped around a bock, rather than honing each die individually. If you need rougher than 800 grit, then revisit your surface finish technique on the mill.
Then use a tumbler with ceramic media. This will make the wheel finishing on the corners unnecessary.
Final finish in a magnetic pin polisher. They will shine line a chrome toaster.
Both machines are useful for other projects.
Magnetic pin polishers are not cheap, but DIY plans are on the web.
The steps above should not degrade the close tolerance dimensions. It takes a lot of work to remove titanium.
Thanks for the comments guys! I’ll admit I had to look up what a magnetic pin tumbler is but that might be something I need to buy. I have a vibratory tumbler but no ceramic media, only corncob and crushed walnut shell. Any suggestions on a ceramic media to use? Unfortunately anymore tool purchases will have to be postponed until these dice sell.
Ed, nice recipe. Thanks for sharing.
James – I should have said vibratory tumbler rather than tumbler. Medium grey triangular ceramic media in water. The dry corncob and crushed walnut shell can be tried after, but may not do much.
The weight of a die will probably require a large magnetic pin tumbler, not the little ones made for jewelry. Thus the DIY plans using a large motor and magnets is your best bet.
Thanks Ed,
Good info! Once I get some sold I’ll look into getting some ceramic media. Probably not ready for another DIY project, just no time. I’m actually considering getting a really fine grit (>1500) belt for the belt sander and honing them that way because I don’t know if I really want a super polished finish because it will show scratches easily. That would significantly speed up the finishing process and still leave a fine grain.
Mark:
I don’t know what that groove is for. It came like that when I bought it. Anyone else know
BTW, I’m working on a website right now. It’s not totally up yet but will be at http://www.warmachinellc.com soon and there will be some good info and a blog on product development and of course more machining videos. The next project will be an AR15 part I invented back in 2007 but have been too slammed with life to make myself.
Also here is the ebay link to batch 1 of the dice:
http://www.ebay.com/itm/Luxor-Titanium-Alloy-Die-Pair-Deluxe-titanium-6-sided-gaming-dice-/321351891919?pt=Games_US&hash=item4ad210bbcf
The slot in the fixed jaw is for a work stop, an idea first realized by Kurt, called Groove Lock. They’re nice and low-profile.
http://www.kurtworkholding.com/images/GROOVE_1.jpg
http://www.kurtworkholding.com/workstop-assembly-p-867-l-en.html
AHA Thanks Atomkinder! I knew it had to be for something like that just didn’t know what.
Hi James,
Where are you located? I was interested in learning a thing or two and volunteering to assist you with production. Is there anyway I can contact you? Thanks again!
Best,
David L.
Hi David,
Sorry I didn’t see this comment until now. I’m in N.KY is that close to you?
Just curious if the dice are balanced. That is, is the center of the die is the center of the mass? Otherwise, they are ‘loaded’ dice because the ‘One’ side is heavier than any other side because of the mass of material removed to make the ‘numbers.’
Hi Mike,
Sorry I just saw your comment. Yes they are balanced. Here is the write up I made about that for the FAQ page.
“Yes the dice are balanced. Cellulose casino dice have their pips filled in with a tinted material of a matching density so there are no weighting discrepancies between any given face. Unfortunately I’m not aware of a similar filler material that could be used that has the same density as titanium alloy so a different method was chosen to compensate for weighting that is almost as good. Since our method of machining the pips is done with a 0.125″ diameter ball mill instead of the less sophisticated, and in our opinion less aesthetic flat bottom end mill the method chosen to compensate for the balance issue is by using the partially filled sphere equation to calculate the actual volume removed during the machining process as follows:
v = (π * h² * r) – (π * h³ / 3)
Here we can fix the volume of the deepest pip, the 1 face, to all the other faces and solve for h, which in this case would be the depth of the pip. This is more complicated but required when using the tip of a ball mill since you cannot simply linearly scale the depth of the pips proportional to the number of pips as you could if using a regular flat bottom end mill when simply removing a cylinder of material that has a fixed proportional volumetric relationship to the depth. An additional verification step was taken to insure the validity of the calculation by modeling the 0.0625 radius pips and their corresponding depths among the 6 sides in CAD then using the program to measure the remaining volume of each side to ensure that they are the same. It is also important to note that the depth of the deepest pip, the 1 face, cannot exceed the radius of the ball mill or the partially filled sphere equation becomes invalid as then the Boolean difference of the geometry removed is no longer a semi-sphere as is demanded by π in the equation but rather a combination half-sphere plus a cylinder. The end result is each face consisting of the exact same volume/mass while the pip depth as well as the diameter decreases as the pip number increases. In other words the material mass removed from each side is exactly the same.”