Introduction to the Menus

G-Wizard Editor has 7 menus:
- File
- Edit
- Insert
- Simulator
- Tools
- Backplot
- Help
File Menu Commands
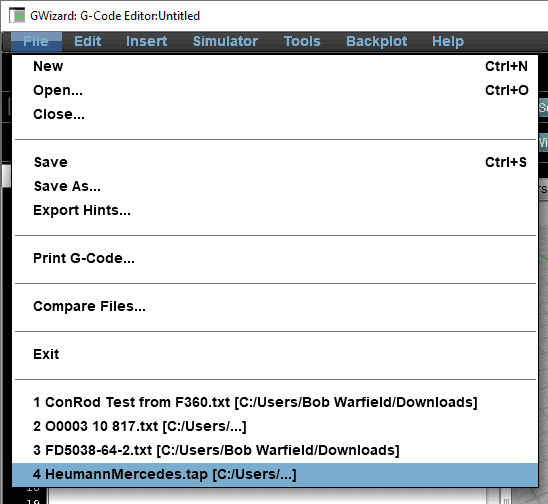
The GWE File Menu is pretty standard, and includes:
- New: Creates a new empty file.
- Open...: Pops up the File Browse Dialog to allow you to select a file to Open.
- Close...: Close current file, prompt to save if unsaved changes were made.
- Save: Saves the current file.
- Save As...: Saves the current file with a new name.
- Export Hints...: This powerful command exports the hint information for each line of g-code to a CSV file. Use it to analyze or perform complex changes on a file.
- Print G-Code...: Print your g-code.
- Compare Files...: Find what's changed between two files. Here's a quick video showing the File Compare command.
- Exit: Exits G-Wizard Editor
- History List: A list of the 4 most recent files loaded so you can go back to them easily.
If you try to Exit without saving, or use New or Open without saving a file that has been modified, you will be prompted to save or abandon your changes.
Export Hints Command
It’s accessed from the File Menu:
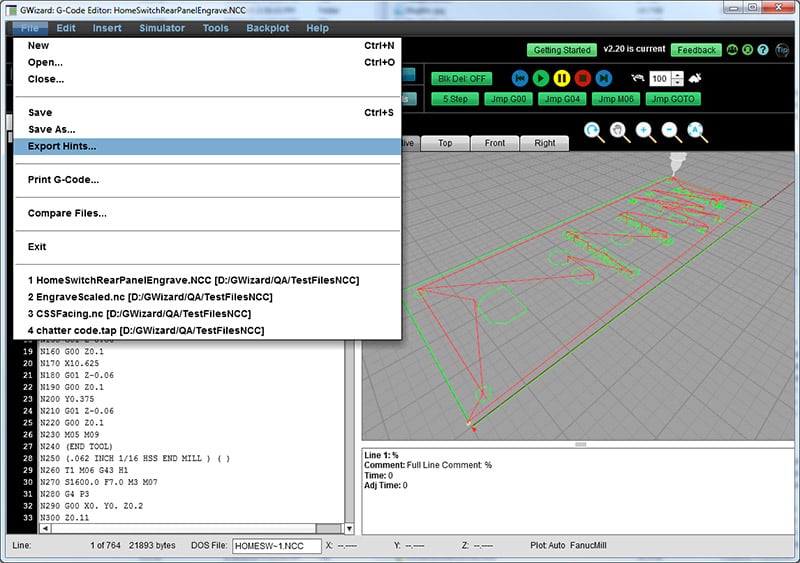
Export Hints may be found on GWE’s File Menu…
Make sure you’re working with a file that has been saved at least once because Export Hints wants to take the same file name, and add “.csv” to get the name of the CSV (spreadsheet) file it will save to. When you open that file, here’s what you’ll see (with a touch of column width and word wrap tweaking to make it more obvious what’s there):
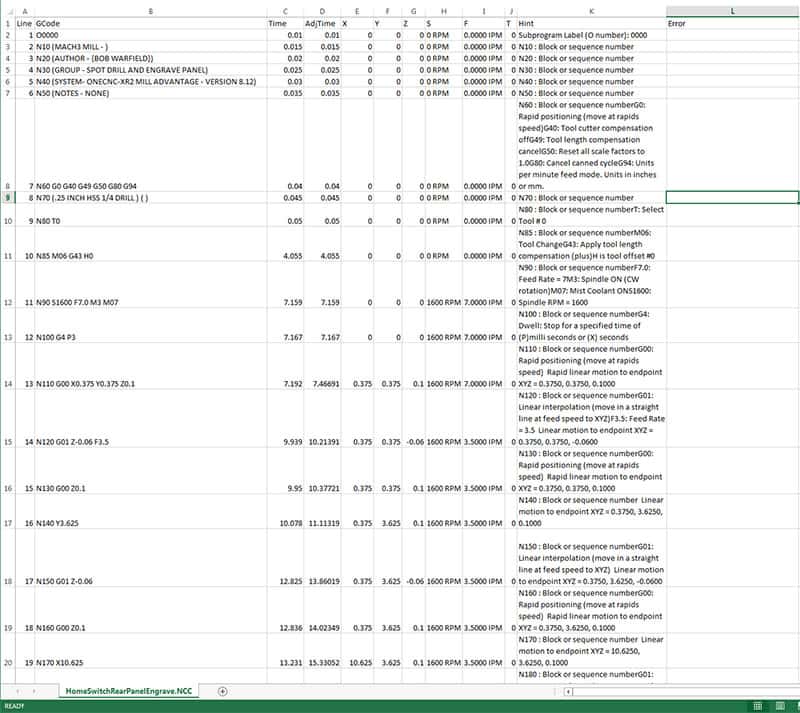
The output of Export Hints is a CSV (Spreadsheet) File…
Here in one file you get a whole bunch of useful columns that tell you:
– The GCode line
– GCode text
– Time to get to the line, in seconds
– Acceleration adjusted time to get to the line, in seconds
– Final XYZ coordinates after executing the line
– Speeds (S) and Feeds (F) in effect for the line
– Tool (T) loaded for that line
– Hint: This is our special GCode-Explained-In-Plain-English hint seen in our Hints view. There’s tons of additional useful information in there that you could pick apart with spreadsheet formulas if you needed to.
– Error: Full text of any errors associated with the line of GCode
That’s a lot of useful information in a spreadsheet format that makes it easy to manipulate. Use it to print columnar reports as an aid to documenting your GCode. Add formulas to do analysis of various kinds on the GCode. Use it to make it easier to understand what the GCode is doing. Give a copy to an Operator they can mark up while they watch the program run to give ideas how to improve it.
There’s a lot of potential for anyone who can run a spreadsheet to do creative things with the information found here.
Edit Menu Commands
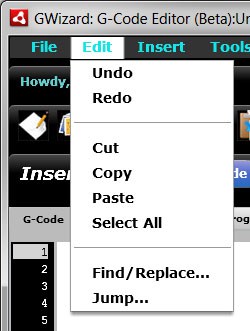
The GWE Edit menu includes most of the typical commands you'd expect to see on an Edit menu:
- Undo/Redo: GWE has n-level undo, so you can go back as far as you like.
- Cut/Copy/Paste/Select All: Clipboard operations
- Find/Replace: GWE's Find/Replace command
- Jump...: GWE's Jump command
Find/Replace
Find/Replace can be used either to search or to search and replace the text with replacement text. When you select Find/Replace from the menus or toolbar, a special Find/Replace toolbar is activated:

The Find/Replace toolbar makes it easy to use Find/Replace repeatedly without covering up what you're looking for. To get rid of it, just click the red "Close" button. Here are the functions on the Find/Replace toolbar:
- Search: The string you're searching for. The "..." button brings up the history of strings you've searched for during this session in case you need to search again.
- Replace: The string you'd like to replace the string you searched for with. Replace also has a "..." button with history.
- Forward/Backward: These radio buttons control whether the search moves forward from the cursor or backward.
- Case Sensitive: Controls whether the search cares about an exact match or whether it will ignore case.
- Whole Word: Controls whether the search string must be surrounded with spaces to count.
- Find: Search for the next occurrence and highlight it. If you type at this point, your typing will replace the string just found.
- Replace/Find: If the currently highlighted text was just Found, replace it with the Replace string and find another. This button is disabled unless the last thing you did was a Find/Replace operation.
- Replace: If the currently highlighted text was just Found, replace it with the Replace string but don't do anything further.
- Replace All: Replace all strings that can be found before the end of the file (if searching Forward) or beginning of file (if searching backward).
- Close: Closes the toolbar.
Jump
Jump can be used to move to specific points of interest that are a little different than Find/Replace. For example, specific line or block numbers. When you select Jump from the menus or toolbar, a special Jump toolbar is activated:

Like Find/Replace, the Jump toolbar makes it easy to use Jump repeatedly without it being in the way. Here are the functions on the Jump toolbar:
- Mode: The mode determines what Jump will jump to. It can jump to Lines, Blocks (Lines with "N" numbers), Errors, or Tool Changes.
- Goto#: Enter the number you'd like to jump to if you want to go to a specific number. For example, the 3rd Tool Change (enter a 3 in ToolChange mode) or Block N20 (enter a 20 in Block mode).
- Clear resets the Goto#
- First Line: Goes to the very first occurrence of whatever you're jumping to.
- Last Line: Goes to the last occurrence of whatever you're jumping to.
- Previous: Jump to the first occurrence above the cursor.
- Next: Jump to the first occurrence after the cursor.
- Close: Closes the Jump toolbar.
Jump can be really handy to have open for moving around your g-code program quickly, for example, from one tool change to the next.
Insert Menu Commands
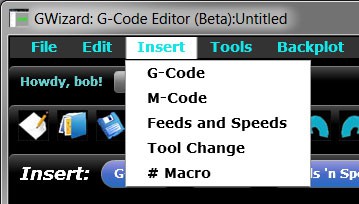
The Insert Menu is used to access the various Wizards for creation of new g-codes. For more information on the G-Code Wizards, consult the Wizard Page.
Simulator Menu Commands
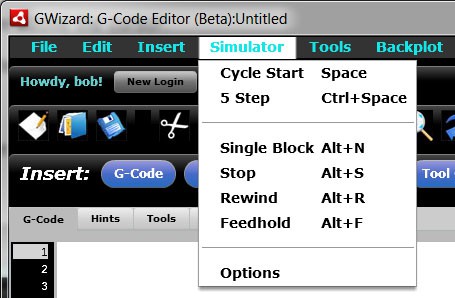
The Simulator Menu controls program execution when playing back g-code in slow motion. This is handy for debugging and understanding g-code programs. If you're just looking for a backplot, don't bother with the simulator. The Simulator Menu has the following commands:
- Cycle Start: Execute blocks. If Single Block is active, only one block is executed.
- 5 Step: By default, this command executes 5 blocks, but you can change it to do a variety of things using the Simulator Options command.
- Stop: Stop running the Simulator and resume normal editing and backplotting.
- Rewind: Prepare to execute from the beginning of the program. The "Rewind" command is the preferred way to start the Simulator.
- Feedhold: Stop execution.
- Options: Accesses the Simulator Options popup. This popup may also be accessed by right clicking the Simulator buttons on the toolbar.
The functions of the Simulator commands are described in more detail on the Simulator page.
Tools Menu Commands
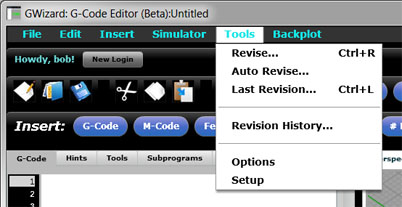
The Tools Menu has 4 commands:
- Revise: Where Revisions can be accessed.
- Auto Revise: Where you set up automatic Revisions that can be triggered on file load, file save, or every time the file is parsed.
- Revision History List: A list of recent Revisions in case you want to run one again.
- Setup: Access to the Setup Tool.
Revisions
Revisions are commands that scan through the g-code and make revisions. They can be used to scan the currently selected range of g-code and make line-by-line revisions. Selecting the Tools Revise command brings up the Revision Tool:
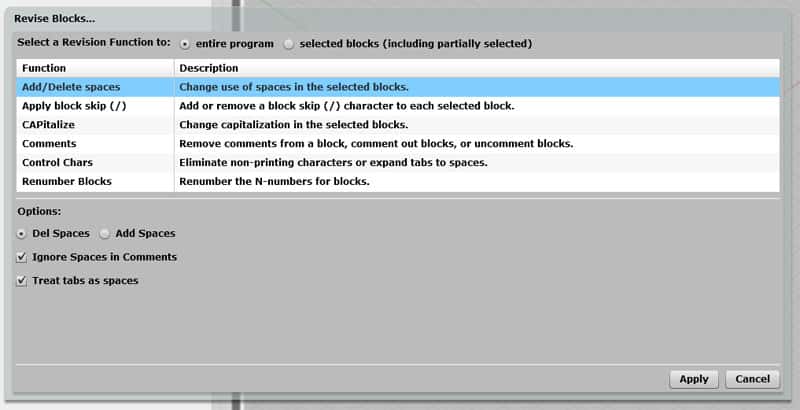
The Revision Tool lets you select different Revision Functions, see what they do in the Description column, and see their various options down below. When you find the Revision you'd like to make, select the appropriate options and press "Apply". Or, press "Cancel" to back out without making any revisions.
For a complete description of the available Revisions, see the Revisions documentation page.
Auto-Revisions
Auto-Revisions are revisions that automatically run. You can select one or more revisions to run when a file is first loaded, each time the file is parsed, or when the file is saved. Auto-Revisions are run in the order they're listed in.
<Lots more to come here. Auto-Revisions are not really baked yet!>
Setup
Selecting Tools Setup brings up the Setup Tool. For more information, see the Setup Tool Documenation Page.
Backplot Menu Commands

The Backplot Menu has just two commands:
- Zoom Extents: Changes the zoom factor of the backplot and centers on the toolpaths so it all fits in the view. Once activated, Zoom Extents becomes a mode that will dynamically re-zoom after each operation. It can be overridden with the mouse scroll wheel, which manually changes the zoom as well as moving the view towards wherever the mouse pointer is.
- Redraw: Completely replots.
What to read next
Onward to the Keyboard shortcuts page, where you'll learn about GWE's keyboard commands.
Be the first to know about updates at CNC Cookbook
Join our newsletter to get updates on what's next at CNC Cookbook.