Free GD&T Calculator [ + Much More ]
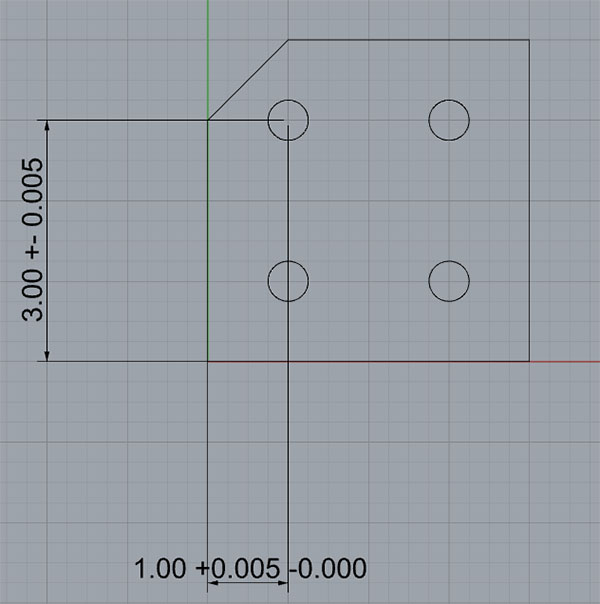
Plus/Minus Tolerancing, also called Limit Tolerancing, is a two dimensional tolerancing system that is probably the most familiar way of expressing tolerances there is. The notion here is that the drawing is perfect, the dimensions are perfect, and it is the role of plus/minus tolerancing to tell the builder or inspector how much the dimensions can differ from perfect. Here is a drawing with some very typical Plus/Minus Tolerances:

Plus/Minus Tolerancing on the top left hole in the drawing...
The tolerancing depicts the top left hole center to be located at 3 inches from the lower edge, plus or minus 0.005 inches and 1 inch from the left edge , plus 0.005 inches and minus zero inches. These are the kinds of tolerances most of us are used to seeing, before GD&T.
The dimension without tolerances is known as the Basic Size. For any given part, when we measure that dimension, we arrive at an Actual Size. For the part to pass inspection, the Actual Size must fall within tolerances of the Basic Size. There are also specific terms that apply to the tolerances and their relationship to parts. The Limits are the maximum and minimum sizes given by the toleranced dimension. The Allowance is the minimum clearance or maximum interference between parts. Think of it as the worst base the part may deviate from the Basic Size ideal.
Note that for ISO-specific drawings, we may see a little different arrangement. For example, you could write a limit tolerance with two negatives. For example, the hole size could be written as 8mm -.027mm -.034mm. That's a perfectly acceptible style that would mean the hole's diameter should fall between 7.966 and 7.973 mm.
Why Do We Use Tolerancing?
Why can't we just list the dimensions of the part and go from there?
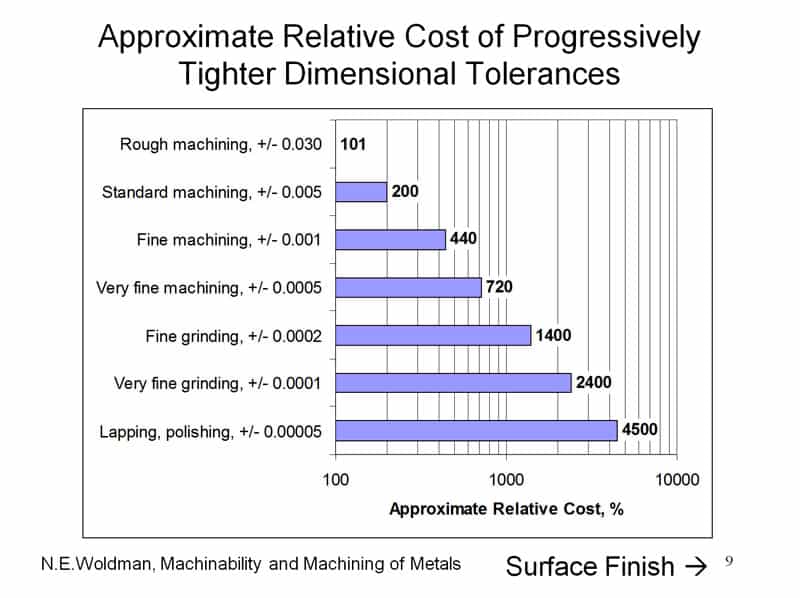
For the most part, tolerances exist so that we can make interchangeable parts cost effectively. If it was even possible to make everyting with infinitely tight tolerances, we would have parts that fit perfectly together. But it isn't possible to achieve that level of perfection. Moreover, the more perfect the parts have to be (in other words, the tighter the tolerances), the more expensive it is to make the parts. And the costs go up very rapidly indeed.
Here is a chart that shows tolerances and the costs associated with them:


Tight Tolerances can be very expensive...
Rather than chase unduly precise tolerances, we instead specify the least tolerances that will still allow our parts to work with other parts.
Fits and Tolerances: How Much Tolerance is Enough?
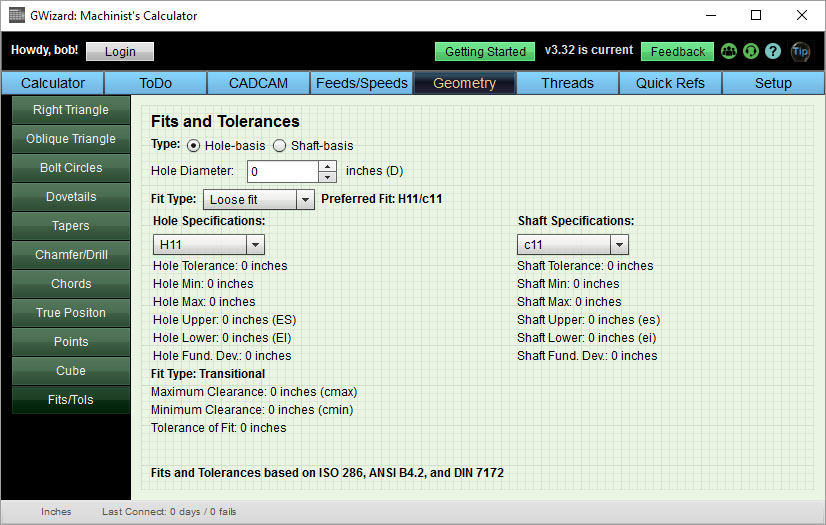
Okay, now that we know what tolerances are good for, how can we decide how much tolerance is enough? It turns out there is a set of standards designed to do precisely that. This area is called Fits and Tolerances, and our G-Wizard Calculator software has a nifty built-in Fits and Tolerances calculator to help you implement Fits and Tolerances. You'll find it under the Geometry tab (makes sense), and it looks just like this:
 Fits and Tolerances applet in G-Wizard Calculator...
G-Wizard Calculator offers the following types of Fits:
– Loose fit: Used where the most clearance is needed on things like latches or parts that may corrode
– Free running: Shafts rotate easily without noticeable clearance or gap in the hole
– Easy running: The part slides easily
– Sliding fit: Precise clearances for guiding and centering
– Close clearance: Getting tighter
– Location clearance: Tight, but still without interference, used for precision location
– Slight interference: Assembly will take a rubber mallet
– Transition: Fit will depend on tolerances and could fall to either side
– Press fit: Cold pressing will be needed for assembly
– Medium fit: Cold pressing with large forces will be needed
– Force fit: Assembly will require different temperatures as well as pressing forces
As you can see, quite a range of applications are covered. One of the great things the Industrial Revolution and subsequent manufacturing sciences has brought us is various standards that define this sort of thing. A number of people had to do a great many experiments to arrive at what would work and what wouldn’t for these various types of fits. G-Wizard Calculator encapsulates the ISO 256, ANSI B4.2, and DIN 7172 standards, which are the most widely used.
For more detail on how to use the Fits and Tolerances Calculator, we've got an entire article. For purposes of this discussion, know that there is a science behind how well parts have to fit together to work well and you can harness the benefits of that science by using the Fits and Tolerances standards.
Conclusion
We've seen plus/minus tolerances and discussed how they used and how to choose them. GD&T is all about tolerancing, so it should come as no surprise that it lets you do tolerancing even better than simple plus/minus tolerancing can. In our next chapter we'll describe how.
Next Article: MMC, LMC, RFS, and Bonus Tolerances
GD&T Table of Contents GD&T Symbols
Be the first to know about updates at CNC Cookbook
Join our newsletter to get updates on what's next at CNC Cookbook.