These pages contain tips to be used in the design or manufacture of parts. They’re time and cost savers designed to get the parts made as quickly and accurately as possible.
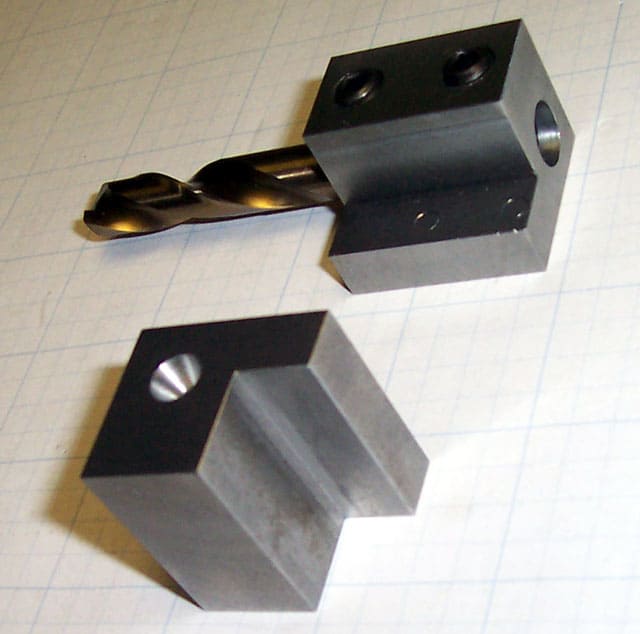
Use the Spot Drill as a Countersink
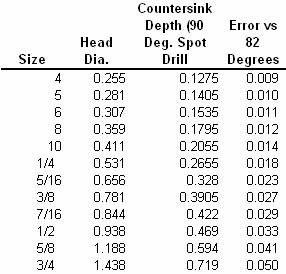
When installing Flathead Cap Screws, consider using a spot drill as countersink. I read about this on CNCZone, and it sounds like a handy shortcut. One fellow says, “Forget the countersink, just do it with your spot drill up front, then drill the hole, and you are done.” “Brilliant!”, says I. Rather than spot drill, drill, and then countersink, let’s kill 2 birds with one stone. The one fly in the ointment is that the countersink spec for US flat head cap screws calls for an 82 degree countersink, whereas spot drills are 90 degrees. This immediately led me to produce the following little chart that lays it all out:
First we have the size of the bolt, followed by the expected diameter of the head according to a manufacturer on the web. We can apply a little bit of geometery and realize that for a 90 degree angle, the cone of the cap screw is the hypoteneuse of a right isosceles triangle and 1/2 the head diameter is therefore the depth. Now a little trig and we can figure the error between the 82 degree countersink and our 90 degree spot drill’s countersinking. As you can see, it isn’t miniscule, but I doubt it is the end of the world either.
Note that 82 degree spotting drills are also available, though in fewer sizes. They will be spot on with no error. As far as I can see on Enco, 82 degree and 90 degree spotting drills cost the same. You will have to buy a pretty good sized diameter spotting drill given that you need one at least equal to the head diameter of the flat head cap screw you end to spot and countersink with it. A 3/4″ diameter spotting drill is only good for 5/16″ and smaller screws. These spotting drills are not cheap, and cost about 2x what a countersink does, so you’d better be able to justify that with the time savings. I think I would learn to sharpen drill bits in short order if I was planning on doing very much of it.
I have ordered up some flat head cap screws from Enco (having needed them for another project anyway), but I can see I now need to order some spotting drills so I can experiment with this!
Consider Roller Burnishing Rather than ID/OD Grinding
Roller burnishers are rotating tools that have hardened pins designed to either go around an OD or inside an ID. They apply pressure and burnish to move the material just a bit. They can be accurate to 0.0001″ and leave a very superior surface finish. If you need to do the same dimension a number of times for production, a burnisher will be cheaper and faster than cylindrical grinding. They are ideal for bearing races, and lengths up to 6″, but they can only move the material a tenth or two, so it has to be close to start.
Roller burnishers are sold by Yamato, Monaghan, Superoll, Sandvik, and Cogsdill.
Tension/Compression Tapping Head
These are ideal for tapping in a CNC mill when you don’t have a rigid tapping cycle, or to be used in the tailstock of a lathe to tap under power. A good one will be self-centering and will feed the tap with just enough pressure to do the job well.
Consider Keyless Bushings
Need to attach a pulley to a shaft but don’t have a keyway? Consider keyless bushings. Available from places like McMaster-Carr, keyless bushings go on just by tightening a nut. The nut clamps an inner sleeve around the shaft and expands an outer sleeve to fit your pulley. I understand you need about 0.003″ clearance on the ID and OD fits around the bushing. They’ll carry quite a lot of torque. These would be ideal in cases where you don’t want to or can’t modify a shaft for your application. Trantorque has a lot of information on this on their web site.
Give Bolts a Loose Fit
Keep as much clearance as possible in the holes that locate bolts. This provides a margin for error if things don’t line up quite right. Clearance may be achieved with oversized holes, or even by having slots rather than holes. Remember: you can’t move threaded holes! If things don’t line up, your best bet is more clearance in the non-threaded holes.
With Multiple Vises, Give Each a Different Setup
With multiple vises the tempation may be to have them all run one setup. That’s certainly simpler. But consider running a different setup in each vise. This way, if there is a bad setup that is only discovered when you try to run a later setup, you will see it before you’ve run all the parts through it.
For Small Shops, Get as Much Spindle as You Can Afford and a Toolchanger
Toolchanging is a mindless activity, and with few employees, why waste their time with it? If you have a lathe, look at gang tooling as a cheap way to avoid changing tools. In terms of running a lot of spindle, it lets you cut faster. Shoot for job cycle times of around 1 to 3 minutes, which gives enough time for a single employee to keep 2 or 3 machines humming efficiently.
Organize Your Parts for a Small Production Run
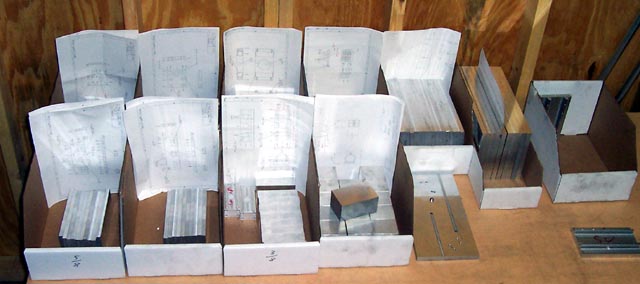
I learned this tip from the Fidgiting Widgitmaster. He takes a box with an open top for each part and staples a print of the part to the box. He then squares all the blocks that will be needed to make each part before going on to make the parts. This way, everything is organized, and each part starts out as a square and true block.
Each part has a box with print, and the material is squared and ready for machining!
Consider a 4-Axis Milling Machine Instead of a Lathe When Both Ends Matter
I never would have guessed it, but Geof on CNCZone says the following 4-axis mill set up was able to machine these aluminum bars to length, ensure the faces were square, and drill and tap a hole faster than he could do it in a lathe:
Hmmm. I’m guessing the reason for that is that he has to deal with both ends. A basic lathe will do one end great with a bar puller, but then you have to reload each piece by hand to get the other end. This setup gets 8 of them done per setup, which saves a lot of manual intervention. I believe their are lathes with more than one spindle that are designed to deal with the problem by transferring the part to the second spindle. Nevertheless, this is a very cool idea for saving time!
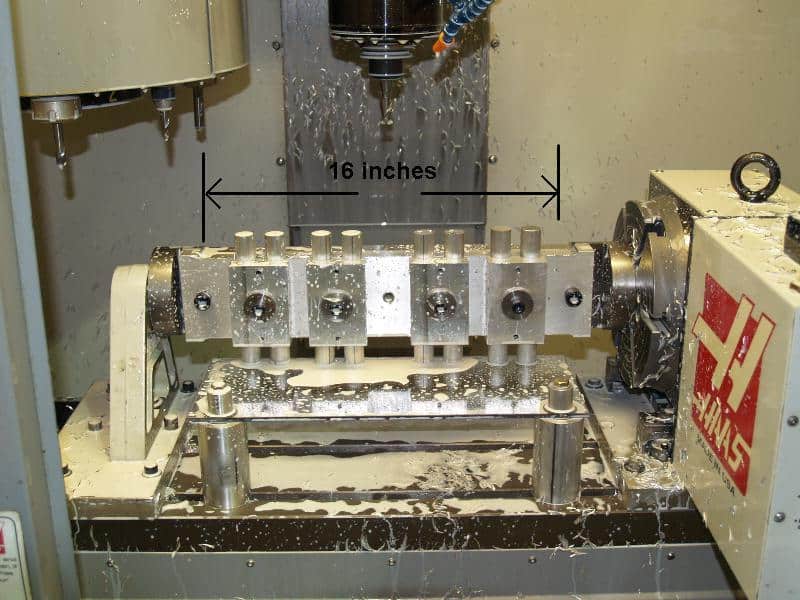
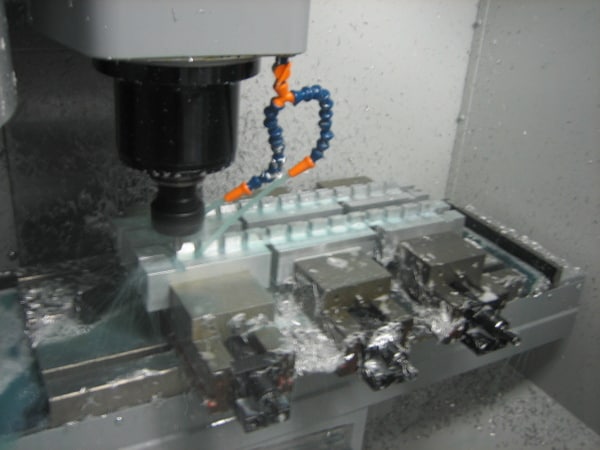
Use Double Vises to Double the Capacity of a Setup
The more vises you can get on your mill table, the more parts you can machine in a single setup. Double vises raise the ante another notch by letting one vise act as 2. Here are 3 double vises on a Haas Mini Mill:
3 double vises = 6x the capacity of 1 vise!
Looks like he has 4 parts in each of the end vise jaws and 5 in the middle vise for a total of (4 + 4 + 5) *2 = 26 parts per setup!
Quit Drilling With Your Tailstock in the Lathe
Widgitmaster made up these nifty drill holders that will fit in a QCTP holder:
He’s got one with a chuck in it too. These just slide into a regular QCTP toolholder which is then clamped down on it. I’ve seen some chucks built into the full dovetail toolholder. One nice thing about this approach is you can set the cutting depth relative to the QCTP by sliding this holder and locking it down at the right spot. This would allow a series of tools to be aligned to the same depth and a carriage stop used to make repeatable production with a set of tools easy.
One thing about using the QCTP to hold these is you will have to dial them into the center of the workpiece. Widgit claims this is a more accurate way to drill holes on the lathe assume you do dial everything in. Of course with CNC, you can likely come up with a way to get the thing dialed in once and then have it be repeatable. Faster than dialing into the center is to put a precision pin in the lathe chuck and use that pin to align the drill chuck on that center. Note that spot with your DRO!
Light CNC Mill Production Checklist
These are things to look for if you’re going to convert a mill to CNC or buy a mill for use in light production:
Backlash Control: Whatever your methods, having low or no backlash is key for CNC. It is the difference between getting good results and having to fight the machine to get where you’re going.
Home/Limit Switches: For repeatability when you start the machine up or between cycles, it is important to be able to home the machine. Without this capability, you will find it hard to make efficient use of fixtures or even vises because you’ll need to touch off with an edgefinder every time to re-zero the machine.
Spindle and Coolant Control: You want to be able to control the spindle and coolant from the CNC program without needing to push the buttons manually. Spindle speed control is also important for repeatability and surface finish. You want to be able to optimize your programs and then have them do the same thing over and over again as you make parts. Anything manual is something left to chance.
Those are some bare minimums. Then there are some “step up” features that will start to really enhance your productivity and the quality of the parts you’re producing:
Tool Height Control: Whether you have a tooling system that takes care of this or you’re running a tool height touchsetter, this is key. Without tool height control you’ll need to do a touch off with every tool change so the system knows where the end of the tool is.
Coolant and Enclosure: Having the ability to run flood coolant is huge. Chip evacuation, if nothing else, is very important on CNC machines.
Servos vs Steppers: Lost steps are the bane of the step motor world. A good servo system eliminates that cause of problems as well as being able to deliver higher performance over a greater range of speeds. Rapids are generally faster with a servo system.
Good Spindle Speed Range: Being able to achieve the spindle speeds necessary for the materials you’re machining is very important to surface finish and throughput. For aluminum and plastics, you’re going to want at least 6,000 rpm.
Toolchanger: This is the last feature I’ll mention for light production. A toolchanger gets you the ability to push the button and walk away while the job runs. It’s the biggest key to productivity because it means a single operator can be responsible for multiple machines. Toolchangers are what fundamentally set machining centers apart from knee mills, and for good reason.
Like what you read on CNCCookbook?
Join 100,000+ CNC'ers! Get our latest blog posts delivered straight to your email inbox once a week for free. Plus, we’ll give you access to some great CNC reference materials including:
Our Big List of over 200 CNC Tips and Techniques
Our Free GCode Programming Basics Course
And more!
Just enter your name and email address below:
100% Privacy: We will never Spam you!
Rate this post
Recently updated on September 17th, 2023 at 07:13 am
Bob is responsible for the development and implementation of the popular G-Wizard CNC Software. Bob is also the founder of CNCCookbook, the largest CNC-related blog on the Internet.